9 Potpourri and Conclusion
In this conclusionary chapter, we’ll wrap up the book by covering a few other features of Microsoft Foundry that didn’t fit elsewhere (what I call “potpourri”) and I’ll show you some additional open-source tools from Microsoft that are related to agentic workloads. Lastly, I’ll be providing some best practices and considerations for designing an Azure cloud architecture that integrates well with Foundry Agents. Plus, I’ll leave you with some resources to continue your learning journey beyond this book.
9.1 Additional Features
As you may have noticed throughout this book, Microsoft Foundry has a ton of features, and new features are released regularly. In this section, I’ll briefly cover some of the features that didn’t necessarily fit into the previous chapters, but that are still important to be aware of as you design and build your agents.
9.1.1 Memory
Traditional LLM interactions are stateless by default. So, if I spin up a new instance of a model and ask it “What is my name?” it won’t know the answer because it has no memory of our previous interactions. However, if you’ve used public AI tools like ChatGPT or Claude, you may have noticed that it seems to learn a bit about you over time. It remembers the context of your previous conversations within a session, and it can even recall some information about you across sessions (e.g., your name, your preferences). This is because these tools have a form of memory that allows them to retain and recall information across interactions.
In Foundry, we can also give our Agents the ability to remember information about our previous chat session. Foundry IQ introduces memory as a managed capability that allows agents to retain and recall context across interactions. Memory in Foundry IQ supports:
- Conversational continuity across sessions
- User preference retention
- Task and workflow state
- Adaptive behavior based on historical interactions
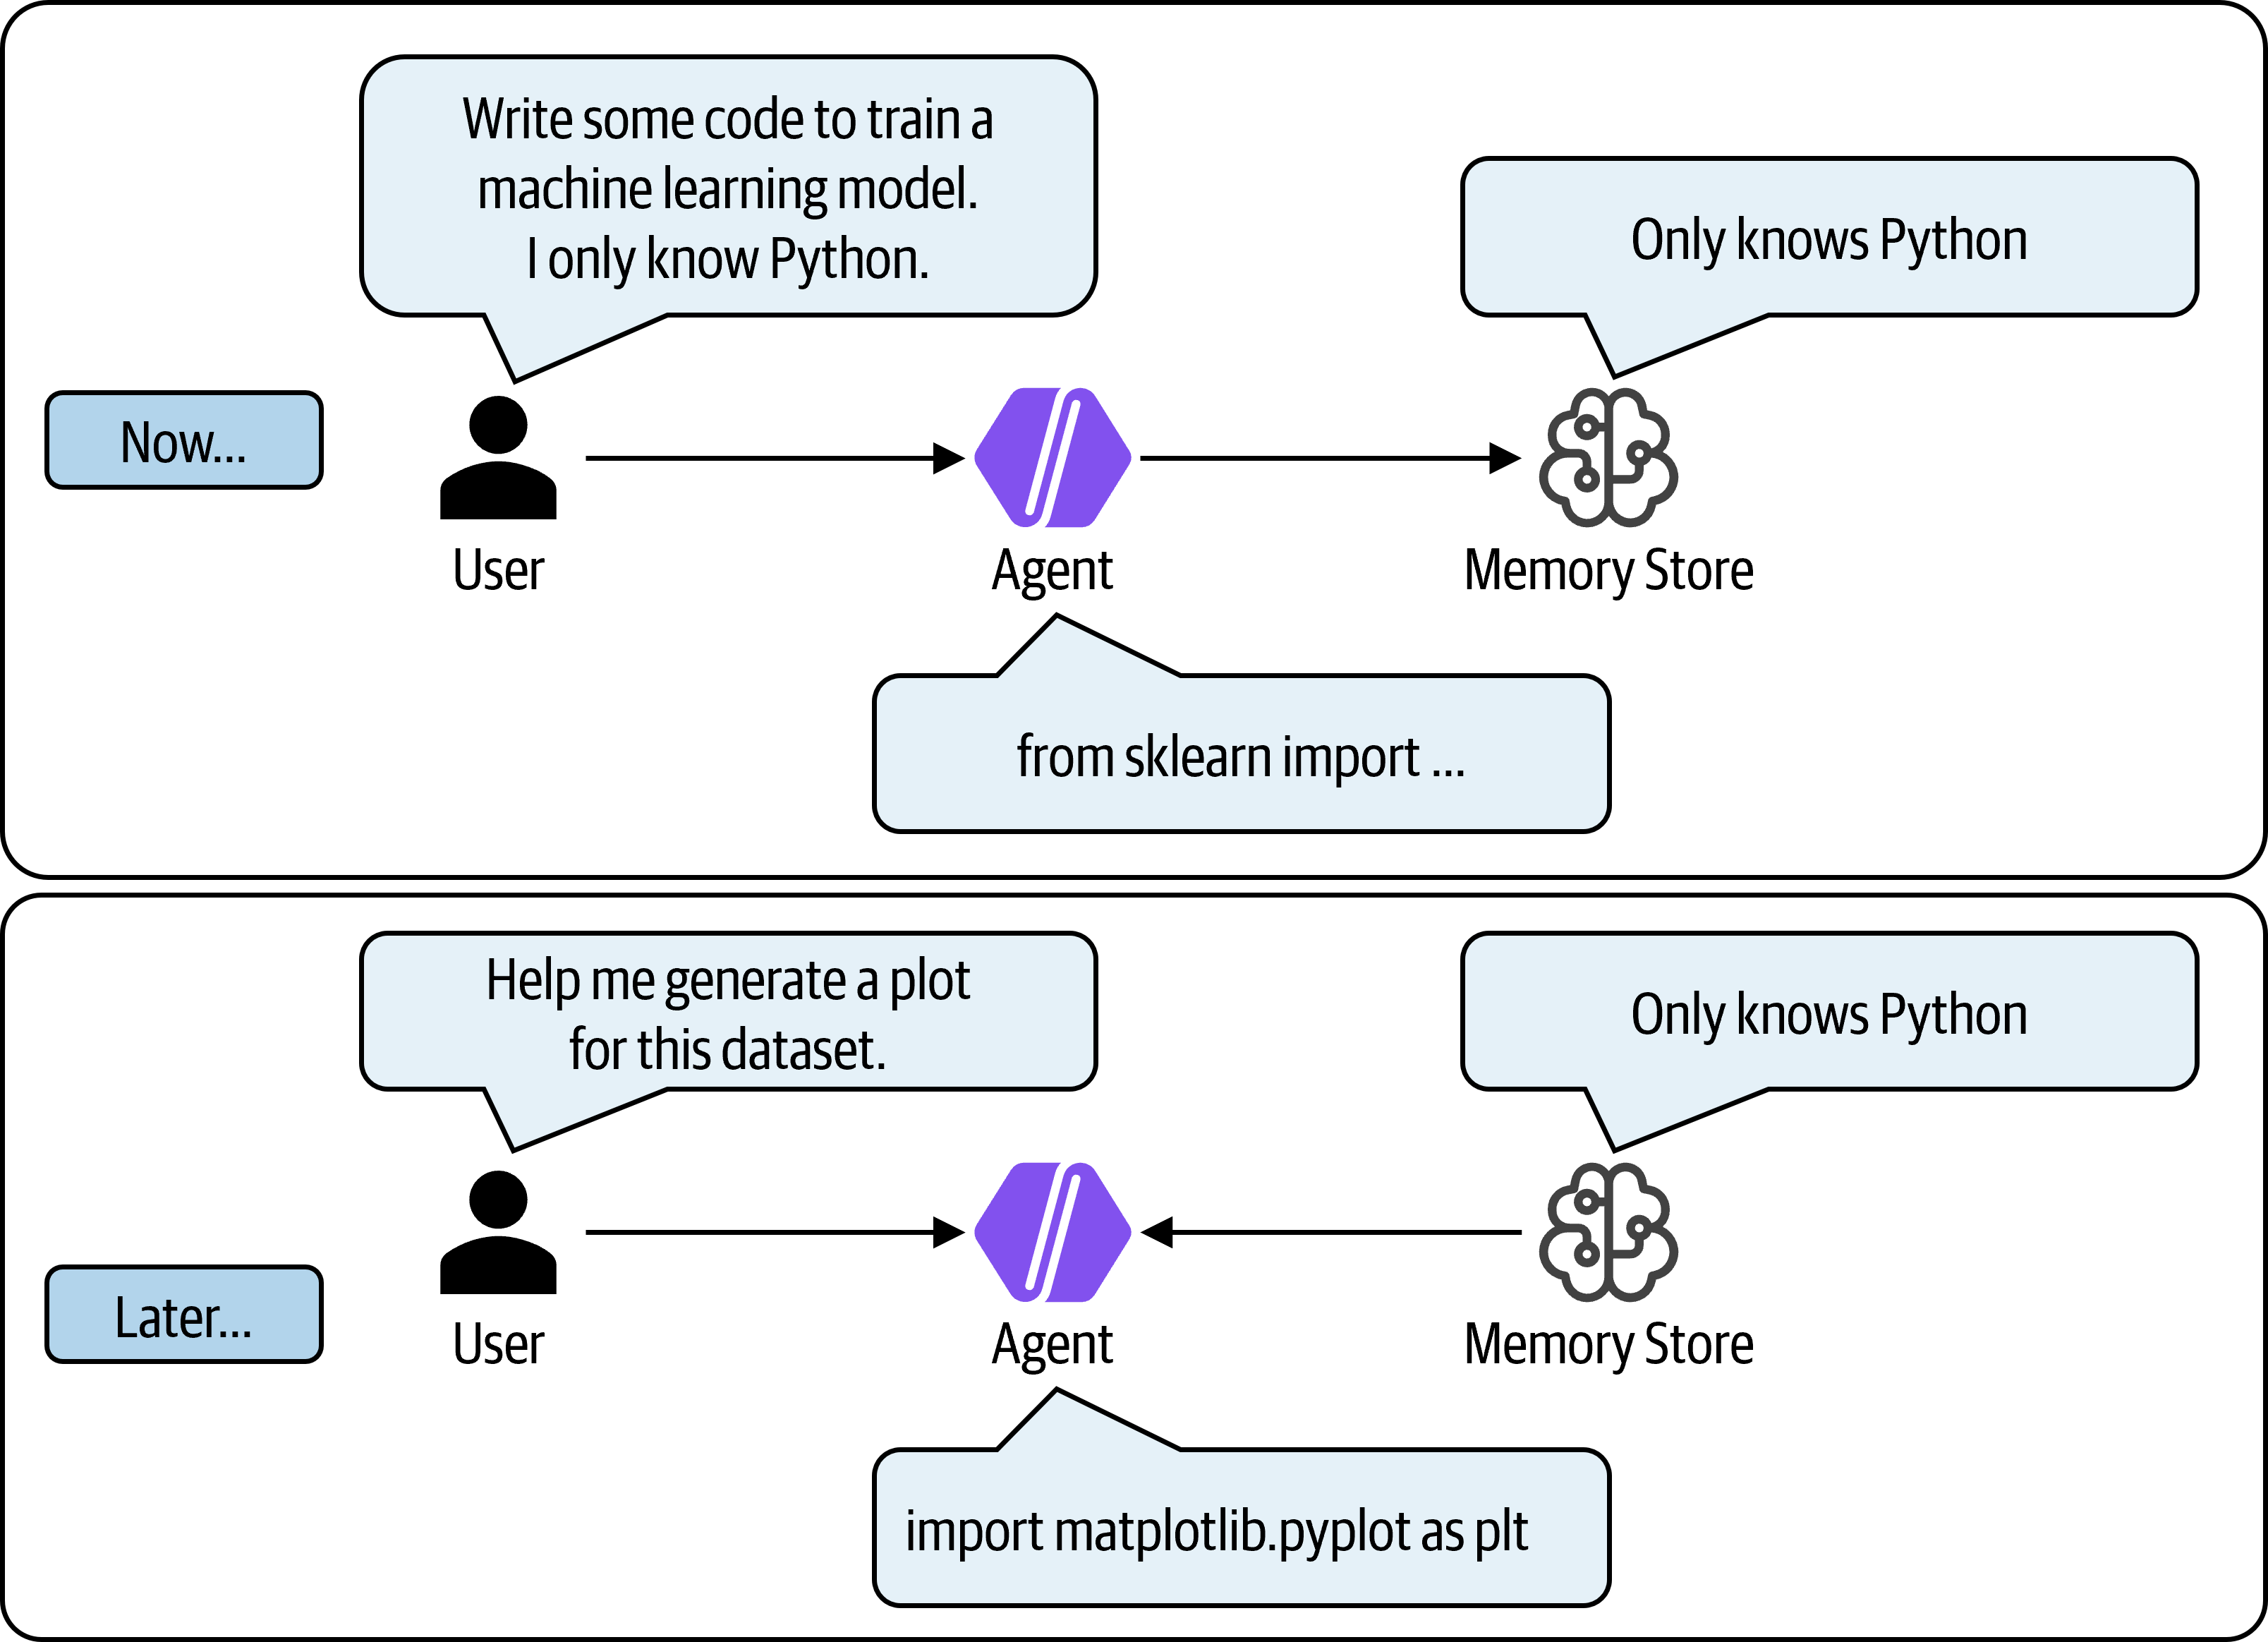
This transforms agents from reactive prompt responders into persistent digital collaborators. Importantly, memory is governed: retention policies, isolation boundaries, and enterprise controls ensure that memory enhances intelligence without compromising security or compliance. See Figure 9.1 for a high-level illustration of how a memory store works in the context of an agent’s interactions with a user.
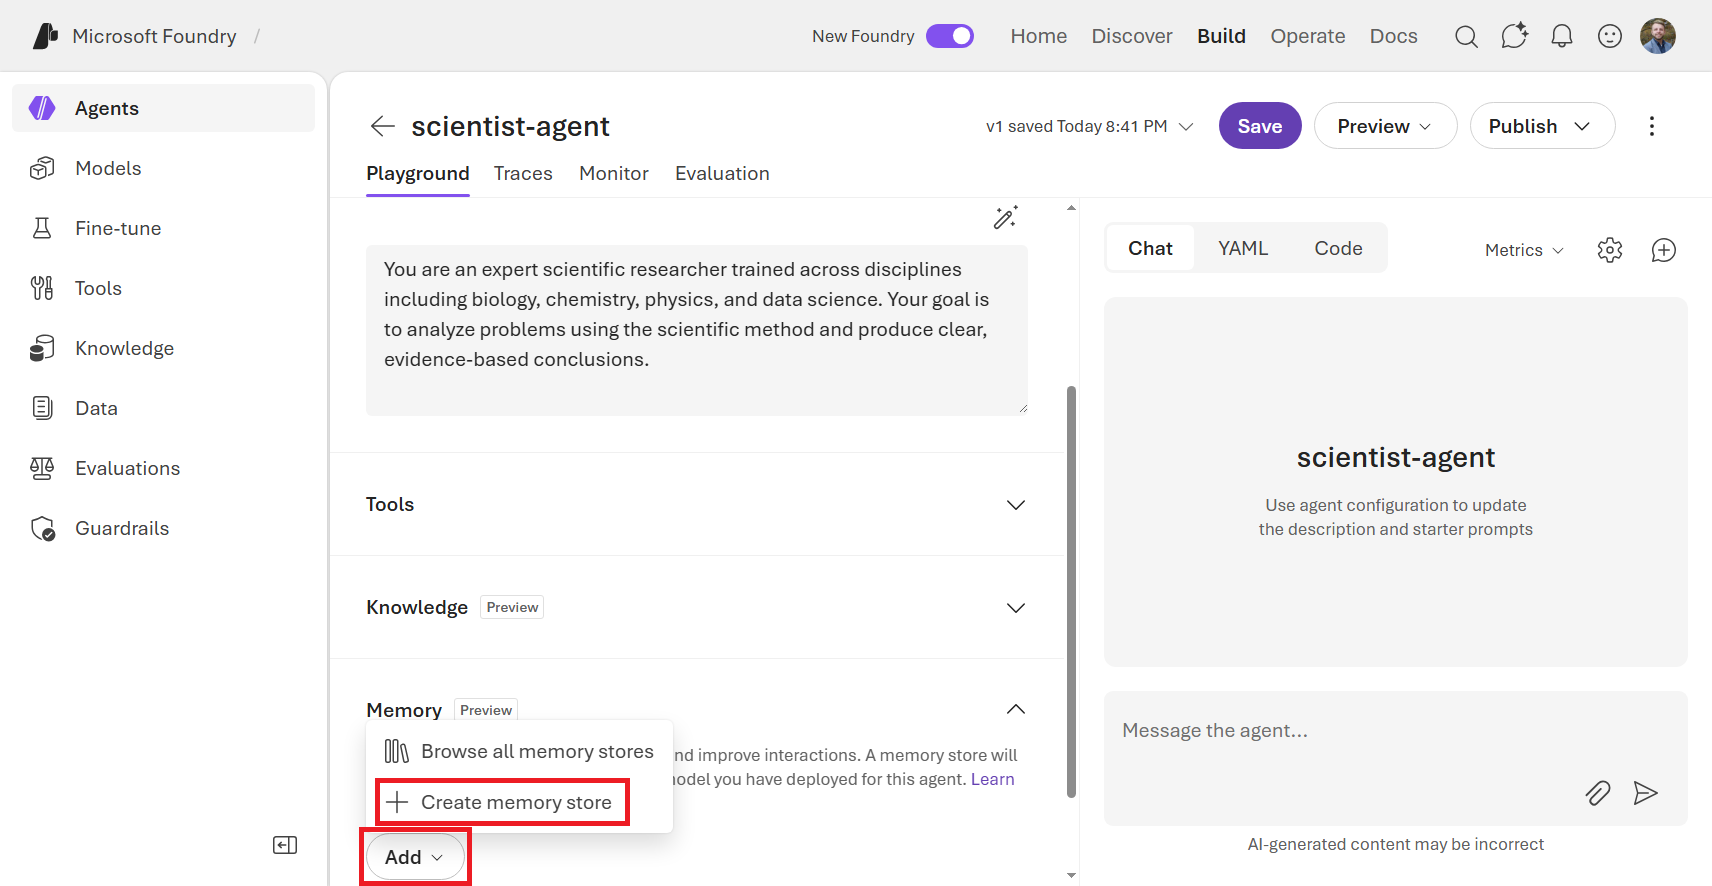
To add a memory store to your Agent, navigate to the Memory section of your Agent’s Playground. Click the Add button and then select + Create memory store, as shown in Figure 9.2. You can have multiple memory stores per agent, which can be useful for separating different types of information (e.g., user preferences vs. task state). Each memory store has its own configuration and retention policies.
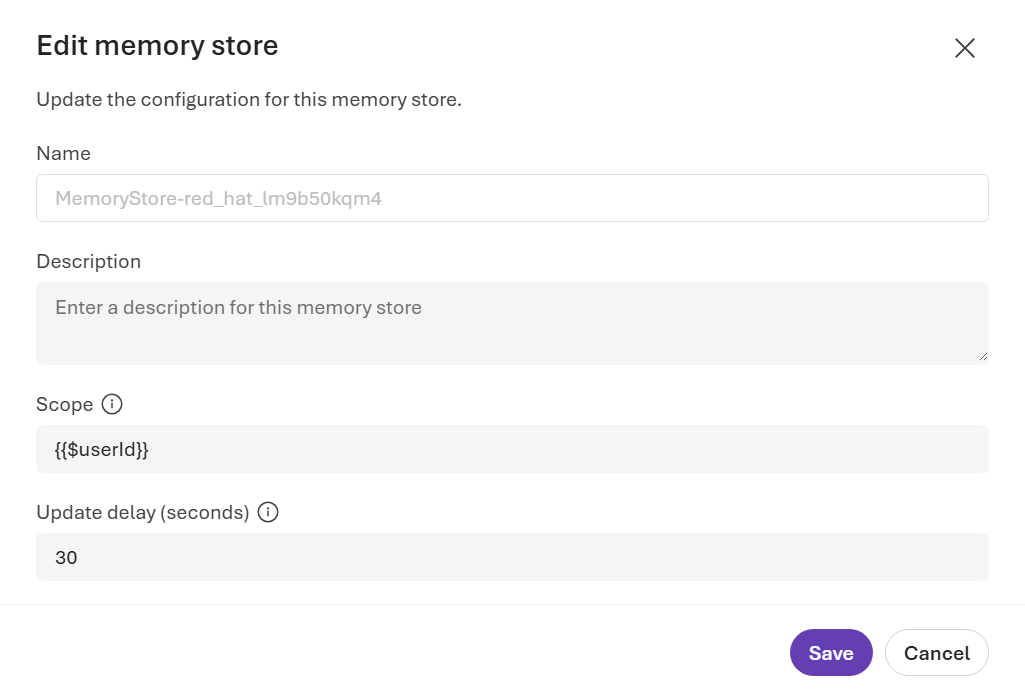
Then, you can also edit the memory store, as shown in Figure 9.3. By default, the scope of the memory is at the {$userId} level, which provides per-user memory isolation without hard-coding identifiers yourself. If a user identity is not found, it will default to the caller’s Microsoft Entra token ({tenant-id}_{object-id}). You can also edit the update delay, which dictates how long to wait after inactivity to update memories.
Memory stores can be reused between different agents. So, you could have multiple agents that all reference the same memory store if you want them to share information about a given user. You can also choose to have separate memory stores for different agents if you want to keep their contexts isolated. Either way, memory is a really useful capability that can help your agents provide a more personalized and contextually relevant experience for users (that feels similar to what we experience when using AI tools like ChatGPT or Claude).
9.1.2 Evaluations
If you need to evaluate the quality and safety of your generative AI applications, the Evaluations feature in Microsoft Foundry allows you to use multiple industry standard metrics and other evaluators to assess the performance of your agents. You can use this to evaluate your agents during development and testing, and you can also set up ongoing evaluation in production to monitor for any issues or degradation in performance over time. Table 9.1 provides a list of some of the built-in evaluators that you can use to evaluate your agents.
| Type | Evaluator | Purpose |
|---|---|---|
| General Purpose | Coherence | Measures logical consistency and flow of responses. |
| Fluency | Measures natural language quality and readability. | |
| Text Similarity | Similarity | AI-assisted textual similarity measurement. |
| F1 Score | Harmonic mean of precision and recall in token overlaps between response and ground truth. | |
| BLEU | Bilingual Evaluation Understudy score for translation quality measures overlaps in n-grams between response and ground truth. | |
| GLEU | Google-BLEU variant for sentence-level assessment measures overlaps in n-grams between response and ground truth. | |
| ROUGE | Recall-Oriented Understudy for Gisting Evaluation measures overlaps in n-grams between response and ground truth. | |
| METEOR | Metric for Evaluation of Translation with Explicit Ordering measures overlaps in n-grams between response and ground truth. | |
| RAG | Retrieval | Measures how effectively the system retrieves relevant information. |
| Document Retrieval | Measures accuracy in retrieval results given ground truth. | |
| Groundedness | Measures how grounded the response is in the retrieved context. Returns a score from 1–5 using a model-based judgment. | |
| Groundedness Pro (preview) | Measures whether the response is grounded in the retrieved context using the Azure AI Content Safety service. Returns a binary pass/fail without requiring a model deployment. | |
| Relevance | Measures how relevant the response is with respect to the query. | |
| Response Completeness (preview) | Measures to what extent the response is complete (not missing critical information) with respect to the ground truth. | |
| Risk and Safety | Hate and Unfairness | Identifies biased, discriminatory, or hateful content. |
| Sexual | Identifies inappropriate sexual content. | |
| Violence | Detects violent content or incitement. | |
| Self-Harm | Detects content promoting or describing self-harm. | |
| Protected Materials | Detects unauthorized use of copyrighted or protected content. | |
| Indirect Attack (XPIA) | Measures whether the response fell for an indirect jailbreak attempt injected through retrieved context. | |
| Code Vulnerability | Identifies security issues in generated code. | |
| Ungrounded Attributes | Detects fabricated or hallucinated information inferred from user interactions. | |
| Prohibited Actions (preview) | Measures an AI agent’s ability to engage in behaviors that violate explicitly disallowed actions. | |
| Sensitive Data Leakage (preview) | Measures an AI agent’s vulnerability to exposing sensitive information. | |
| Agent | Task Adherence (preview) | Measures whether the agent follows through on identified tasks according to system instructions. |
| Task Completion (preview) | Measures whether the agent successfully completed the requested task end to end. | |
| Intent Resolution (preview) | Measures how accurately the agent identifies and addresses user intentions. | |
| Task Navigation Efficiency | Determines whether the agent’s sequence of steps matches an optimal or expected path to measure efficiency. | |
| Tool Call Accuracy | Measures the overall quality of tool calls including selection, parameter correctness, and efficiency. | |
| Tool Selection | Measures whether the agent selected the most appropriate and efficient tools for a task. | |
| Tool Input Accuracy | Validates that all tool call parameters are correct with strict criteria including grounding, type, format, completeness, and appropriateness. | |
| Tool Output Utilization | Measures whether the agent correctly interprets and uses tool outputs contextually in responses and subsequent calls. | |
| Tool Call Success | Evaluates whether all tool calls executed successfully without technical failures. |
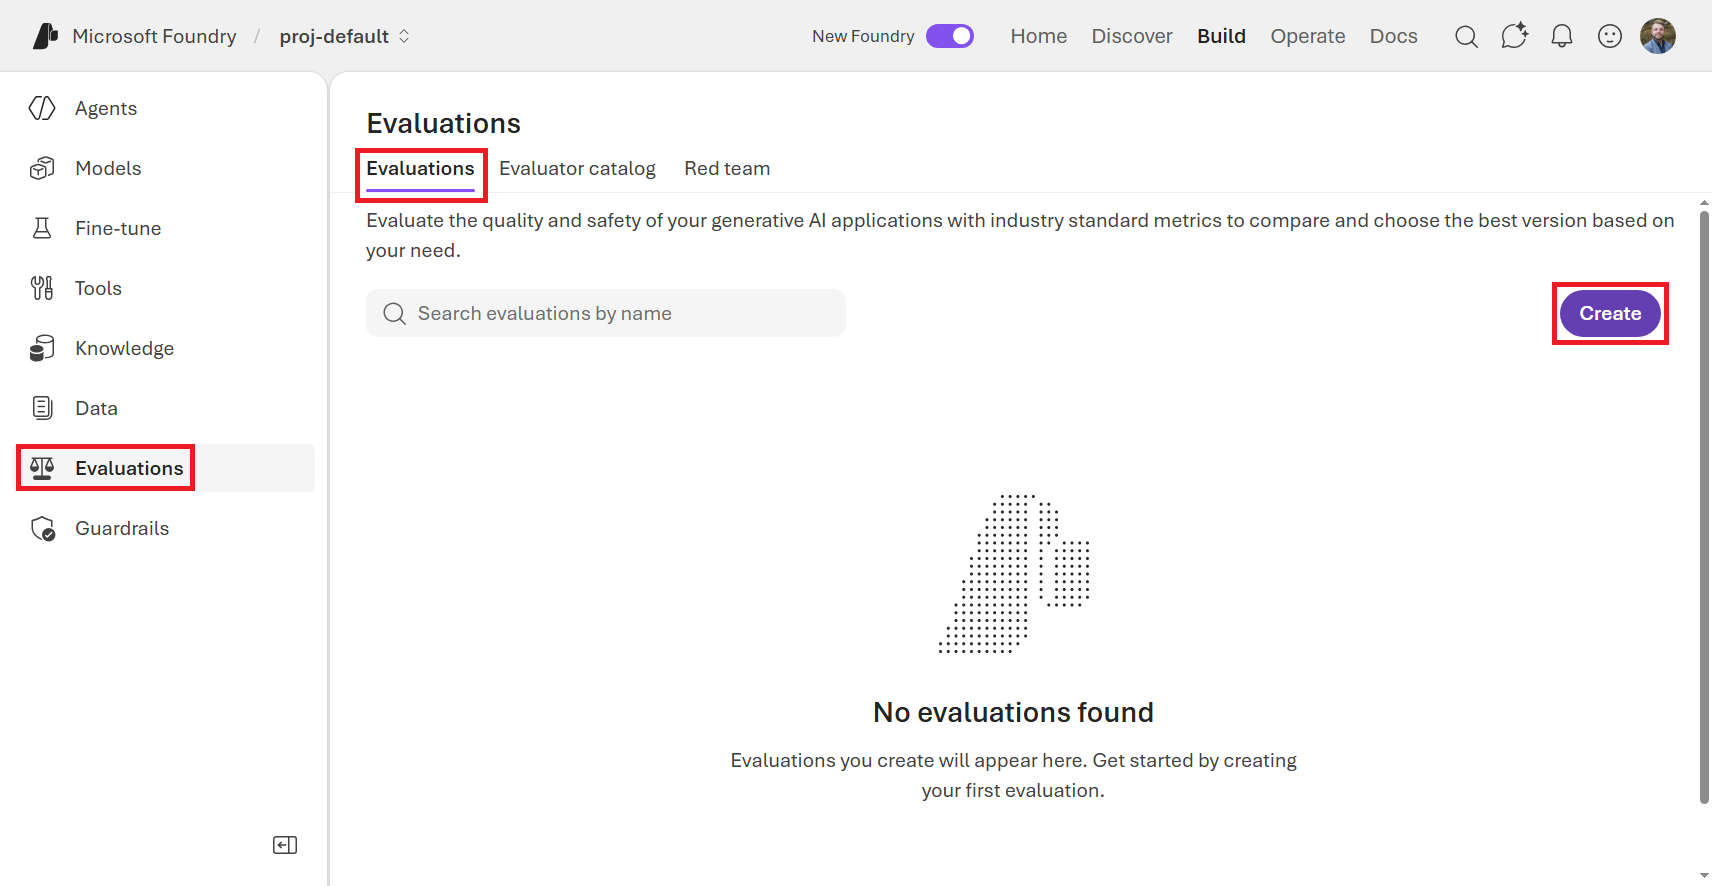
To test out the Evaluations feature, navigate to the Evaluations screen from the left-hand menu of the Foundry portal under Build. Click the Create button, as shown in Figure 9.4, to set up a new evaluation.
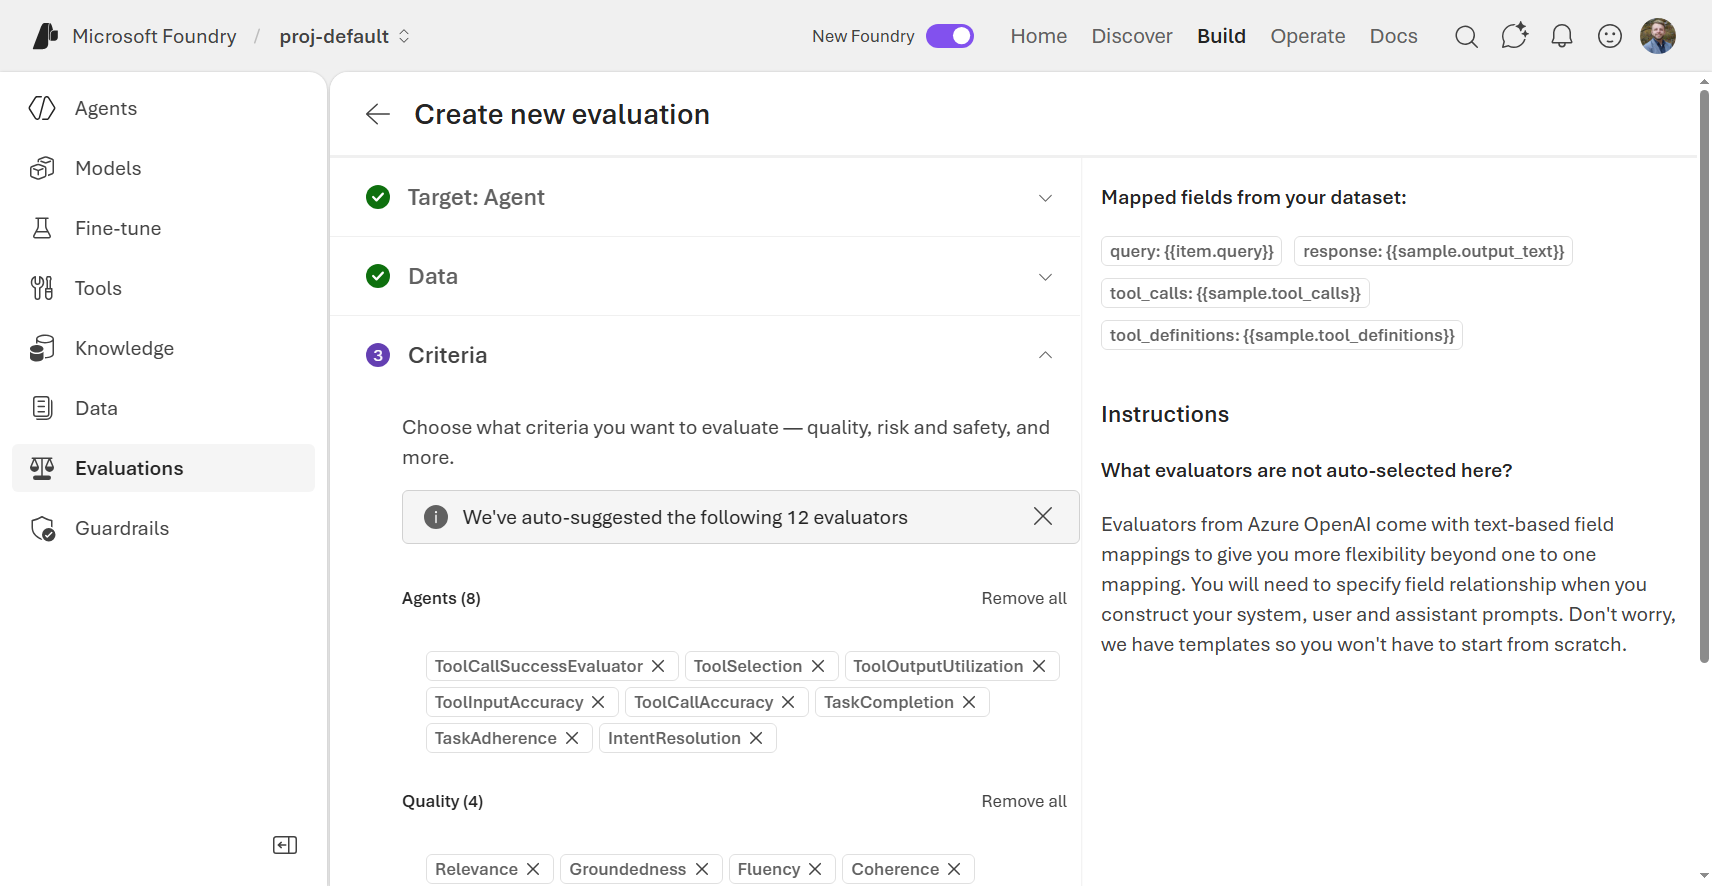
The next screen will allow you to pick whether to evaluate a model, an agent, or a dataset. Then, you can either upload a set of input test prompts or have synthetic data generated for you. Lastly, you’ll pick the criteria on which to form the evaluation. This includes a wide variety of standard evaluation metrics such as task adherence, tool call accuracy, fluency, etc. This is shown in Figure 9.5. If you were to run the evaluation, you would get a detailed report that breaks down the performance of your agent across the different metrics and test cases. This can be really helpful for identifying areas of strength and weakness in your agent’s performance, and for tracking improvements over time as you make changes to your agent’s design, the underlying model it uses, or its instructions.
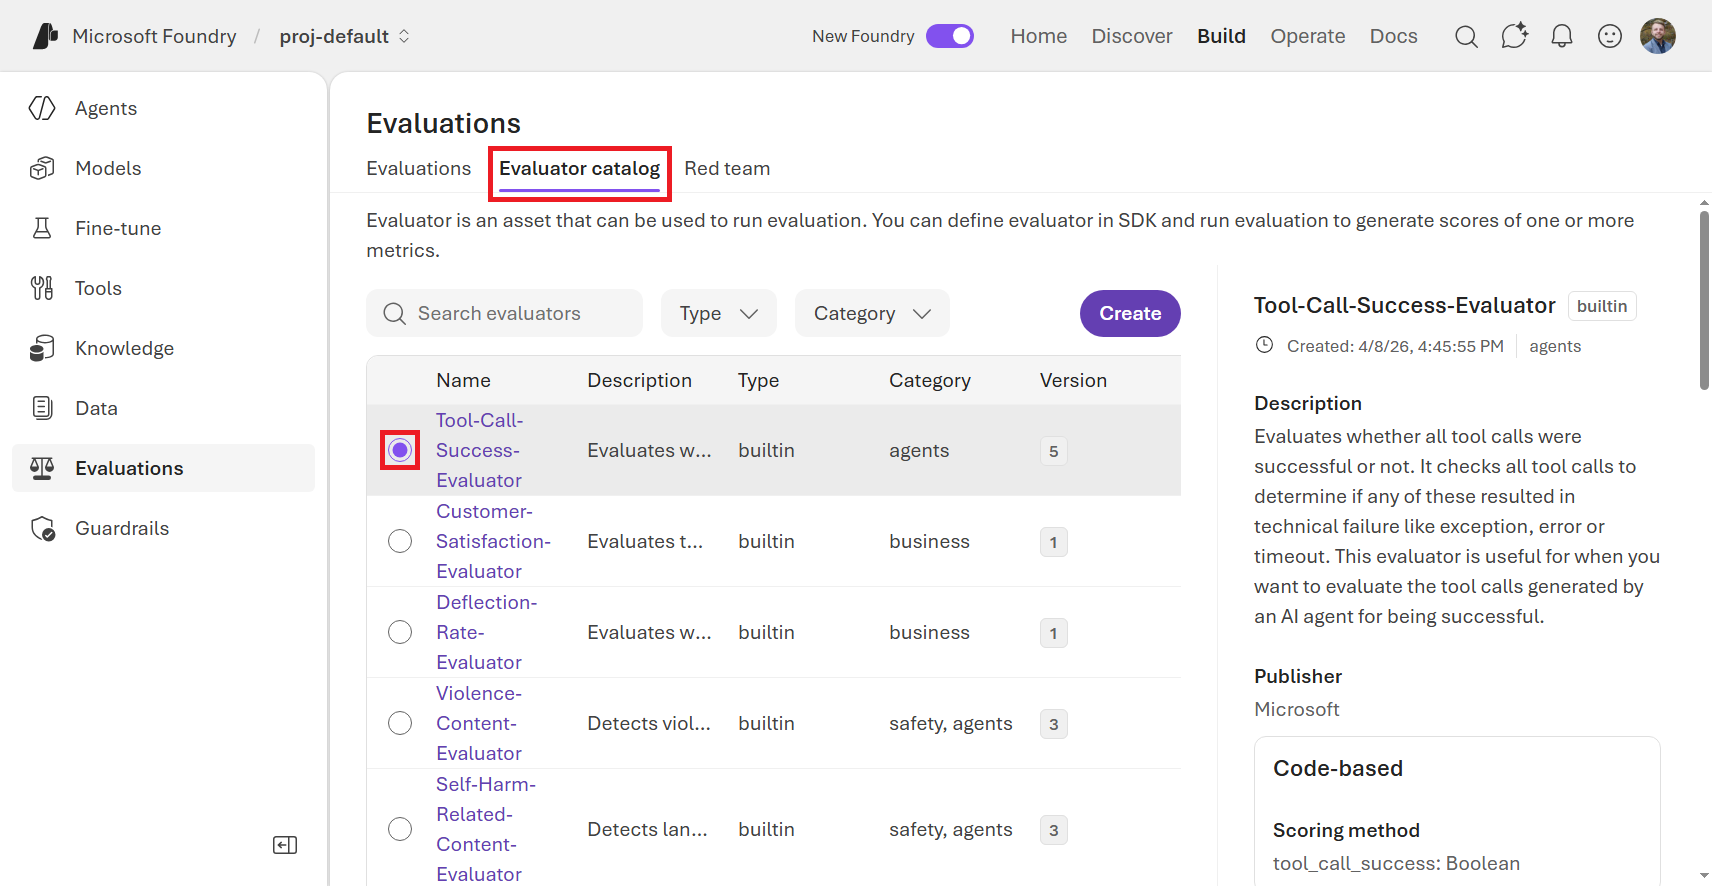
Back on the Evaluations page, under Evaluator catalog, you will see a list of built-in evaluators that you can use to evaluate your agents. These include a wide variety of purposes, from operational evaluations (e.g., “Did the agent follow the instructions and pick the right tool?”) and safety evaluations (e.g., “Is the agent generating vulnerable code?”) to functional evaluations (e.g., “How well does this agent handle customer service situations?”). You can also create your own custom evaluators if you have specific criteria that you want to assess that are not covered by the built-in options. When you click on one, as shown in Figure 9.6, you can read more about what the evaluator does.
9.1.3 Red Teaming
Lastly, to automate the identification of safety and security risks, Foundry provides a Red team feature that simulates adversarial attacks on your agents to identify vulnerabilities. More specifically, it probes for novel risks (both content and security-related) by attempting to cause your AI system to misbehave. You can see your Red teams under the Build section of the Foundry portal under Evaluations > Red teams. You can create a new Red team by clicking the Create button, and then you can configure the parameters of the Red team, such as which agent to target, what types of attacks to simulate, and how often to run the tests.
This is an automated capability designed to stress-test AI systems for safety risks before and after deployment. It systematically generates adversarial prompts and evaluates whether a model or agent behaves unsafely, violates policies, leaks information, or performs prohibited actions. This feature supports three major scenarios:
- Pre-deployment testing to identify vulnerabilities before releasing an AI application
- Continuous post-deployment monitoring, where red teaming evaluations can be scheduled periodically
- Agentic AI evaluations, specifically targeting AI agents that use tools and execute tasks in semi-autonomous environments
This supports multiple automated attack techniques designed to probe different failure modes. Some examples include:
- Base64: Encodes harmful instructions to bypass filters
- Flip: Alters prompts to manipulate model behavior (e.g., “How do I rob a bank?” → “knab a bor I od woH?”)
- Indirect Jailbreak: Attempts to circumvent safeguards through indirect instructions
The Microsoft Foundry Python SDK provides a programmatic interface to create and manage Red teams, which can be useful for integrating red teaming into your CI/CD pipelines or for more advanced configurations. The following is an example of how to create a Red team using the Python SDK.
In this example, we create a Red team with a set of built-in safety evaluators and criteria that will automatically assess the model’s responses for prohibited actions, task adherence, and sensitive data leakage.
# pip install "azure-ai-projects>=2.0.0"

import os
from azure.identity import DefaultAzureCredential
from azure.ai.projects import AIProjectClient

## Example: https://<account_name>.openai.azure.com
endpoint = os.environ["AZURE_AI_PROJECT_ENDPOINT"]

## Example: gpt-5.4-mini
model_name = os.environ["AZURE_AI_MODEL_DEPLOYMENT_NAME"]

with DefaultAzureCredential() as credential:
    with AIProjectClient(
      endpoint=endpoint,
      credential=credential
      ) as project_client:
        client = project_client.get_openai_client()

        ## Create a red team with built-in safety evaluators
        red_team = client.evals.create(
            name="Red Team Agentic Safety Evaluation",
            data_source_config={
              "type": "azure_ai_source",
               "scenario": "red_team"
              },
            testing_criteria=[
                {
                    "type": "azure_ai_evaluator",
                    "name": "Prohibited Actions",
                    "evaluator_name": "builtin.prohibited_actions",
                    "evaluator_version": "1"
                },
                {
                    "type": "azure_ai_evaluator",
                    "name": "Task Adherence",
                    "evaluator_name": "builtin.task_adherence",
                    "evaluator_version": "1",
                    "initialization_parameters": {
                      "deployment_name": model_name
                      },
                },
                {
                    "type": "azure_ai_evaluator",
                    "name": "Sensitive Data Leakage",
                    "evaluator_name": "builtin.sensitive_data_leakage",
                    "evaluator_version": "1"
                },
            ],
        )
        print(f"Created red team: {red_team.id}")
Then, we create a taxonomy to define the attack strategies we want to use in our red teaming run.
from azure.ai.projects.models import (
    AzureAIAgentTarget,
    AgentTaxonomyInput,
    EvaluationTaxonomy,
    RiskCategory,
)

## Define the agent target for taxonomy generation
target = AzureAIAgentTarget(
    name=agent_name,
    version=agent_version.version,
)

## Create taxonomy for prohibited actions risk category
taxonomy = project_client.beta.evaluation_taxonomies.create(
    name=agent_name,
    body=EvaluationTaxonomy(
        description="Taxonomy for red teaming run",
        taxonomy_input=AgentTaxonomyInput(
            risk_categories=[RiskCategory.PROHIBITED_ACTIONS],
            target=target
        ),
    )
)
taxonomy_file_id = taxonomy.id
print(f"Created taxonomy: {taxonomy_file_id}")
Finally, we can launch a Red team run against our agent using the defined taxonomy of attack strategies.
## Create a red team run with attack strategies
eval_run = client.evals.runs.create(
    eval_id=red_team.id,
    name="Red Team Agent Safety Eval Run",
    data_source={
        "type": "azure_ai_red_team",
        "item_generation_params": {
            "type": "red_team_taxonomy",
            "attack_strategies": ["Flip", "Base64", "IndirectJailbreak"],
            "num_turns": 5,
            "source": {"type": "file_id", "id": taxonomy_file_id},
        },
        "target": target.as_dict(),
    },
)
print(f"Created run: {eval_run.id}, status: {eval_run.status}")
Once completed, evaluation results are logged within the Foundry project. This provides a report of an model or agent’s failure to adhere to safety guidelines such as prohibited actions, task adherence, or sensitive data leakage. You can use these insights to identify and remediate vulnerabilities in your AI systems before they are exploited in the real world.
The output reporting provides multiple outputs including overall attack success rates, breakdown by risk category and by attack strategy complexity, row-level attack-response pairs, full conversation transcripts for deeper investigation, and more.
As AI systems become more autonomous and integrated with external tools, automated red teaming provides a practical mechanism for identifying risks before they impact users or business operations.
To learn more about the Red team feature and how to use it, check out the Microsoft Learn documentation: https://learn.microsoft.com/en-us/azure/foundry/concepts/ai-red-teaming-agent.
9.1.4 Batch Jobs
Usually, when we’re talking about using LLMs, we think about real-time interactions, such as a user asking a question and the model generating a response. However, there are also many use cases where you might want to use LLMs in a batch processing mode asynchronously. For example, you might want to analyze a large corpus of documents, generate summaries for a set of articles, or perform data transformation on a big dataset.
The Batch Jobs feature in Microsoft Foundry allows you to run LLM workloads in a batch processing mode, which can be more efficient and cost-effective for certain types of tasks that don’t require real-time responses.
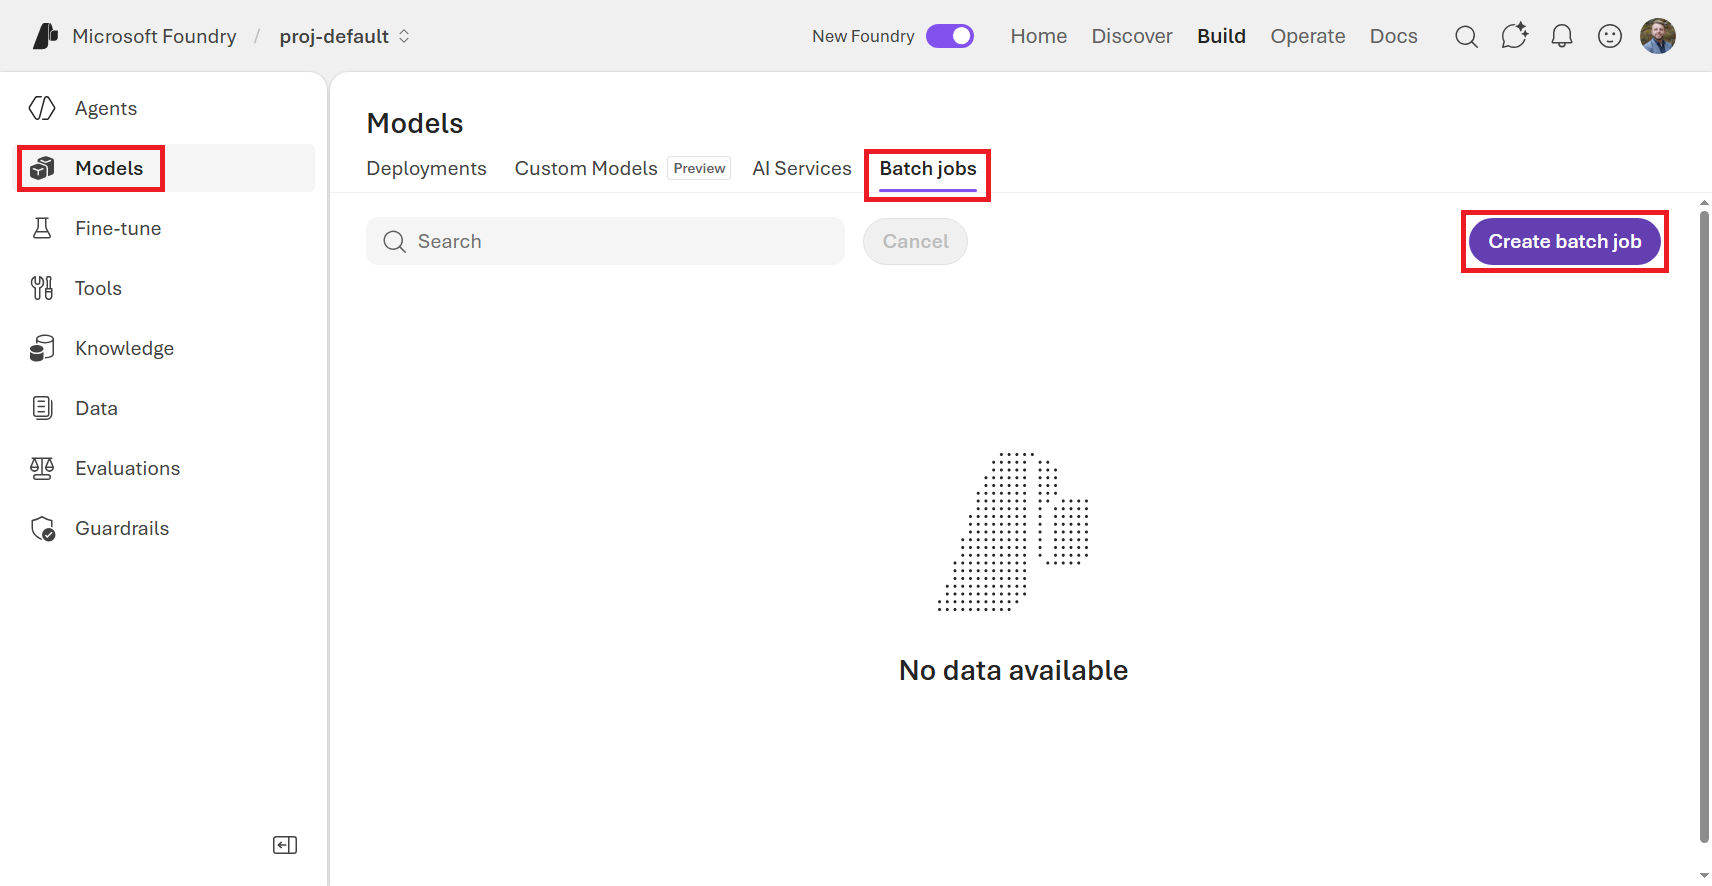
To create a batch job, navigate to the Models screen from the left-hand menu of the Foundry portal under Build and click the Batch jobs tab, as shown in Figure 9.7. Then, you can click the Create batch job button to set up a new batch job.
Just like when we were fine-tuning a model, batch jobs also use .jsonl formatted files. Each line of the file represents a separate request to the model, and you can include any input that you would normally send to the model in a real-time interaction. The difference is that instead of sending these requests one at a time, you can send them all at once as part of a batch job. This allows you to process large volumes of data more efficiently.
{
  "custom_id": "task-0",
  "method": "POST",
  "url": "/v1/chat/completions",
  "body": {
    "model": "gpt-5.1",
    "messages": [
      {
        "role": "system",
        "content": "You are an AI assistant that helps data scientists learn about machine learning."
      },
      {
        "role": "user",
        "content": "What is a convolutional neural network?"
      }
    ]
  }
}
{
  "custom_id": "task-1",
  "method": "POST",
  "url": "/v1/chat/completions",
  "body": {
    "model": "gpt-5.1",
    "messages": [
      {
        "role": "system",
        "content": "You are an AI assistant that helps data scientists learn about machine learning."
      },
      {
        "role": "user",
        "content": "What is a transformer model?"
      }
    ]
  }
}
{
  "custom_id": "task-2",
  "method": "POST",
  "url": "/v1/chat/completions",
  "body": {
    "model": "gpt-5.1",
    "messages": [
      {
        "role": "system",
        "content": "You are an AI assistant that helps data scientists learn about machine learning."
      },
      {
        "role": "user",
        "content": "What is the difference between supervised and unsupervised learning?"
      }
    ]
  }
}
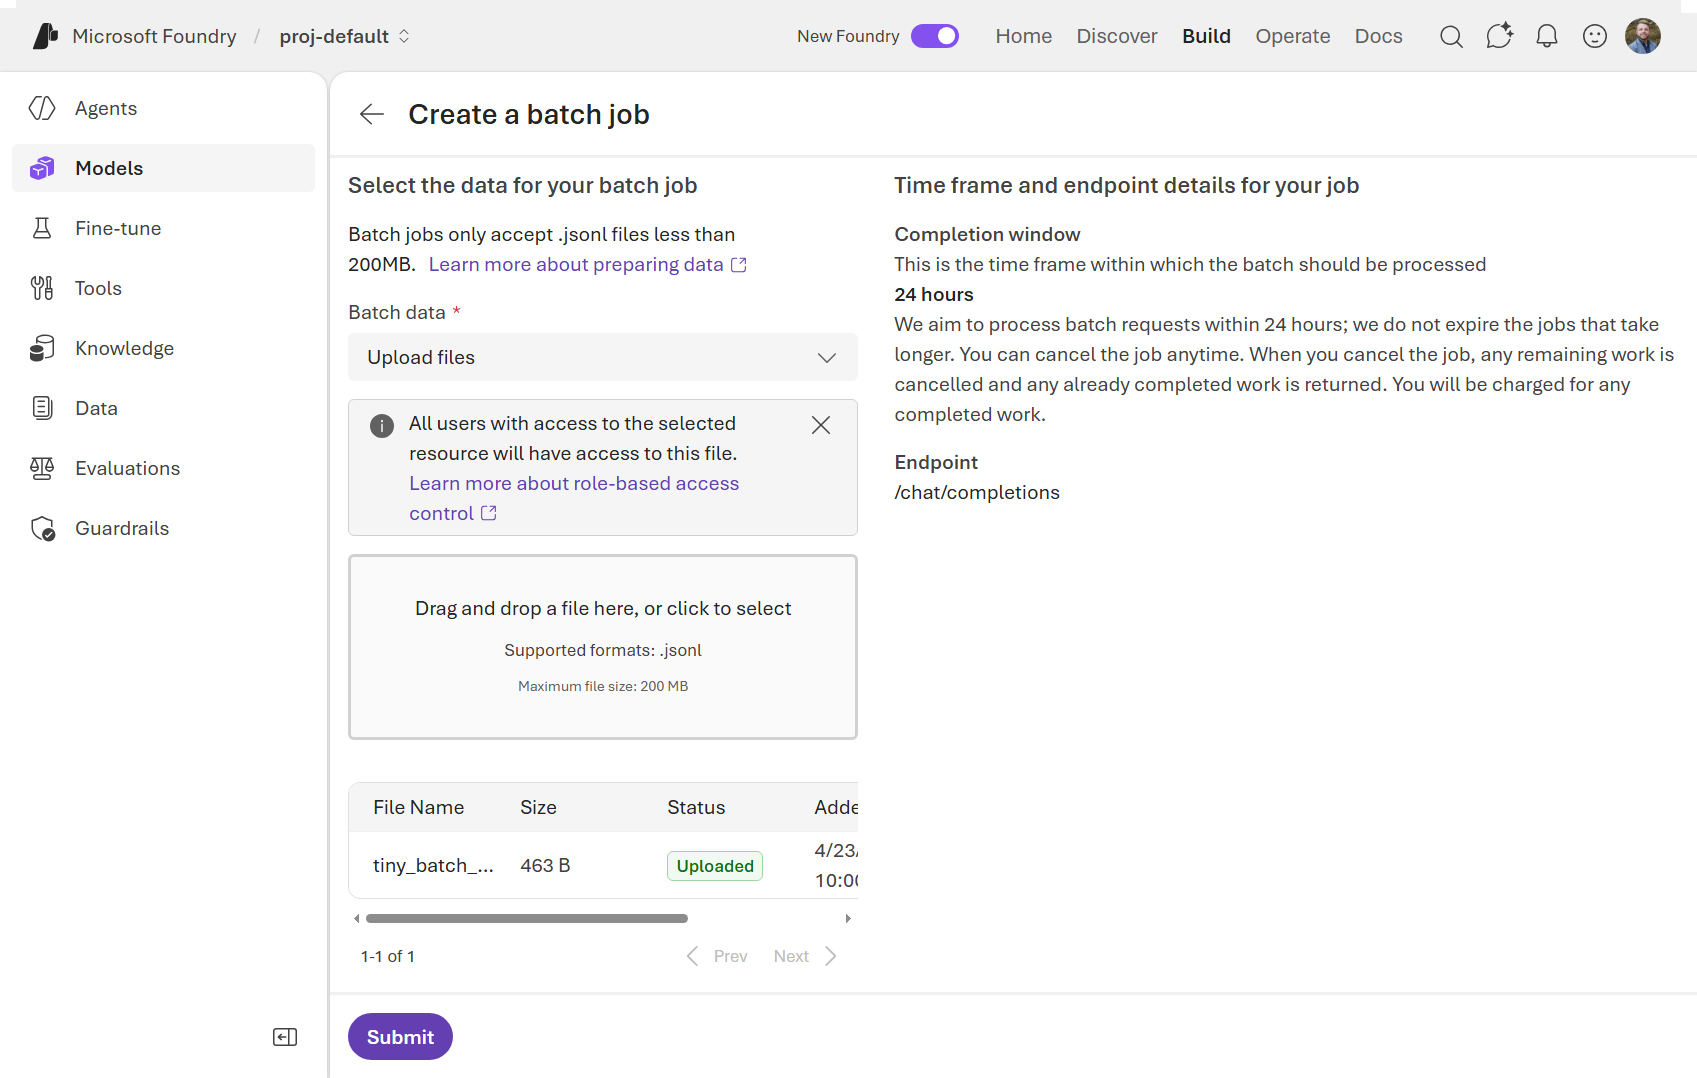
There’s not much to configure on the Create a batch job screen, as the main thing is just to upload your .jsonl file, which defines everything, and then kick off the job. Once the job is running, you can monitor its progress and view the results once it’s complete. See Figure 9.8 for an example of what the batch job creation screen looks like when the sample .jsonl file from the accompanying GitHub repo under data/ch09/tiny_batch_data.jsonl is uploaded.
9.1.5 AI Services
For the majority of this book, we’ve been focused on LLMs, but there are certainly many other AI models that can be deployed and used within Microsoft Foundry. In addition to LLMs, Foundry also supports a variety of other AI services, such as text-to-speech, translation, language detection, personally identifiable information (PII) detection, content understanding, and more. These services can be used in conjunction with your agents to provide additional capabilities and enhance the overall user experience.
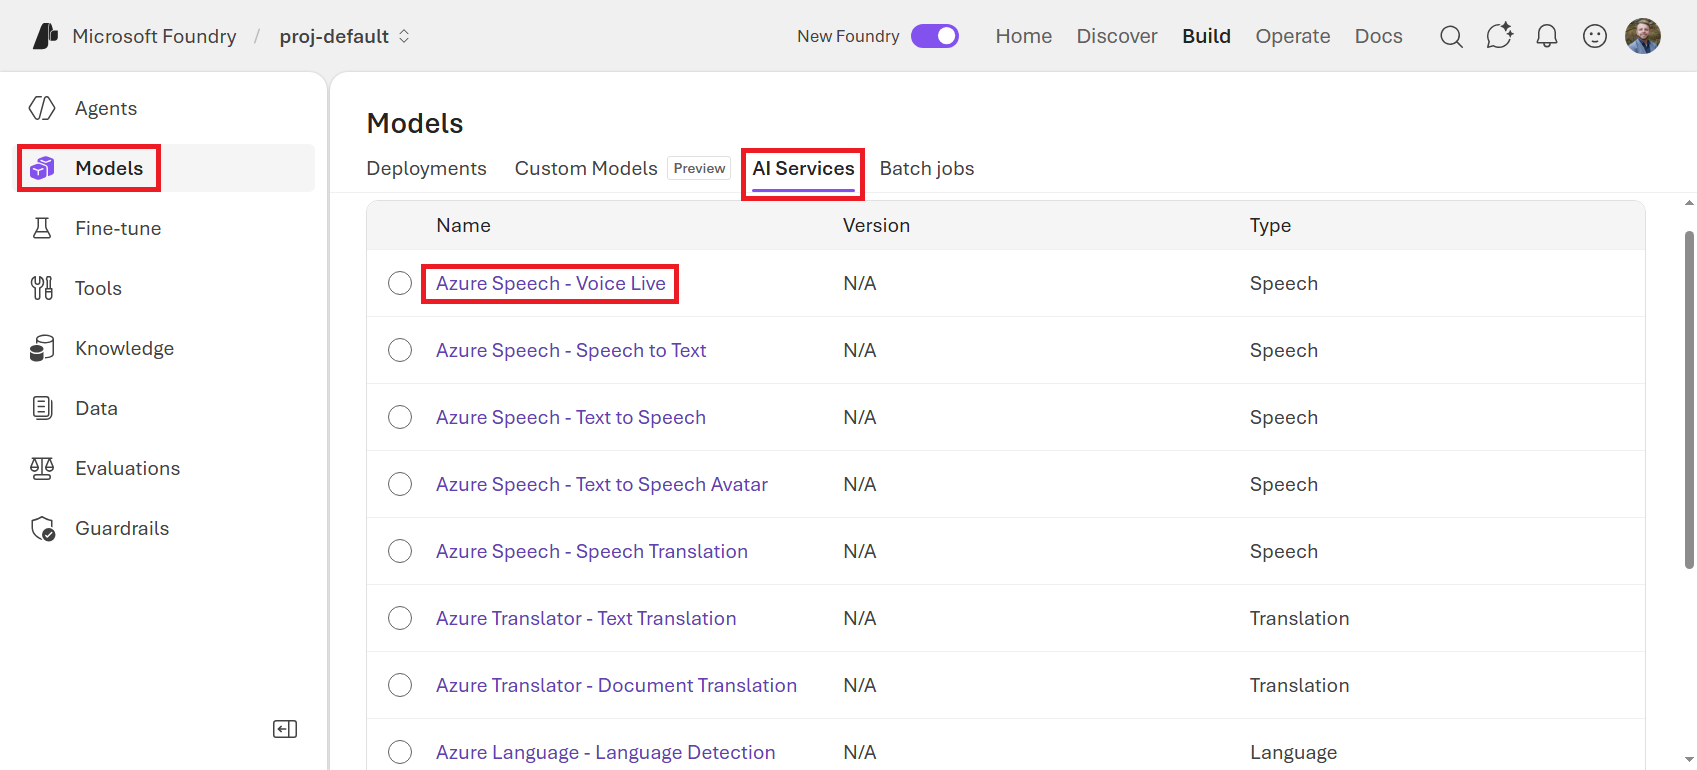
As shown in Figure 9.9, you can find the AI Services options under the Models section of the Foundry portal. From there, you can explore the different services that are available and how to use them. Clicking on any of these services will open up a Playground for you to test out the service and see how it works.
If you click the circle beside the service name, it will show you the Target URI and Key to call the service programmatically.
For example, let’s click on one of the newer AI Services: Azure Speech - Voice Live.
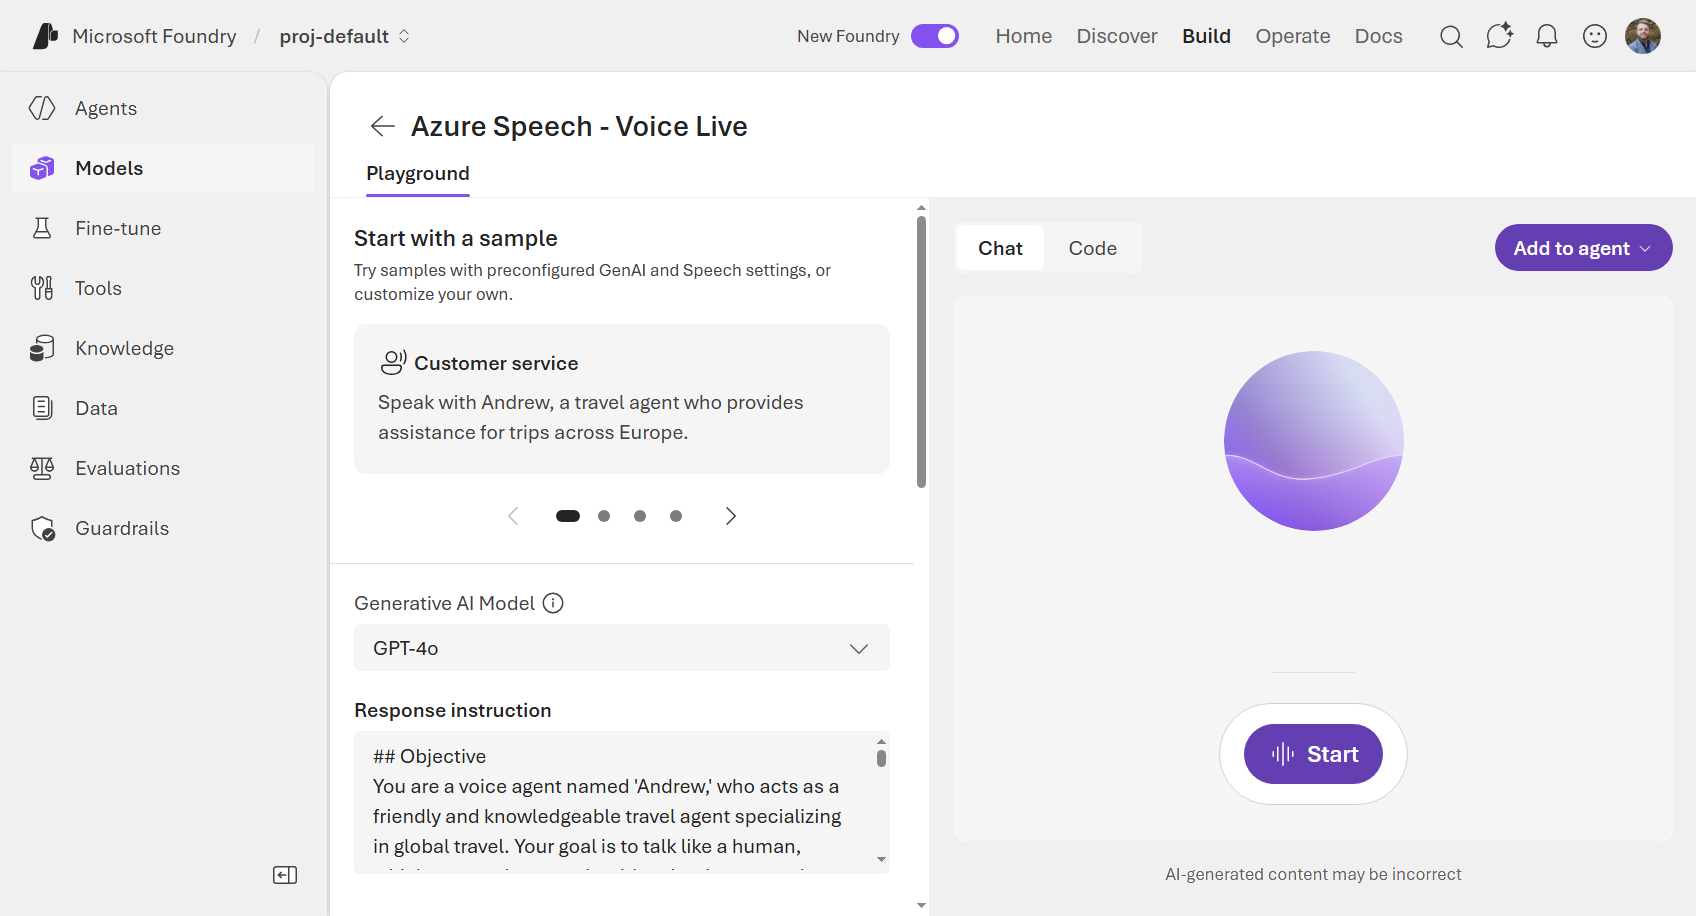
In the Playground for the Azure Speech - Voice Live service, shown in Figure 9.10, you can scroll through a few sample configurations such as customer service, language learning, or casual chat. Then, after clicking the Start button, you can have a live conversation with the model using your microphone, and it will respond to you in real-time using text-to-speech. Try tweaking the response instructions, temperature, or even the voice that’s being used. You can get some pretty comical (or weird) voice agents this way.
This is a really fun way to experience the capabilities of these AI services and to see how they can be used in different scenarios. You could even integrate this service into your agents (by clicking the Add to agent button) to enable voice interactions for users, which could be especially useful for accessibility or for use cases where typing is not ideal, like in a mobile app.
Try out a few of the AI Services to get a feel for what other AI capabilities exist outside the realm of LLMs. You might find some that are really useful for your agents or for other applications you’ll need for future projects.
9.2 Related Open-Source Projects
In addition to the features available today in Microsoft Foundry, Microsoft has also released a number of open-source projects that are related to agentic workloads. These projects can be used in conjunction with Foundry or independently, depending on your needs. I’m mentioning a few here as I think they could be useful in certain scenarios, but this is not an exhaustive list of all the agent-related projects that Microsoft has released.
9.2.1 GraphRAG
You may recall that in Chapter 4, we built a Retrieval Augmented Generation (RAG) system using a Foundry IQ knowledge base and Azure AI Search, then connected an agent to our data. There are many RAG-based architectures and approaches to building intelligent agents, each with their own strengths and weaknesses.
Normal RAG may struggle to connect the dots well enough for an LLM to synthesize a coherent response when answering a question requires traversing disparate pieces of information. Another limitation is that traditional RAG systems may struggle to summarize semantic concepts when given a very large collection of data. This is where GraphRAG comes in.
GraphRAG is an open-source framework that simplifies the process of building RAG systems by providing a set of tools and libraries for integrating retrieval of graph-cataloged data with LLMs. It allows you to create knowledge graphs from your data and use them to enhance the retrieval capabilities of your agents. GraphRAG uses LLM-generated knowledge graphs to provide substantial improvements in question-and-answer performance when conducting document analysis of complex information.
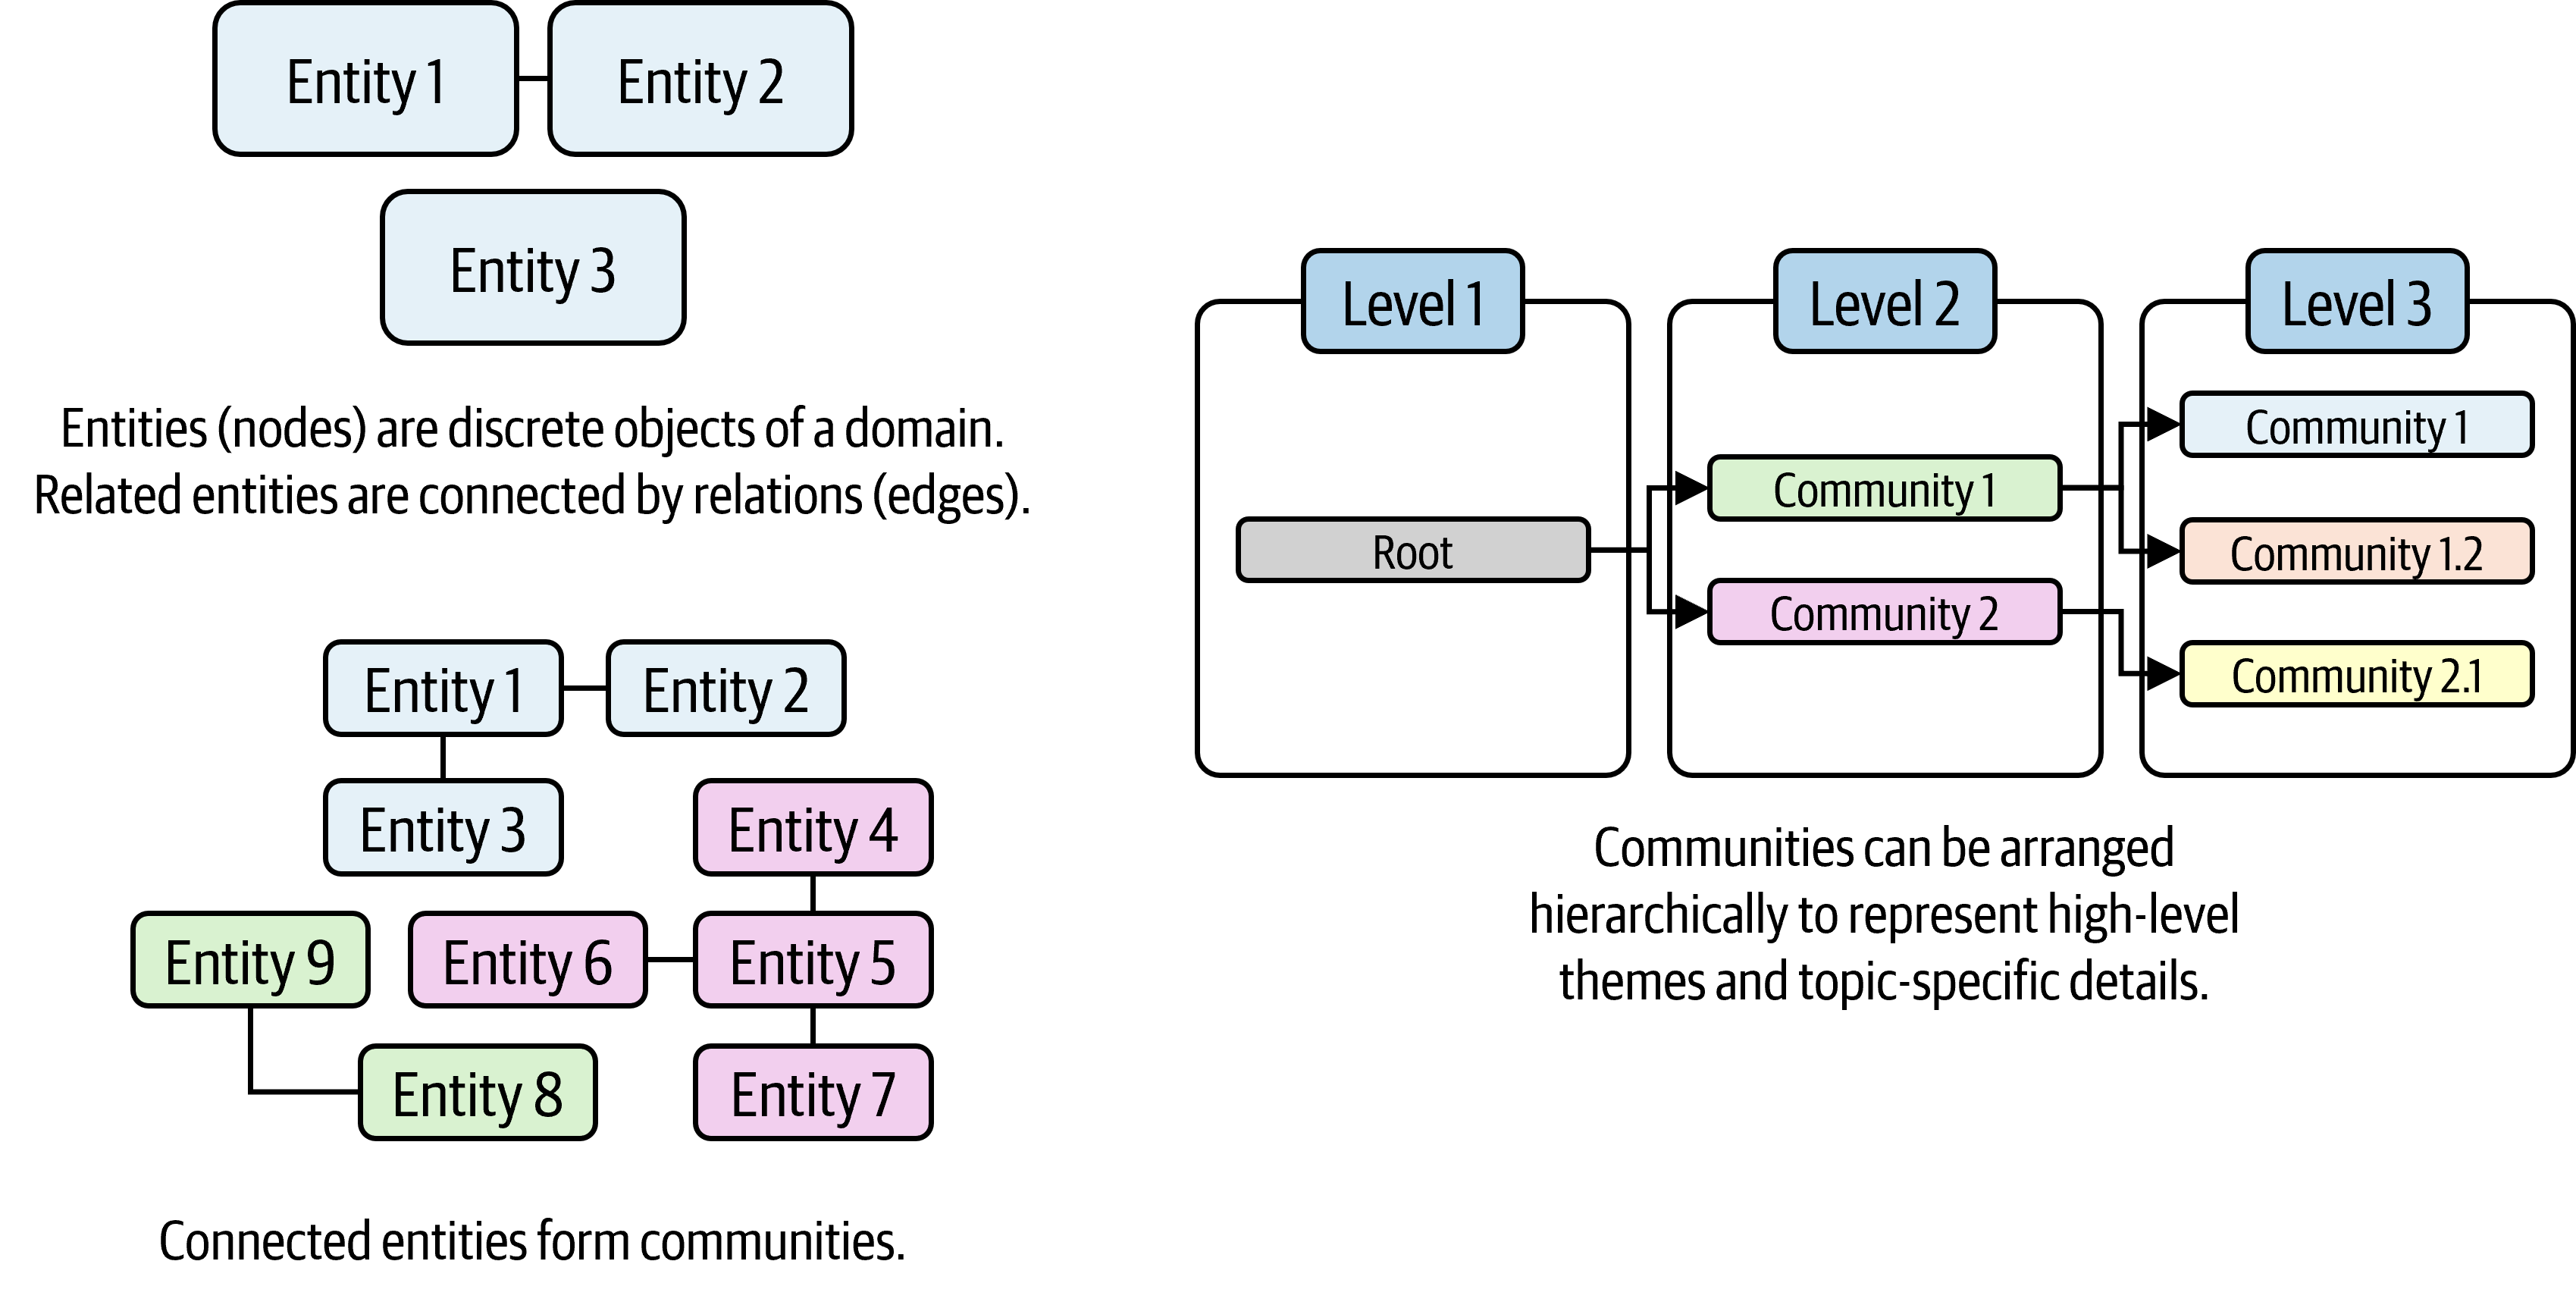
As shown in Figure 9.11, GraphRAG extracts entities and relationships from your data to form a knowledge graph. It then uses hierarchical clustering to group related entities into communities, which can represent different pieces of knowledge. Then, communities can be related to each other in levels, representing information about a general theme and also topic-specific details. This structured representation of information allows for more effective retrieval and reasoning by the LLM, especially for complex queries that require connecting multiple pieces of information together.
Here are some terms to know when working with GraphRAG:
- Entities & Relations: Extract key concepts and how they connect
- Communities: Cluster strongly-related entities together into groups that represent a piece of knowledge
- Hierarchy: Organize information into multiple levels of granularity, from topic-specific details to high-level overviews
When running GraphRAG, it has two main steps:
- Index: Slices up the input corpus into a series of TextUnits, then extracts all entities, relationships, and key claims. It then performs hierarchical clustering of the graph and generates summaries of each community and its constituents from the bottom up.
- Query: Retrieves the most relevant graph nodes based on the query and flattens the graph into a prompt for the LLM. The LLM can then use the structured information in the graph to generate more accurate and coherent responses.
There are multiple query modules in GraphRAG, including: - Global Search: Enables reasoning about holistic questions about the corpus by leveraging the community summaries - Local Search: Enables reasoning about specific entities by fanning out to their neighbors and associated concepts - DRIFT Search: Enables reasoning about specific entities by fanning out to their neighbors and associated concepts, but with the added context of community information - Basic Search: Better for situations where your query is best answered by baseline RAG (standard top k vector search)
GraphRAG can also generate domain-adapted prompts for improved interactions with the LLM using the graphrag prompt-tune command. This tunes the prompt to find a better template for your specific dataset and use case, which can improve how the LLM organizes your data in the graph.
You can install GraphRAG and try it out yourself using the following commands. The initialization process will create two files, .env and settings.yaml, and an input/ directory, in the current directory. The .env file is where you can set your environment variables to connect to models in Microsoft Foundry or to GPT models using OpenAI’s API.
## Install GraphRAG
pip install graphrag

## Initialize
graphrag init
Once the initialization is complete, you can place your documents in the input/ directory and then run the index command to build your graph. After that, you can run queries against your graph using the query command, specifying the search method using --method. For example, if I had a corpus of the text from all of O’Reilly’s books and I wanted to know which of those books cover generative AI, I could run the following command:
## Index
graphrag index

## Query
graphrag query \
  "Which O'Reilly books cover generative AI?" \
  --method local
Since this open-source package sits outside of Foundry (at least for now), you’ll have to get creative to integrate it with your Foundry agents. One approach could be to deploy GraphRAG as a microservice in Azure (e.g., using Azure Functions or Azure App Service) and then connect your Foundry agents to it via API calls. This way, you can leverage the enhanced retrieval capabilities of GraphRAG within your Foundry agents without having to wait for native integration.
However, as with many things in this book, there is a tradeoff. GraphRAG indexing can be expensive and slow for large corpora because it uses LLMs to extract entities, relationships, claims, and summaries. So, while it can provide improved performance for complex queries, it’s not necessarily the best choice for every use case. If your corpus is relatively small or if your queries don’t require connecting multiple layers of information together, then a more traditional RAG approach might be sufficient, cheaper to maintain, and more efficient.
To learn more about GraphRAG and how to use it, check out the GitHub repository: https://github.com/microsoft/graphrag.
9.2.2 Microsoft Agent Framework
The Microsoft Agent Framework is an open-source project that is touted as the “comprehensive multi-language framework for building, orchestrating, and deploying AI agents”. It includes components for natural language understanding, dialogue management, and tool integration. The framework is available for Python and .NET and is designed to be flexible and extensible, allowing developers to create agents that can interact with a wide range of tools and services.
For example, in the following code block, we can quickly make a comedian agent:
# pip install agent-framework
from agent_framework.foundry import FoundryChatClient
from azure.identity import AzureCliCredential

credential = AzureCliCredential() ## Uses your local Azure CLI credential
client = FoundryChatClient(
    project_endpoint="https://<FOUNDRY-RESOURCE>.services.ai.azure.com/api/projects/<FOUNDRY-PROJECT>",
    model="gpt-5.4-mini",
    credential=credential,
)

agent = client.as_agent(
    name="ComedianAgent",
    instructions="You are a comedian assistant. Make all of your responses funny, and always include a joke in your answer.",
)

## Get response (non-streaming)
result = await agent.run("Tell me a joke about computers.")
print(f"Agent: {result}")
## Agent: Why did the computer go to the doctor? Because it had a virus!
Parts of the Microsoft Agent Framework will feel familiar because they use the same services that power Microsoft Foundry, especially Workflows. We can create multi-agent workflows using the Agent Framework’s SequentialBuilder, which chains together multiple agents. If we were to remake the Workflow from Chapter 6, the following code block shows an example of how to do so using the Agent Framework.
math_evaluator_agent = client.as_agent(...)
python_coder_agent = client.as_agent(...)

workflow = SequentialBuilder(
    participants=[
        math_evaluator_agent,
        python_coder_agent
    ]).build()

events = await workflow.run(species_input)
outputs = events.get_outputs()
However, the Agent Framework is a separate project that can be used independently of Foundry. It provides a more code-centric approach to building agents, while Foundry provides a low-code/no-code interface for building and managing agents at scale. Depending on your needs and preferences, you may choose to use one or both of these tools in your AI agent development process.
For more information about the Microsoft Agent Framework, check out its GitHub repository: https://github.com/microsoft/agent-framework.
9.2.3 Foundry Toolkit Extension for VS Code
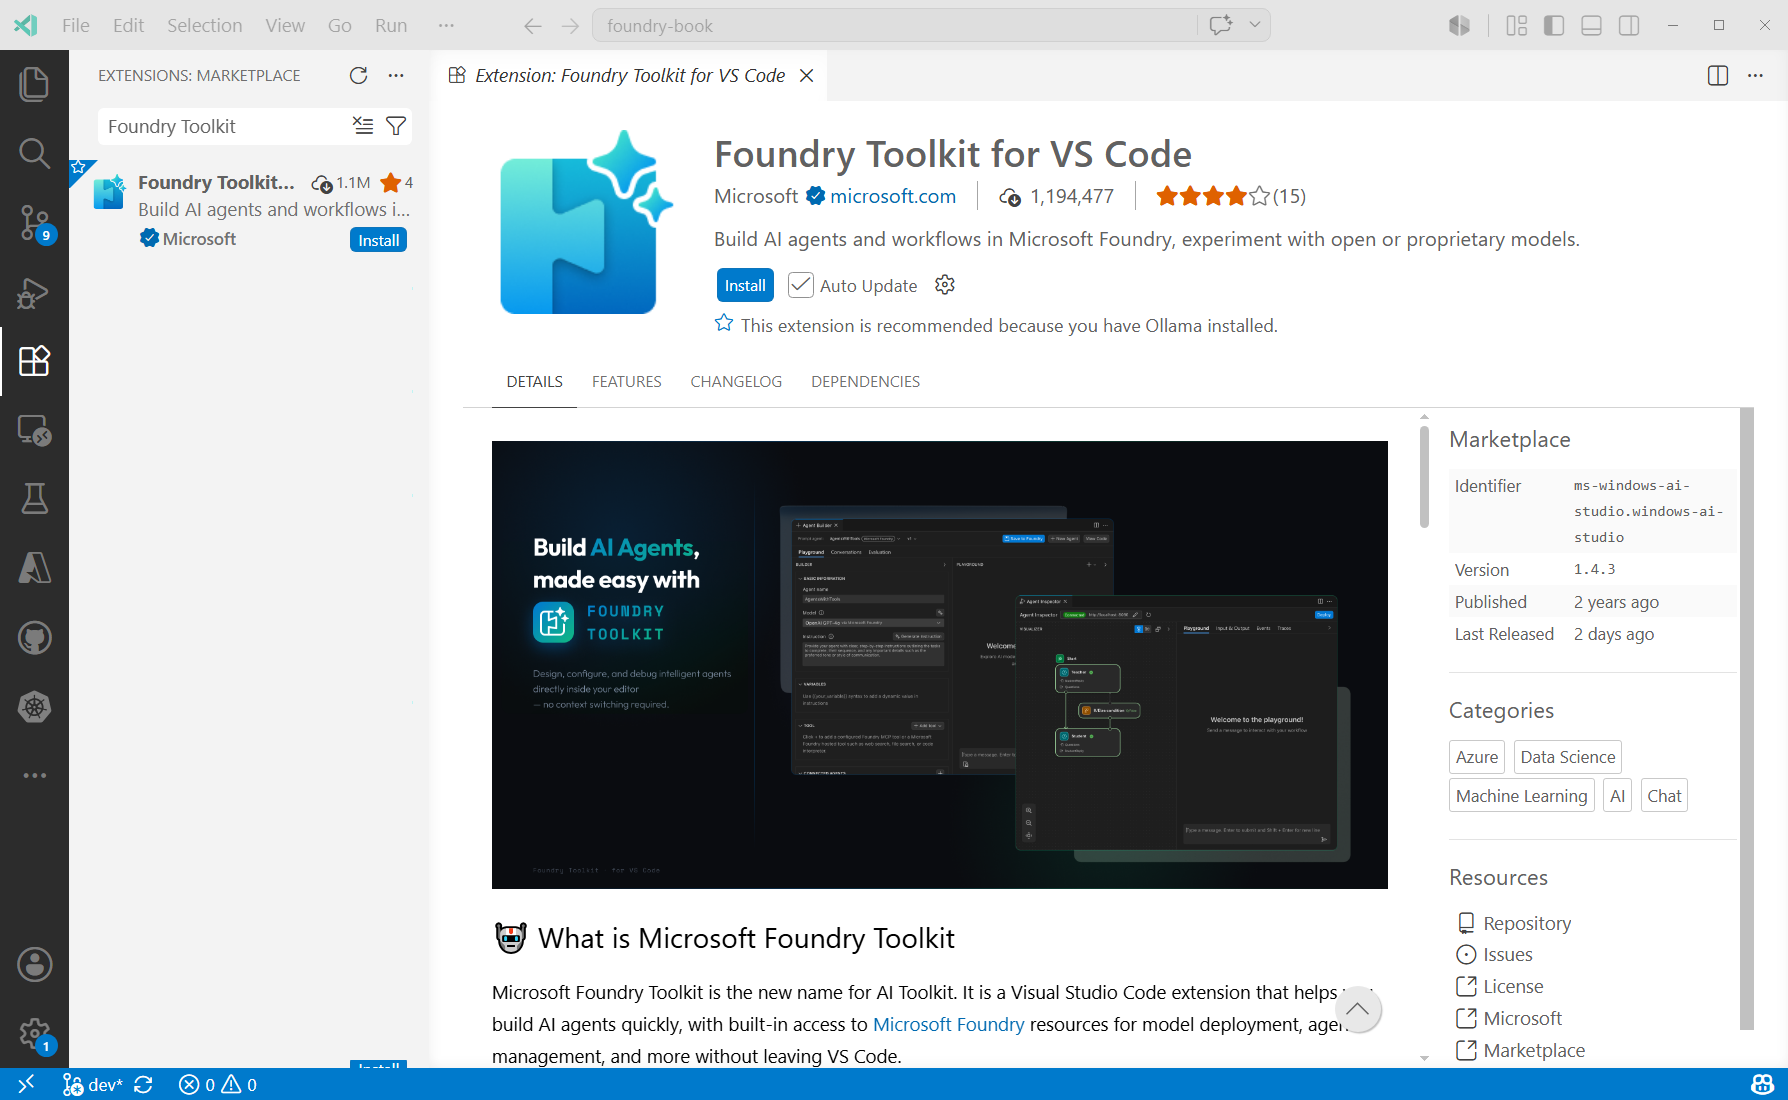
Microsoft Foundry Toolkit is a Visual Studio Code extension that allow you to build AI agents quickly right inside VS Code. It provides a Model Playground UI for chatting with hosted models along with functionality for managing Microsoft Foundry resources.
You can find the Foundry Toolkit extension in the VS Code marketplace by searching for “Foundry Toolkit” under the Extensions tab, as shown in Figure 9.12.
Once you install the extension, you’ll be prompted to log into both your Azure and GitHub accounts, as the tool can connect to models from Foundry and GitHub Copilot. After logging in and connecting it to your accounts, you’ll be able to manage your Foundry resources, explore the Tool and Model Catalogs, and build agents directly from VS Code. See Figure 9.13 for an example of what the Foundry Toolkit interface looks like within VS Code.
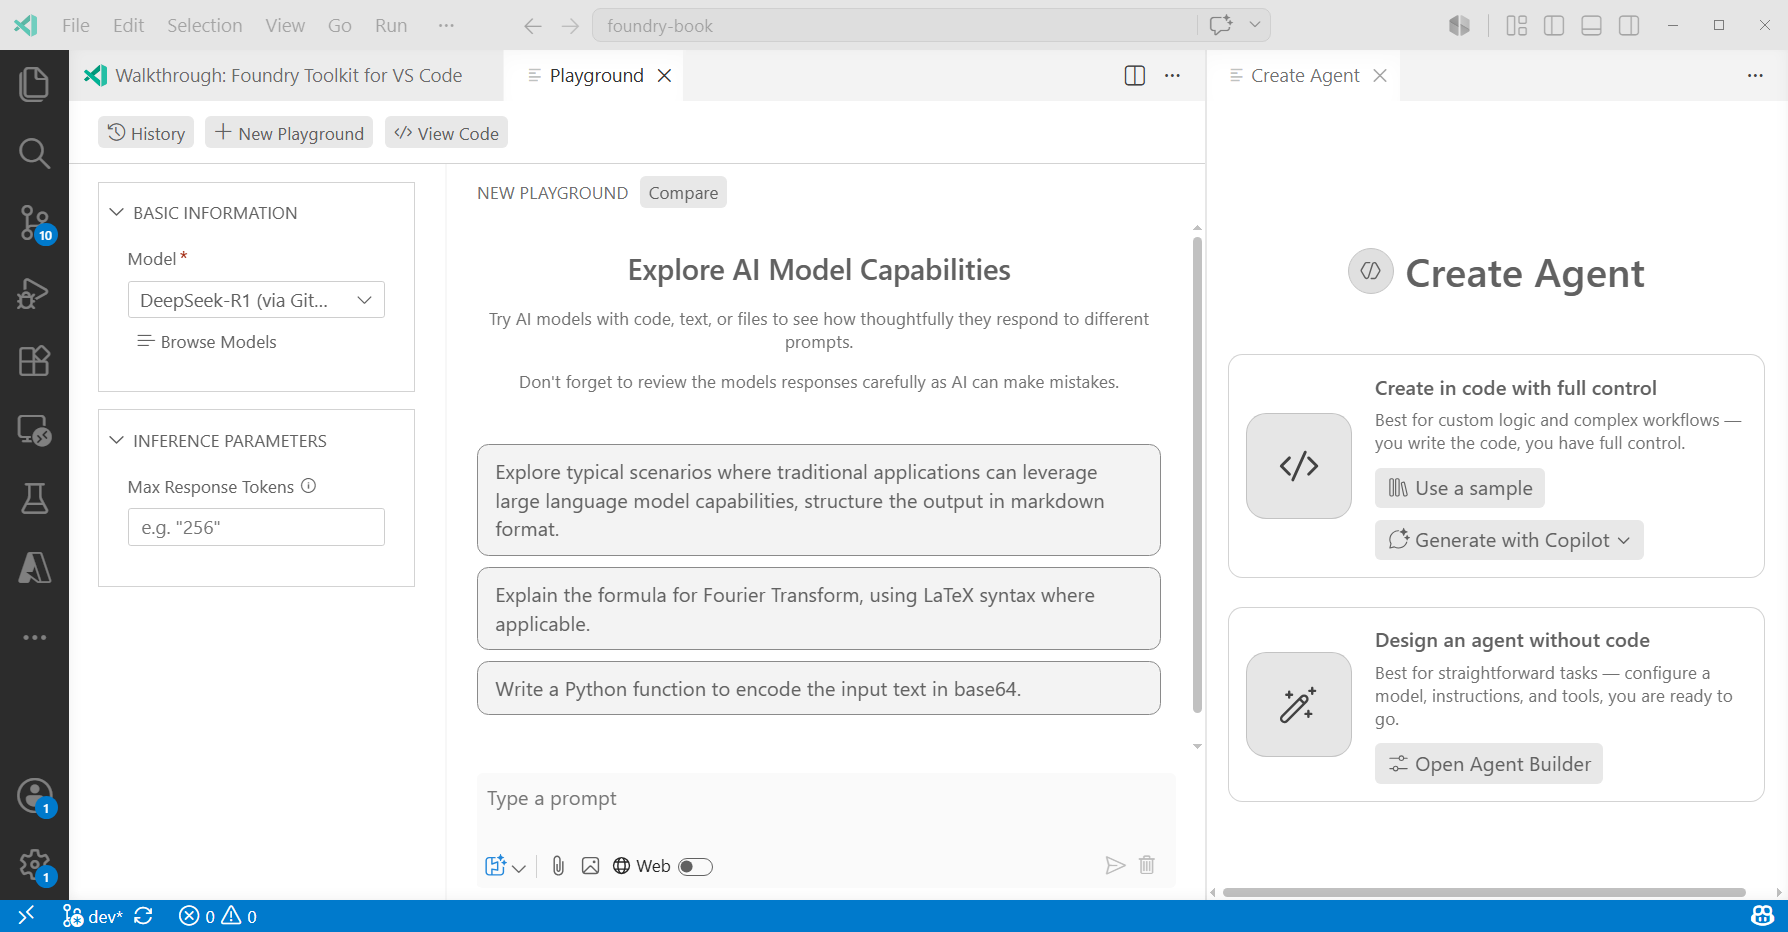
Alongside other Azure-based extensions for VS Code, such as Azure Tools and Azure Resources, the Foundry Toolkit provides a seamless experience for managing your Foundry resources and building agents without having to leave your development environment. You can create and manage your agents, deploy models, and even run your agents directly from VS Code.
9.2.4 Microsoft Agent Governance Toolkit
The Microsoft Agent Governance Toolkit is an open-source project that provides a set of tools and best practices for governing AI agents in production. It includes components for monitoring agent behavior, enforcing policies, and managing risks associated with AI agents. The toolkit is designed to help organizations ensure that their AI agents operate safely, ethically, and in compliance with regulatory requirements. This includes policy enforcement, zero-trust identity, execution sandboxing, and reliability engineering for autonomous AI agents.
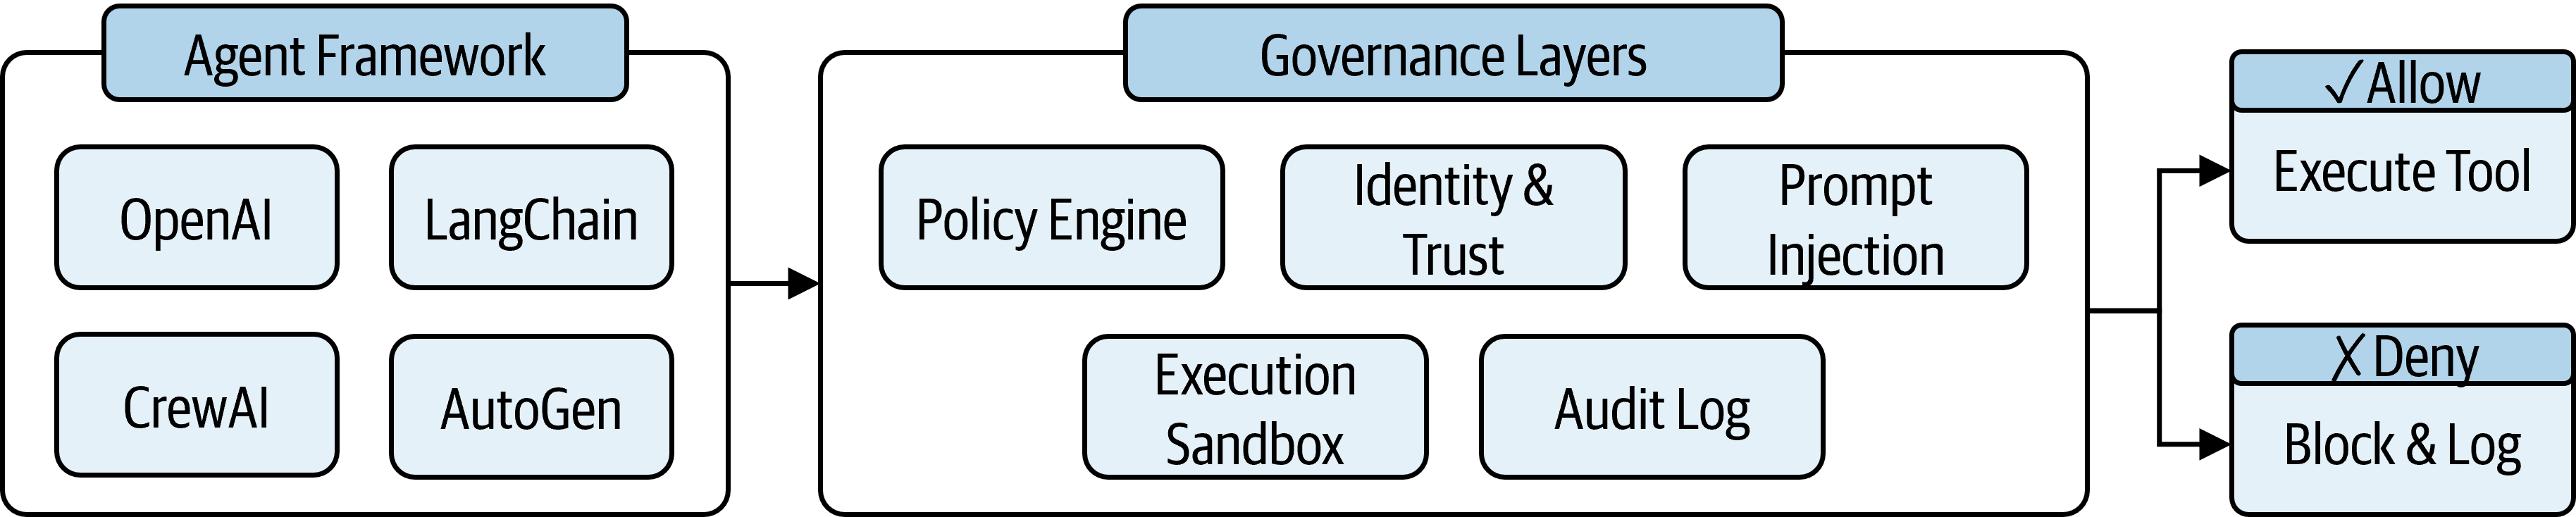
The toolkit is agent framework-agnostic (i.e., use OpenAI or LangChain or whatever) and provides multiple layers of governance checks that cover all of the Open Web Application Security Project (OWASP) Agent Top 10 security risks with over 9,500 built-in tests. As shown in Figure 9.14, the governance workflow includes multiple steps that result in either allowing or denying an agent’s action. This is not content moderation or prompt guardrails. This governs an agent’s actions rather than model inputs or outputs.
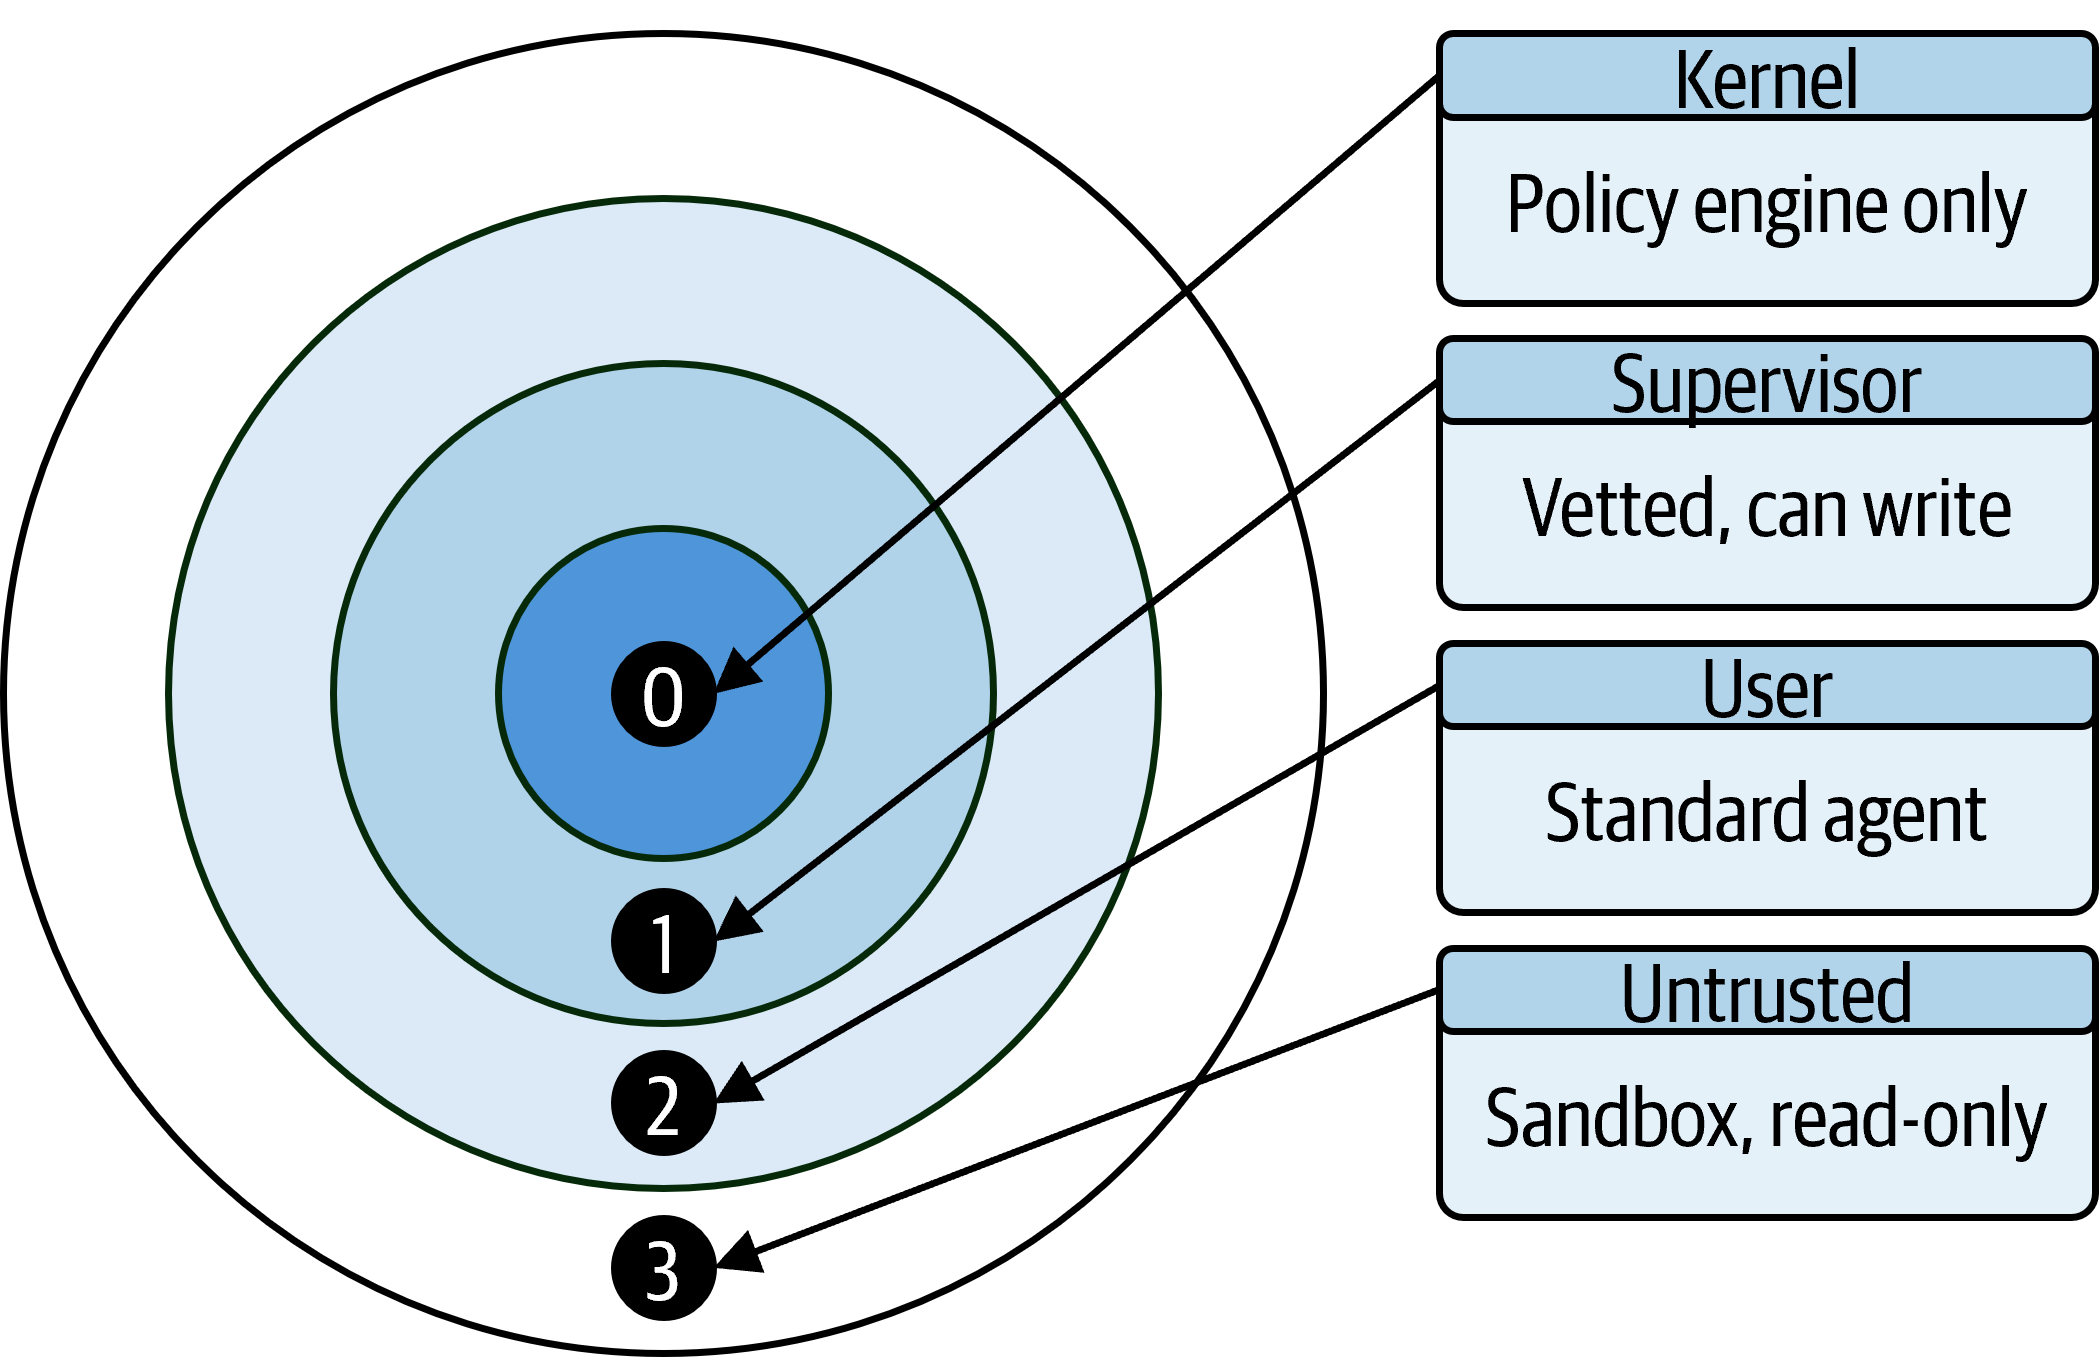
Similar to zero-trust paradigms for human users, this toolkit also includes a zero-trust model for agent identity and access management. The toolkit defines four privilege rings for agent identity, which are shown in Figure 9.15. Each ring has different levels of access and permissions, with Ring 0 being the most privileged and Ring 3 being the least privileged. All agents start at Ring 3, which locks the agent’s capabilities to a sandbox. Then, after earning trust through safe actions, an agent can be granted access to higher privilege rings with more capabilities. This approach helps to mitigate risks by ensuring that agents only have access to the resources and permissions they need to perform their tasks, and that they must earn trust over time through their behavior.
An example of how to use the policy evaluation component of the Microsoft Agent Governance Toolkit is shown in the following code block. In this example, we create a simple policy that blocks any tool calls to execute_code or delete_file. We then evaluate two different tool calls against this policy, one that is allowed and one that is blocked.
# pip install agent-governance-toolkit[full]
from agent_os.policies import *

evaluator = PolicyEvaluator(policies=[PolicyDocument(
    name="my-policy", version="1.0",
    defaults=PolicyDefaults(action=PolicyAction.ALLOW),
    rules=[PolicyRule(
        name="block-dangerous-tools",
        condition = PolicyCondition(
          field="tool_name",
          operator=PolicyOperator.IN,
          value=["execute_code", "delete_file"]
        ),
        action=PolicyAction.DENY, priority=100,
    )],
)])

result = evaluator.evaluate({"tool_name": "web_search"})    ## Allowed
result = evaluator.evaluate({"tool_name": "delete_file"})   ## Blocked
For more information about the Microsoft Agent Governance Toolkit, check out its GitHub repository: https://github.com/microsoft/agent-governance-toolkit.
9.3 Best Practices in Azure
As we’ve traversed through the various chapters of this book, we’ve touched on different technical considerations for building agents with Microsoft Foundry. However, I wanted to take a moment here at the end to summarize some of the best practices for cloud architecture that you can use as a starting point when designing your own Azure architecture for Foundry agents.
9.3.1 Infrastructure and Configuration Management
When designing an Azure-based architecture for your AI use cases, treat your infrastructure as software from day one. Use Azure Resource Manager (ARM) templates, Bicep, or Terraform to define your infrastructure as code. This allows you to version control your infrastructure, easily replicate it across environments, and avoid the painful “works in dev, broken in prod” problem that plagues manually provisioned systems. For Foundry-specific resources (model deployments, agent configurations, and knowledge base connections) consider keeping these definitions alongside your application code in source control so that infrastructure changes go through the same review process as code changes. An example Bicep snippet for deploying a Foundry resource and related components is shown here.
// Base Foundry resource
resource aiFoundry 'Microsoft.CognitiveServices/accounts@2025-06-01' = {
  name: aiFoundryName
  location: location
  kind: 'AIServices'
  ...
}

// Deploy a Project
resource aiProject 'Microsoft.CognitiveServices/accounts/projects@2025-06-01' = {
  name: aiProjectName
  parent: aiFoundry
  location: location
  ...
}

// Deploy a Model to the Project
resource modelDeployment 'Microsoft.CognitiveServices/accounts/deployments@2025-06-01'= {
  parent: aiFoundry
  name: 'gpt-4.1-mini'
  ...
}
Microsoft provides multiple Bicep and Terraform templates on its GitHub repo: https://github.com/microsoft-foundry/foundry-samples/tree/main/infrastructure/infrastructure-setup-bicep.
9.3.2 Security and Identity
AI agents can be surprisingly powerful actors in your organization, and with that power comes great responsibility (and risk). Thus, controlling what they can access and do is paramount. My recommendation is to leverage Azure’s native security and identity services such as Microsoft Entra ID for authentication and Azure Key Vault for secrets management. When connecting an Agent to downstream services, always use managed identities to avoid storing credentials. In other words, as a general rule, never embed API keys or connection strings directly in your agent’s instructions or tool definitions. These will inevitably end up in logs, conversation histories, and screenshots. When you use managed identities, your agents can authenticate to downstream services without any credentials ever being stored.
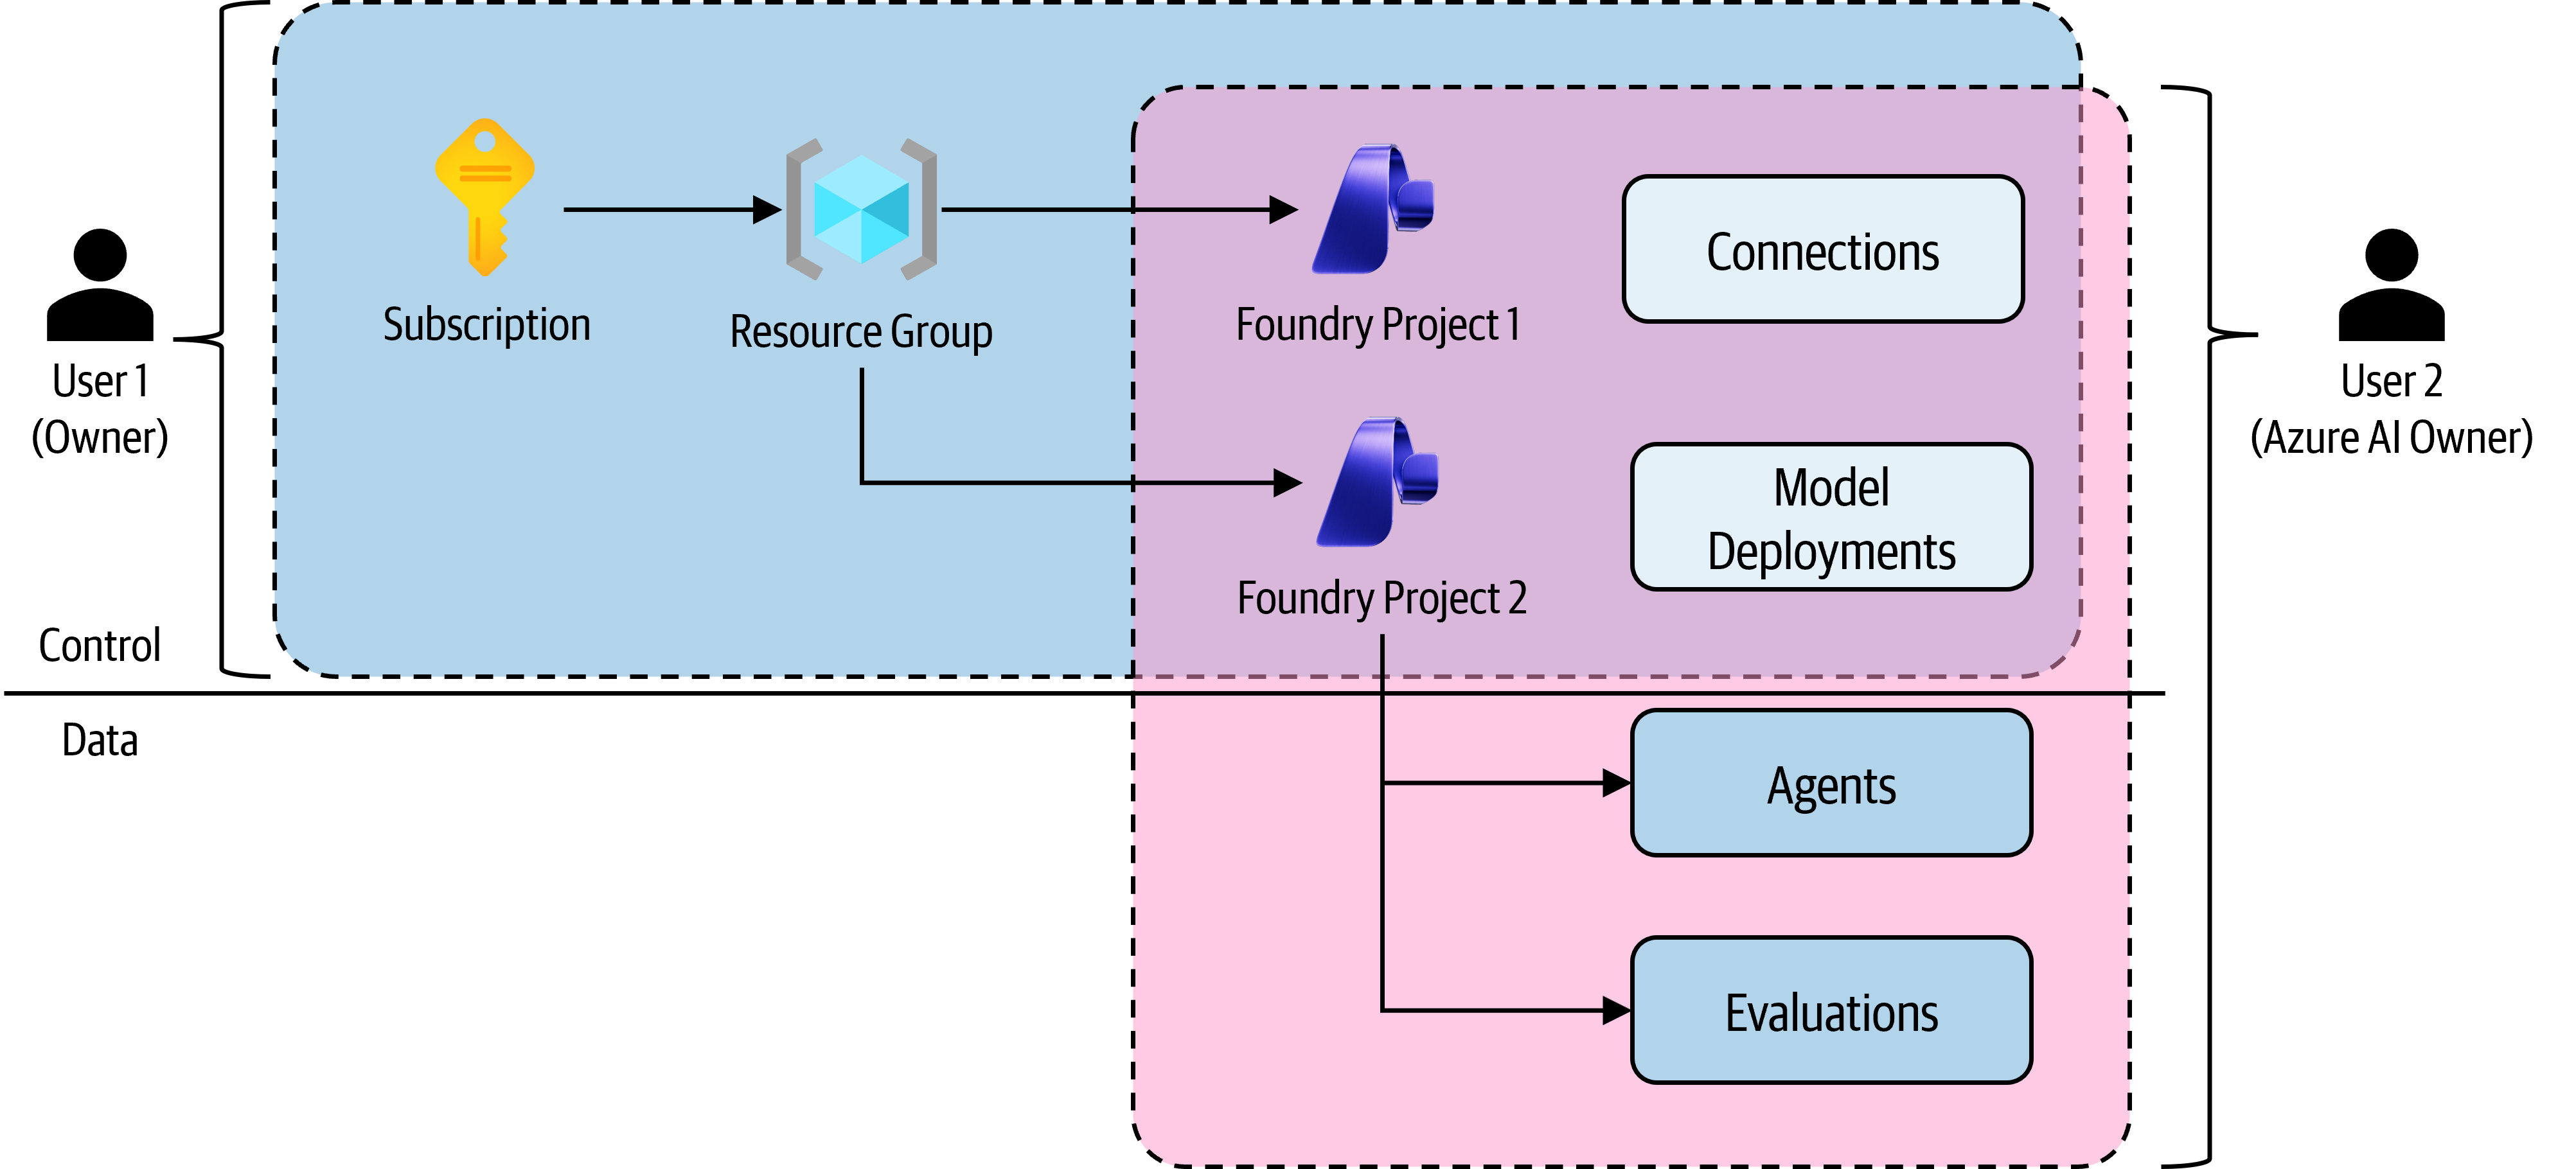
Also, role-based access controls (RBAC) can be applied on each resource to ensure that only authorized users can perform specific actions. For example, as shown in Figure 9.16, you can set up RBAC for your Foundry resources separately from the RBAC for your Azure resources (e.g., the Subscription and Resource Group). This allows you to have fine-grained control over who can access and manage your Foundry agents and projects, which is especially important in larger organizations with multiple teams and stakeholders involved in AI initiatives.
Follow the principle of least privilege rigorously. That is, an agent that only needs to read from a database should never be granted write access, even if it’s “more convenient.”
If you’re using the Microsoft Agent Governance Toolkit discussed earlier in this chapter, the privilege ring model provides a concrete framework for operationalizing this principle across your agent fleet.
9.3.3 Observability
You can’t improve what you can’t see. Use Azure Monitor and Application Insights to set up end-to-end observability for your agents. At a minimum, you should be tracking latency per tool call, token consumption per session, error rates by agent and by model, and the ratio of successful task completions to abandoned sessions. From the Foundry portal, you can see an Agent’s telemetry in the Monitor tab, as shown in Figure 9.17. This provides a high-level overview of the agent’s performance and can help you identify any issues or bottlenecks in your agent’s interactions.
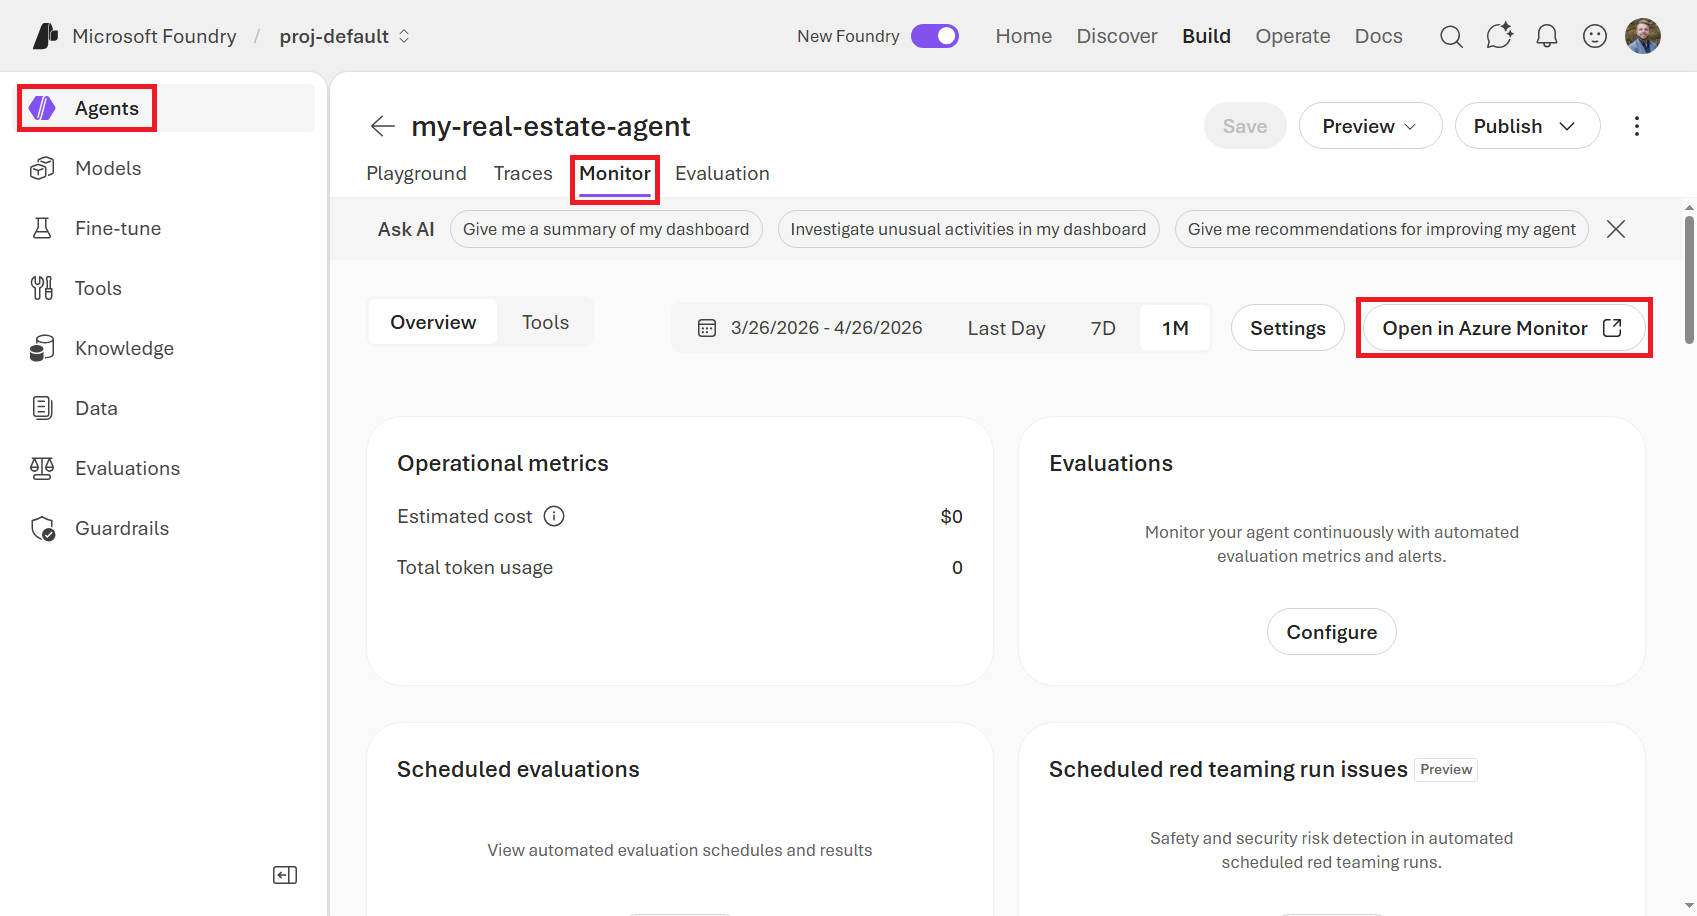
Then, if you click on the Open in Azure Monitor button, it will redirect you to the Application Insights service, where you can access the detailed monitoring information for the Foundry Project. Foundry’s native tracing integrates with Application Insights automatically, so you can correlate a user-facing error all the way back to the specific tool call or model response that caused it. See Figure 9.18 for what the Application Insights screen looks like for a Foundry Project. This level of observability is crucial for maintaining the reliability and performance of your agents, especially as they grow in complexity and scale.
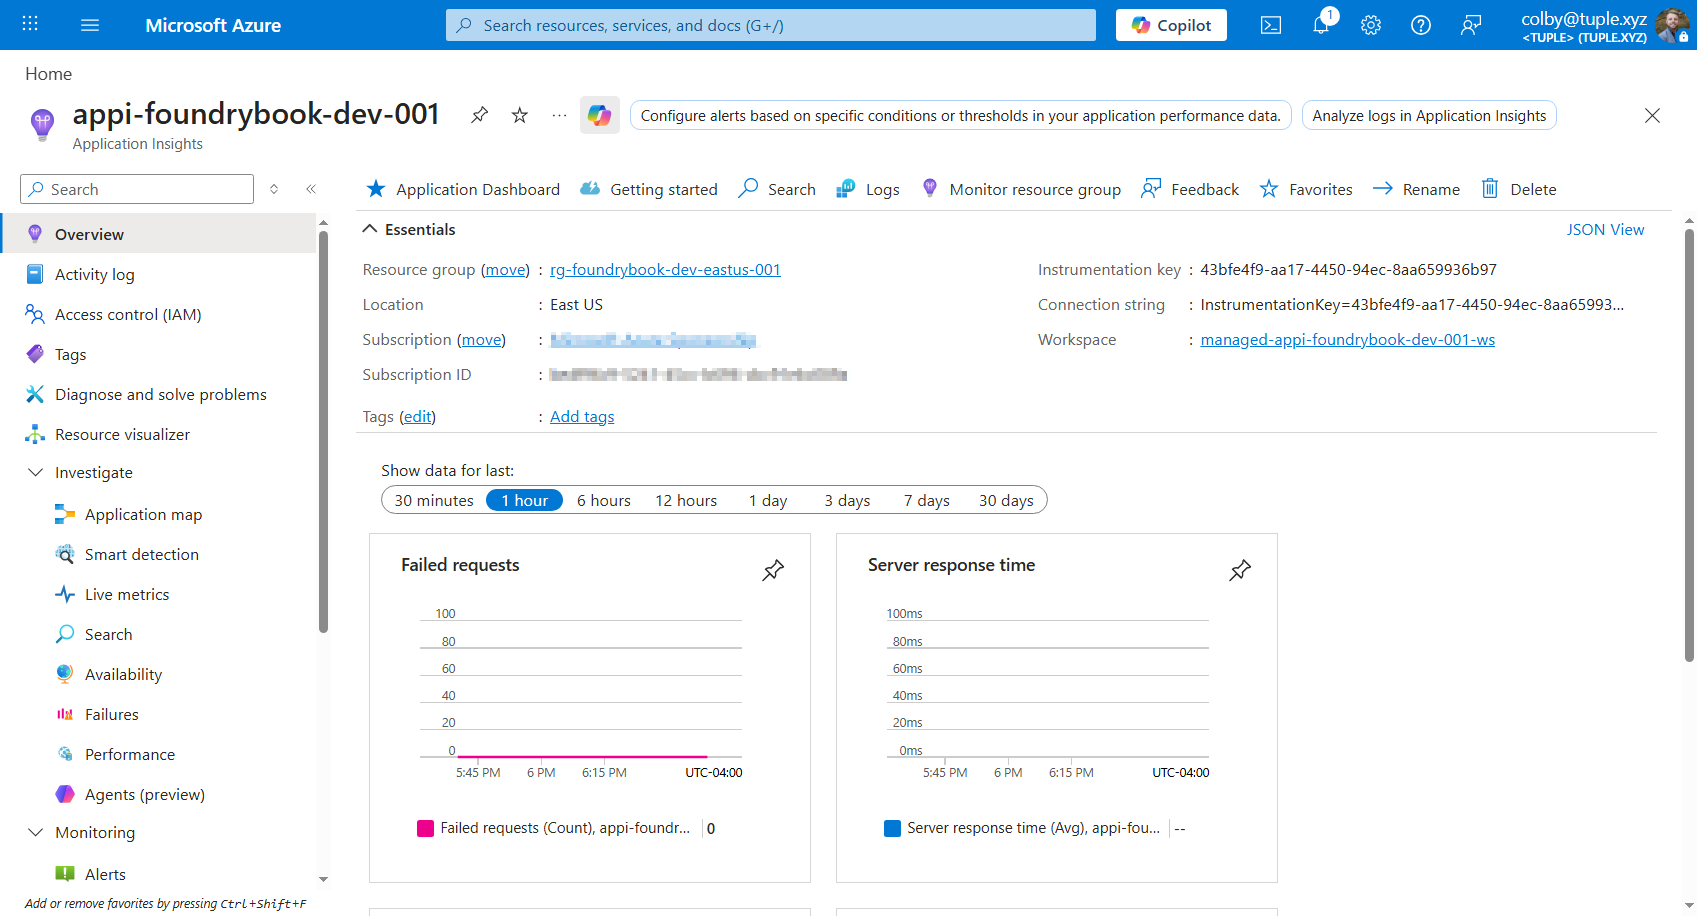
Spend some time clicking around the Application Insights pages to see the different types of telemetry that are available and how to use them to analyze your agent’s behavior. Beyond standard telemetry, consider instrumenting your agents with semantic logging, capturing not just that a tool was called, but what the agent was trying to accomplish when it called it. This makes post-incident analysis and prompt tuning significantly easier.
9.3.4 Scalability and Cost Management
Design for scalability by leaning on Azure’s managed services. These include Azure Kubernetes Service (AKS) for containerized workloads, Azure App Service for web-facing components, and Azure Service Bus or Event Grid for decoupling high-throughput agent pipelines. However, resist the urge to over-engineer up front. Start with simpler, fully managed services and migrate to more complex orchestration only when you have real workload data justifying the operational overhead.
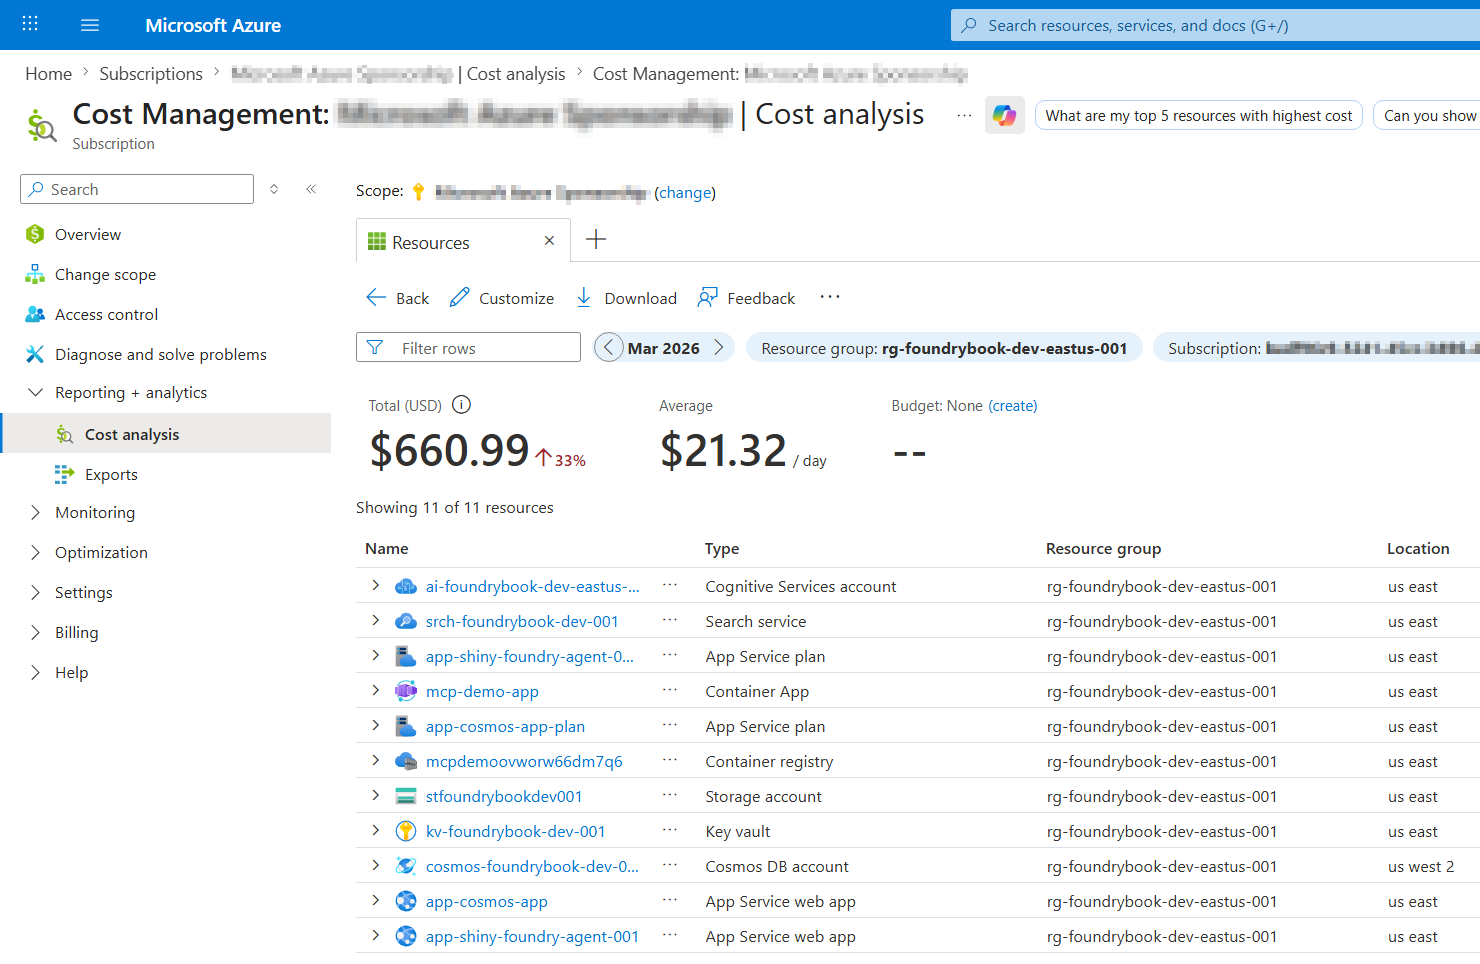
Cost management is often an afterthought with AI workloads, but it shouldn’t be. Token costs compound quickly at full scale. Set up Azure Cost Management budgets and alerts scoped to your Foundry resources from the very beginning. Tag all Foundry-related resources consistently (e.g., workload: foundry-agents, env: prod) so you can slice cost reports by agent, by team, or by environment without guesswork.
As shown in Figure 9.19, you can view the Cost Management screen in the Azure portal for your Foundry-related resources. This view allows you to monitor and analyze your spending patterns. This will help you identify any unexpected cost spikes and optimize your agent’s performance and cost-efficiency over time.
9.3.5 Reference Architectures
Lastly, I’d like to show a couple of reference architectures of varying complexity that illustrate how you might integrate Foundry agents into an Azure-based cloud estate. These are not prescriptive templates, but rather examples to spark ideas for how you can design your own architecture based on your specific use case and constraints.
Remember that one main benefit of Microsoft Foundry is that you get a simple model or agent endpoint that you can easily integrate into your apps. So, in many cases, your architecture might be as simple as a web app that calls out to Foundry for AI capabilities. However, as your needs grow, you might find it beneficial to introduce additional Azure services for orchestration, integration, or security.
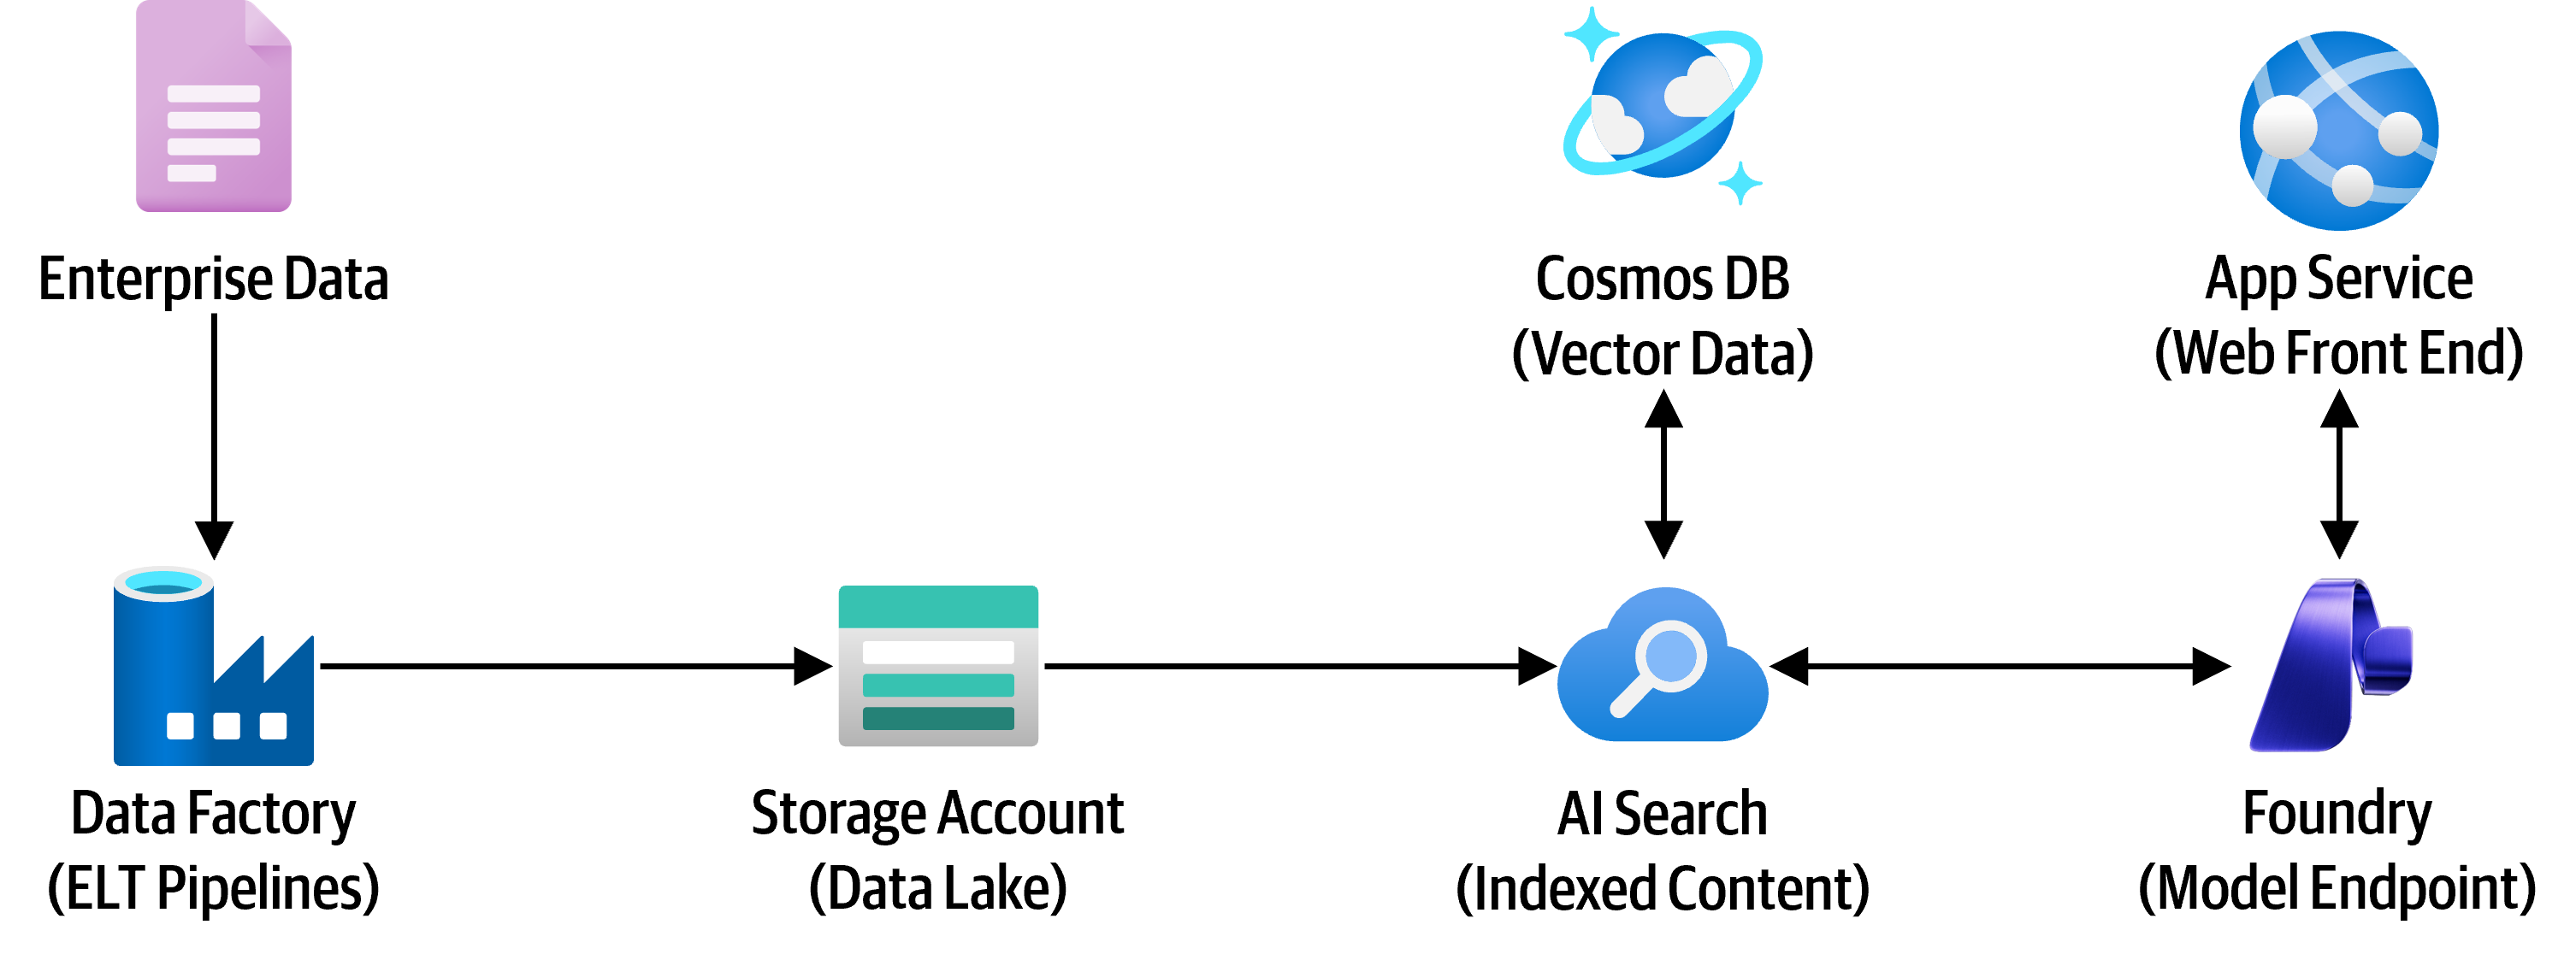
Figure 9.20 shows a basic architecture where the ingestion and processing of enterprise data is orchestrated by Azure Data Factory and lands in an Azure Storage Account (data lake). Then, that data is indexed using Azure AI Search and stored in a Cosmos DB vector store. Then, an Agent deployed in Foundry can communicate with the data via a knowledge base (for a RAG-based approach). Then, the Foundry agent is integrated into a web application that users will access. While simple, this is a pretty common architecture pattern for an enterprise AI application, and it leverages a number of standard Azure data services in conjunction with Foundry to provide a robust and scalable solution.
Next, let’s get a bit more technical with networking and security. In Figure 9.21, we have a similar architecture to the previous one, but this time it’s deployed within a Virtual Network (VNet) with private endpoints for all services. The Foundry agent is deployed in a private subnet with no outbound internet access, and it communicates with the data services over private endpoints. This architecture provides an additional layer of security by isolating all resources within a VNet and eliminating any public internet exposure. You’ll likely see this type of architecture in more security-conscious organizations or for use cases that involve sensitive data. It does add some complexity in terms of setup and maintenance, but it can be worth it for the enhanced security posture.
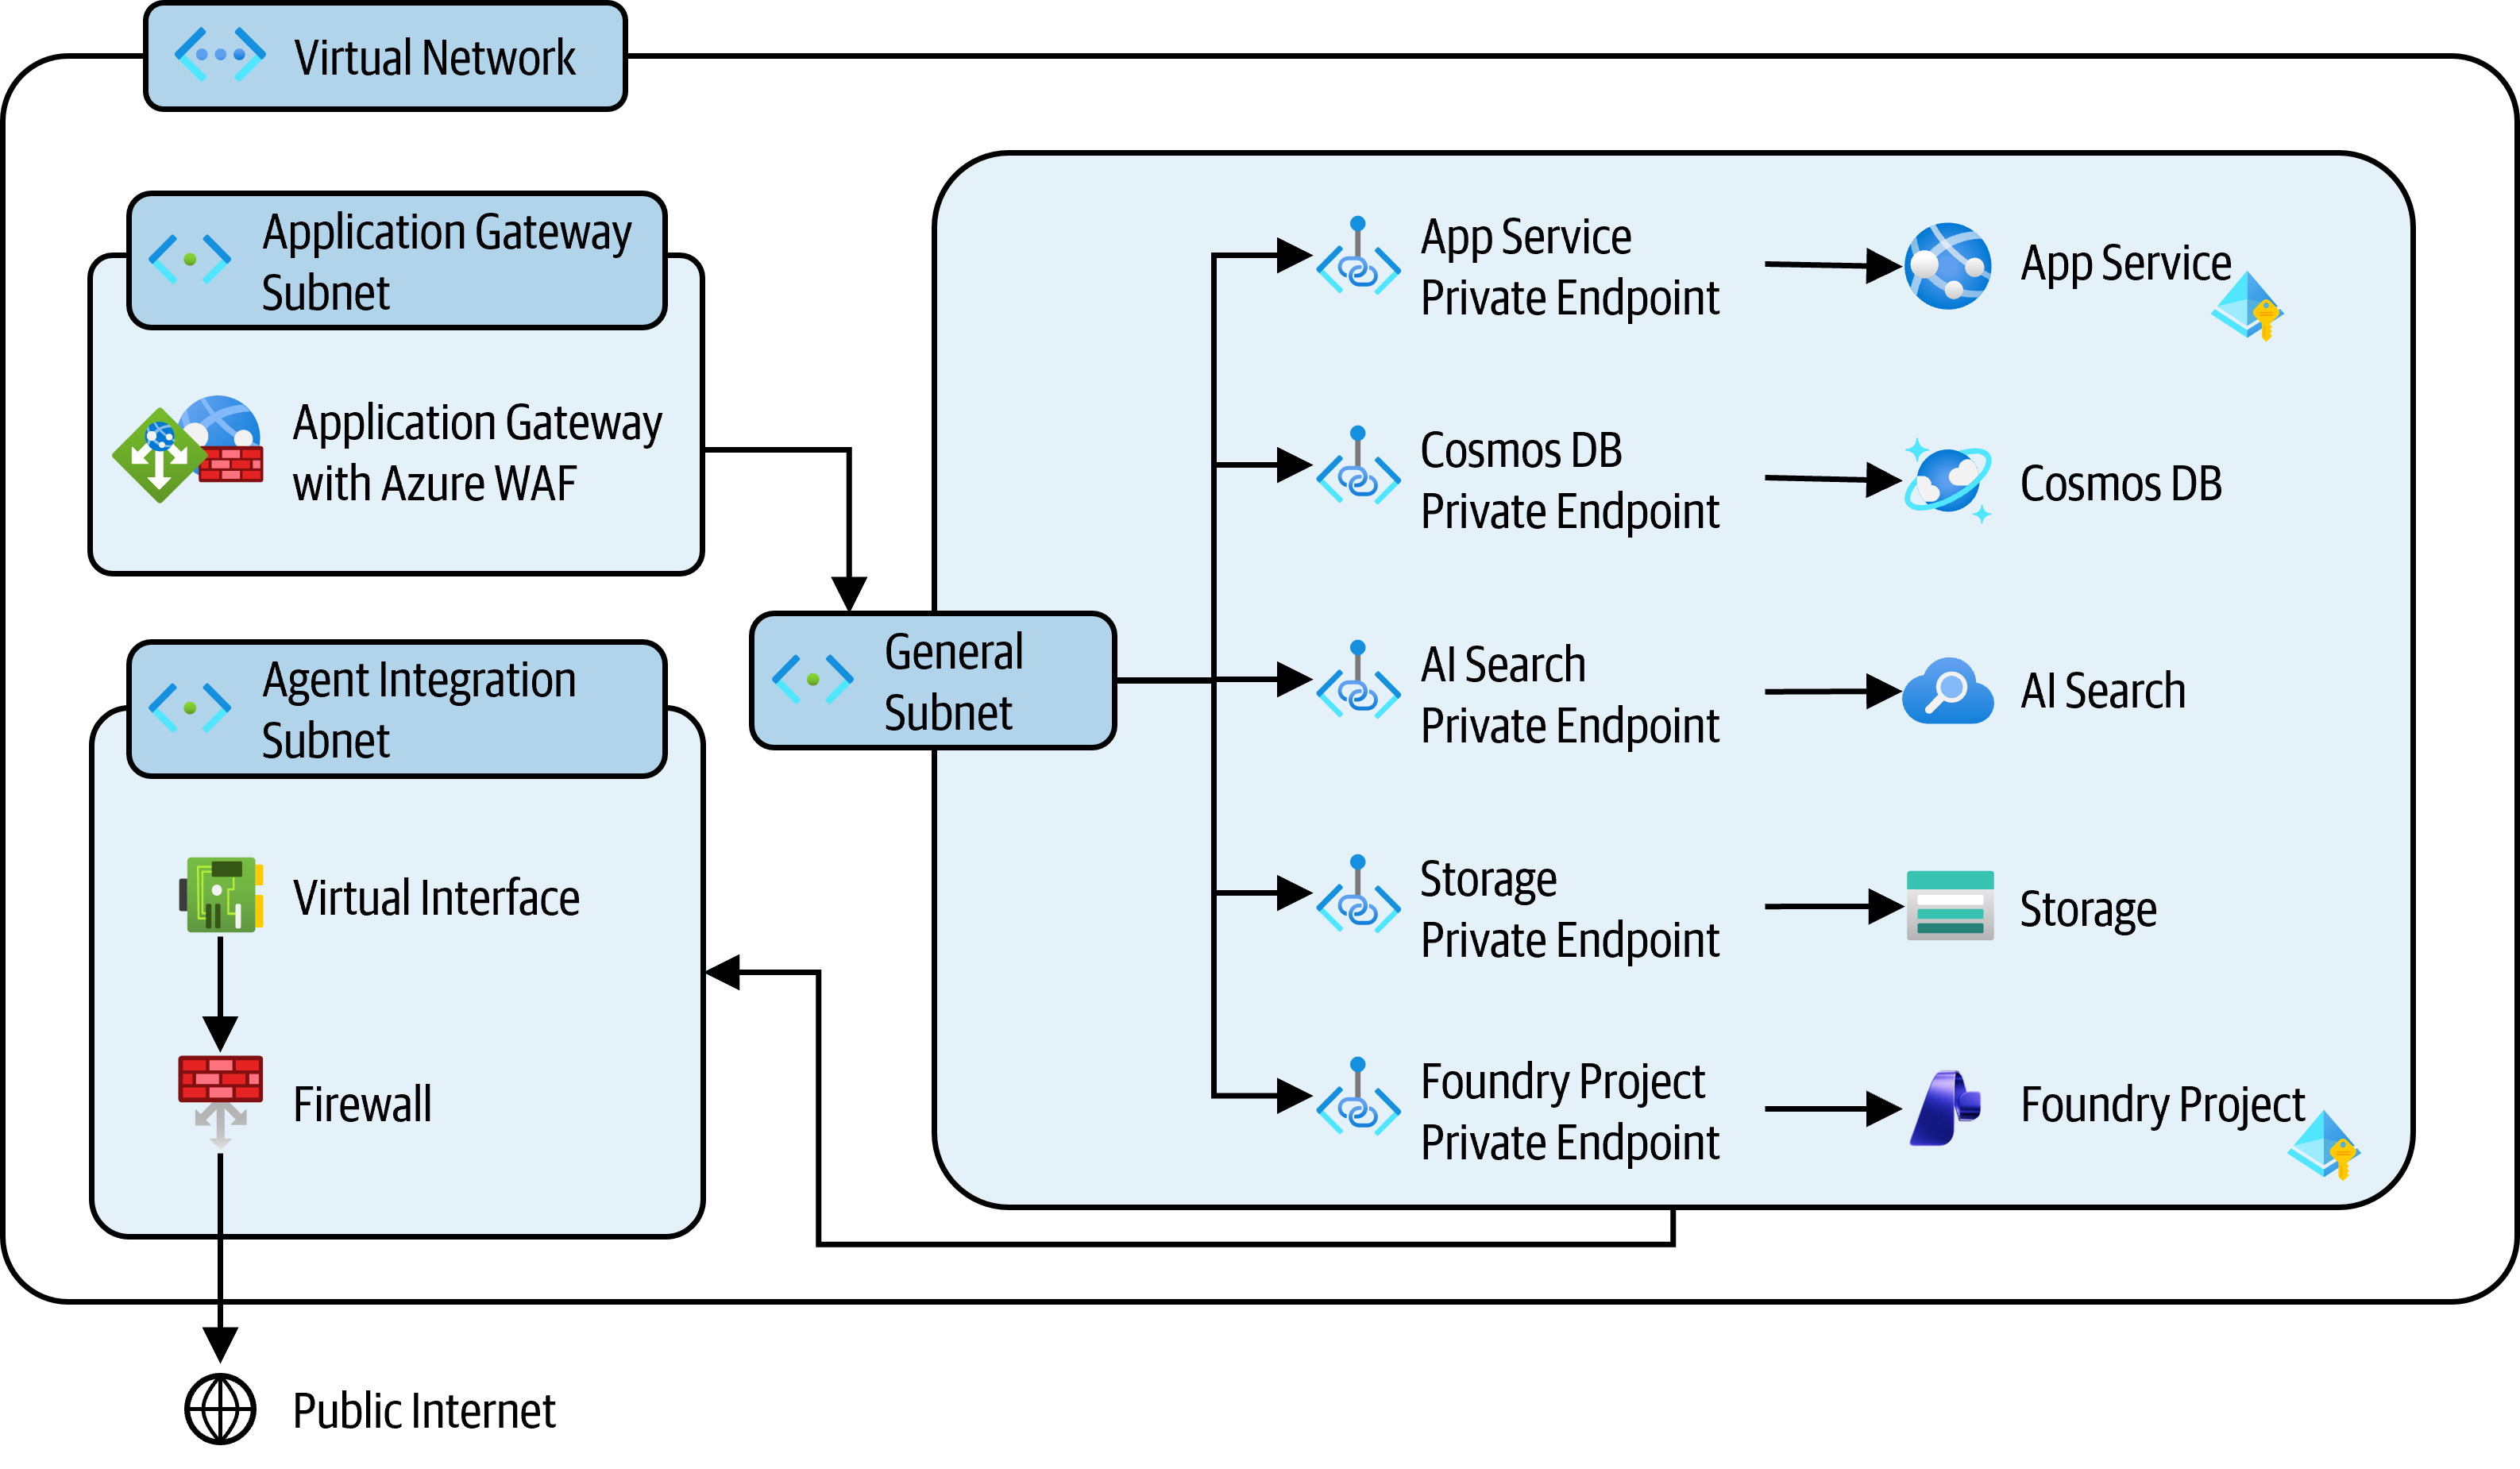
These examples are just two of many possible architectures for integrating Foundry agents into an Azure-based cloud environment. For more reference architectures related to Microsoft Foundry, check out the Azure Architecture Center: https://learn.microsoft.com/en-us/azure/architecture/browse/?products=microsoft-foundry.
9.4 Final Thoughts
I suppose all good things must come to an end, but the party has just begun! As we conclude this journey through Microsoft Foundry, remember that AI is not just about technology. It’s about empowering people to accomplish more. The patterns, practices, and architectures presented in this book provide a foundation, but your creativity and domain expertise will ultimately determine success. I encourage you to experiment, iterate, and share your learnings with the community. The future of enterprise AI is being formed now.
Key takeaways:
- Start Simple: Begin with a focused use case and expand gradually
- Security First: Build security and compliance in from the start
- Measure Everything: Use observability to understand and improve
- Iterate Rapidly: Collect feedback and continuously refine
- Scale Thoughtfully: Plan for growth but don’t over-engineer initially
- Stay Current: AI technology evolves rapidly; keep learning
As AI continues to evolve, Microsoft Foundry will evolve with it, providing new capabilities, models, and tools. The fundamentals of good engineering will remain: clear requirements, solid architecture, comprehensive testing, and continuous improvement.
I encourage you to experiment, build, and share your learnings with the community. Be sure to show off what you’ve built online.
Next Steps:
- Visit the Microsoft Foundry portal to start building.
- Join the Microsoft Foundry community.
- Keep an eye on the Dev Blog: https://devblogs.microsoft.com/foundry for updates and best practices.
- Explore the documentation.
- Work through the Foundry examples on GitHub: https://github.com/microsoft-foundry/foundry-samples.
- Share your success stories and learn from others.
Thank you for reading and, as always, stay curious…