2 Model Deployment
In this chapter, we’ll learn how to deploy models in Microsoft Foundry. Models are brains of any AI agentic solution, so picking the right model for your use case and knowing how to deploy it are critical first steps in building agentic solutions.
Microsoft Foundry provides a wide variety of models that you can deploy with just a few clicks or lines of code. You can choose from popular proprietary models from OpenAI and Anthropic, Microsoft-built models like Phi-4 and MAI-Thinking-1, and even open-source models from Hugging Face. In addition to the variety, Foundry also provides tools to help you compare models across various benchmarks and metrics to help you pick the best model for your specific use case. Once you’ve picked a model, you can deploy it in just a few minutes without needing to manage any infrastructure. After deployment, you’ll then be able to interact with your model through an API endpoint or through the built-in Playground in the Foundry portal.
2.1 Explore Models in the Foundry Portal
Let’s learn how to explore and deploy various AI models from the Foundry Models registry. In later chapters, we’ll also explore some pre-built MCP tools for connecting to data sources.
From the Foundry portal, navigate to the Discover tab at the top of the screen as shown in Figure 2.1.
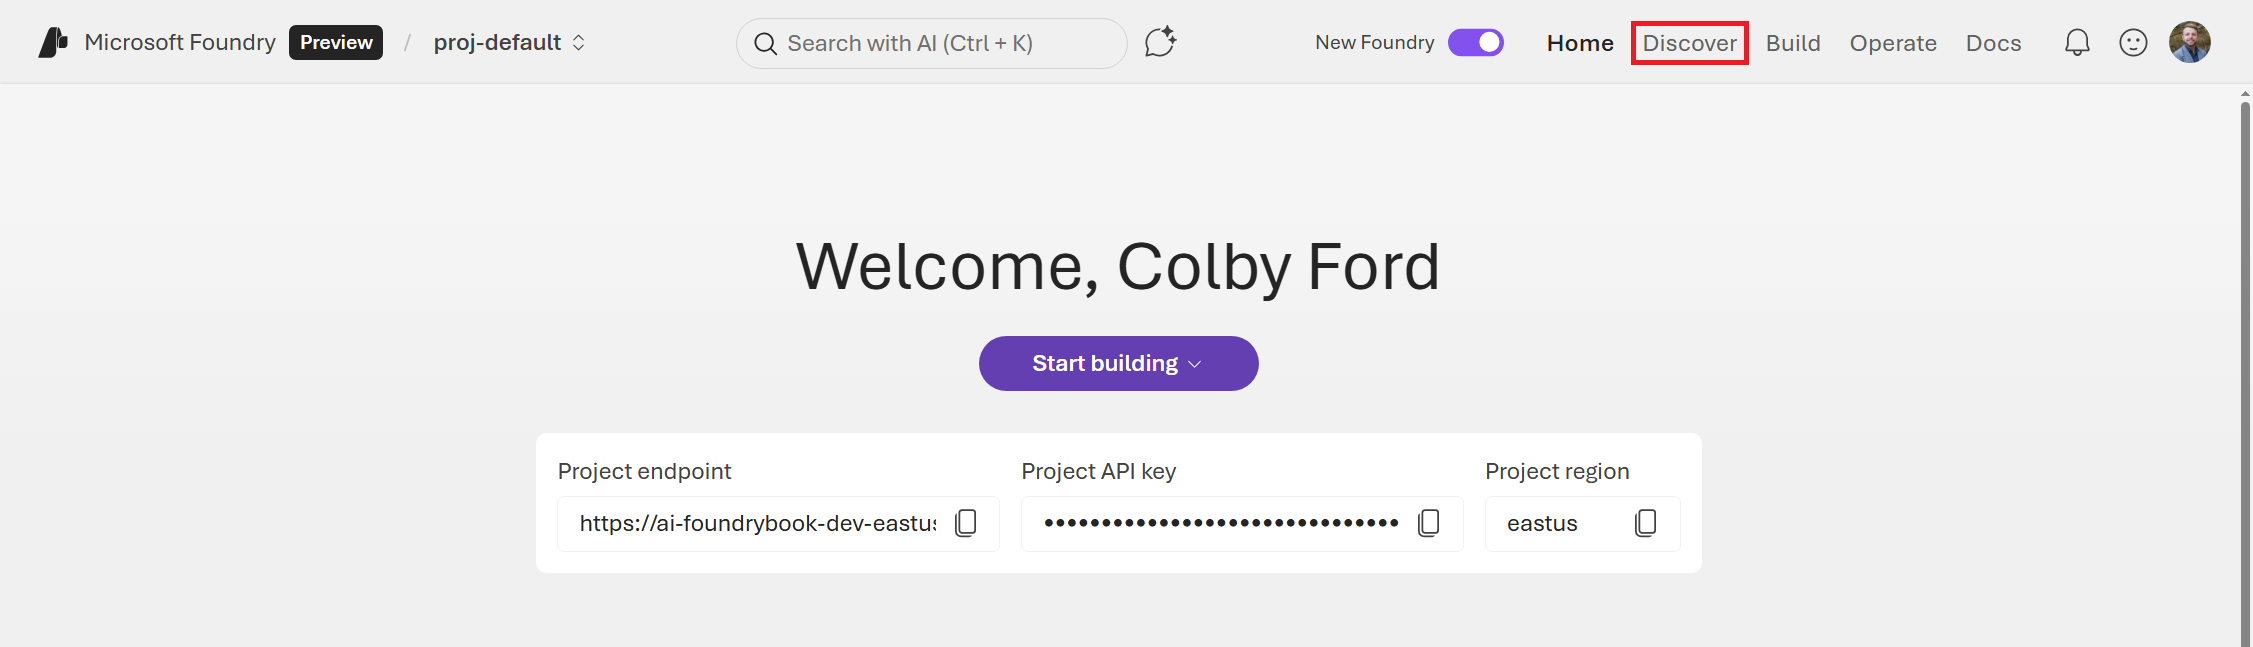
You’ll see a list of featured models can be deployed. You may notice that some are popular proprietary models like OpenAI’s GPT-5.2 and Anthropic’s Claude Opus 4.5 and others may be open-source models from Hugging Face or Microsoft.
But why deploy a model like GPT or Claude on Foundry when we can just can use them for free online? The most simple answer to that is: privacy. When you use ChatGPT or other free models online, your inputs can be used for training future models. While this may be fine personally for writing cover letters or generating blog content, this may not sit well in the enterprise space with proprietary data. Thus, deploying instances of these foundation models in your own Azure Tenant gives you much more control over where your data ends up. Plus, as you’ll see soon, we have a lot more control over model behavior with Foundry-deployed models over the public versions of these models.
Once you’re done browsing the Discover page, click on Models on the left-hand menu, shown in Figure 2.2.
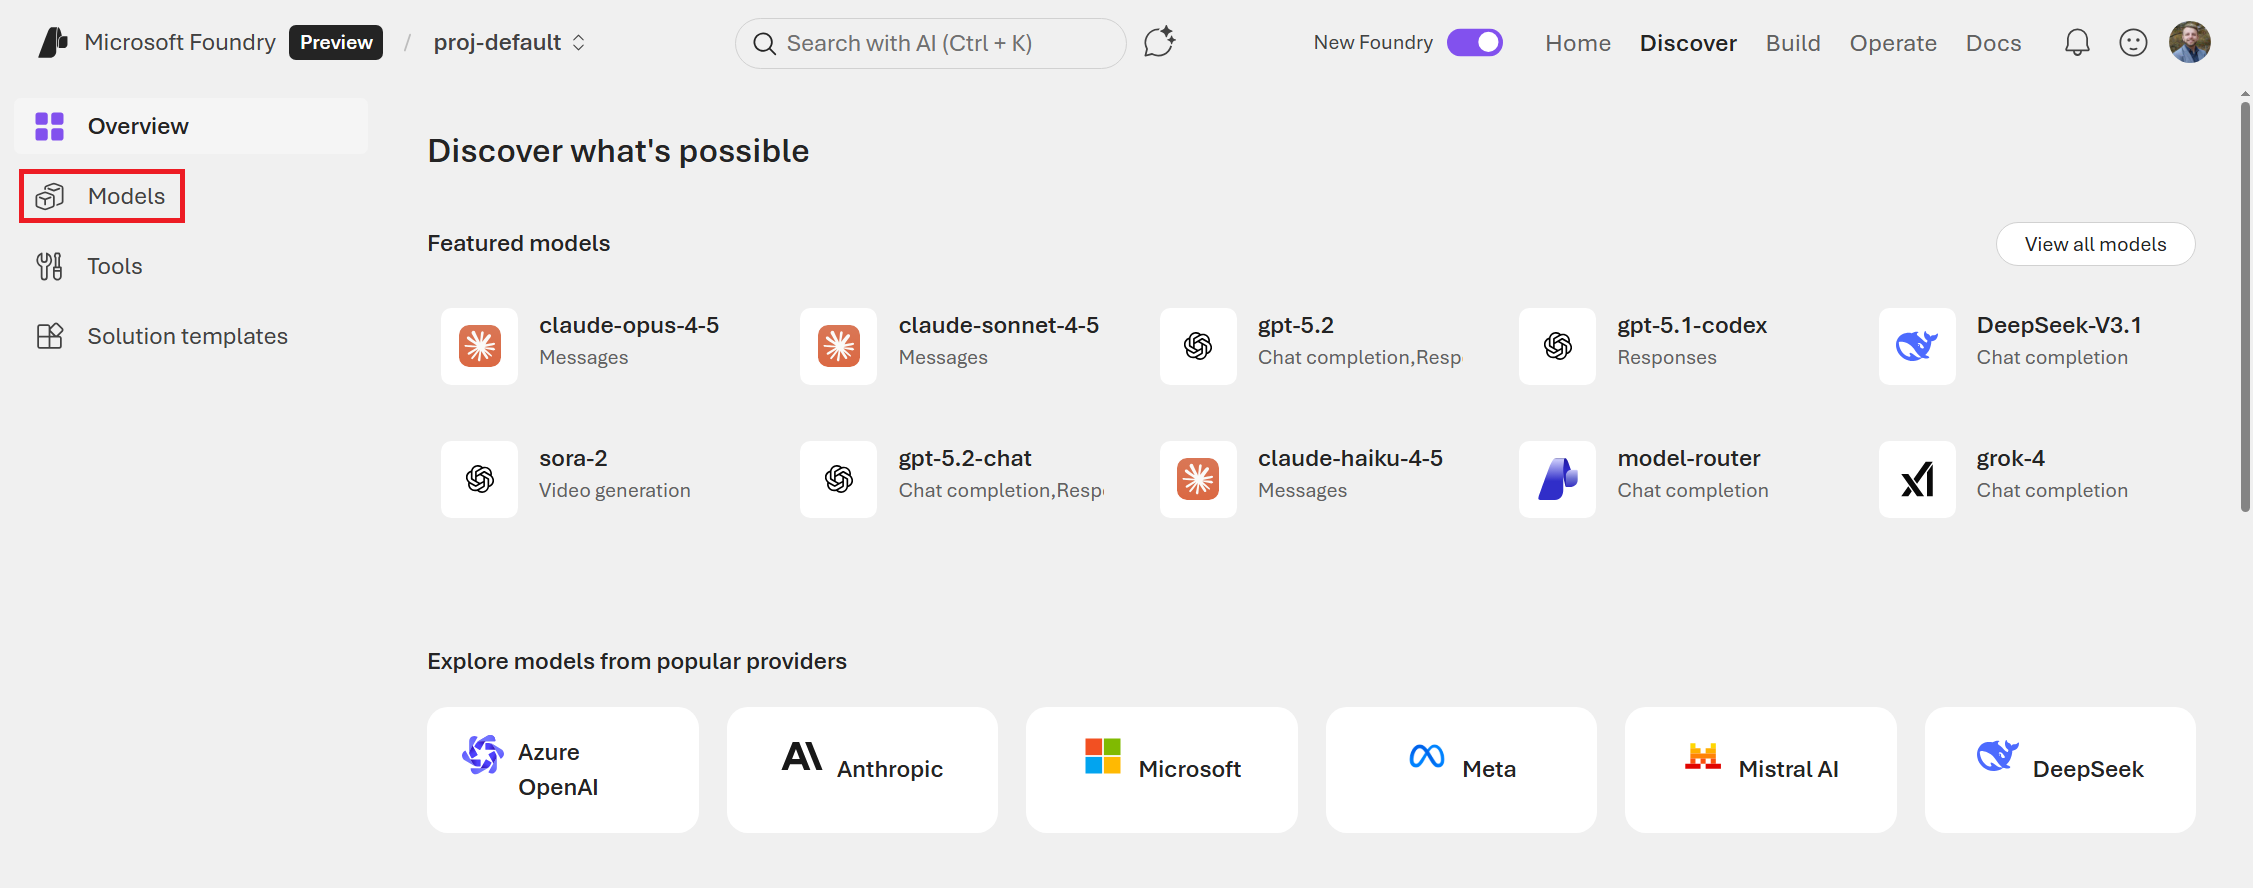
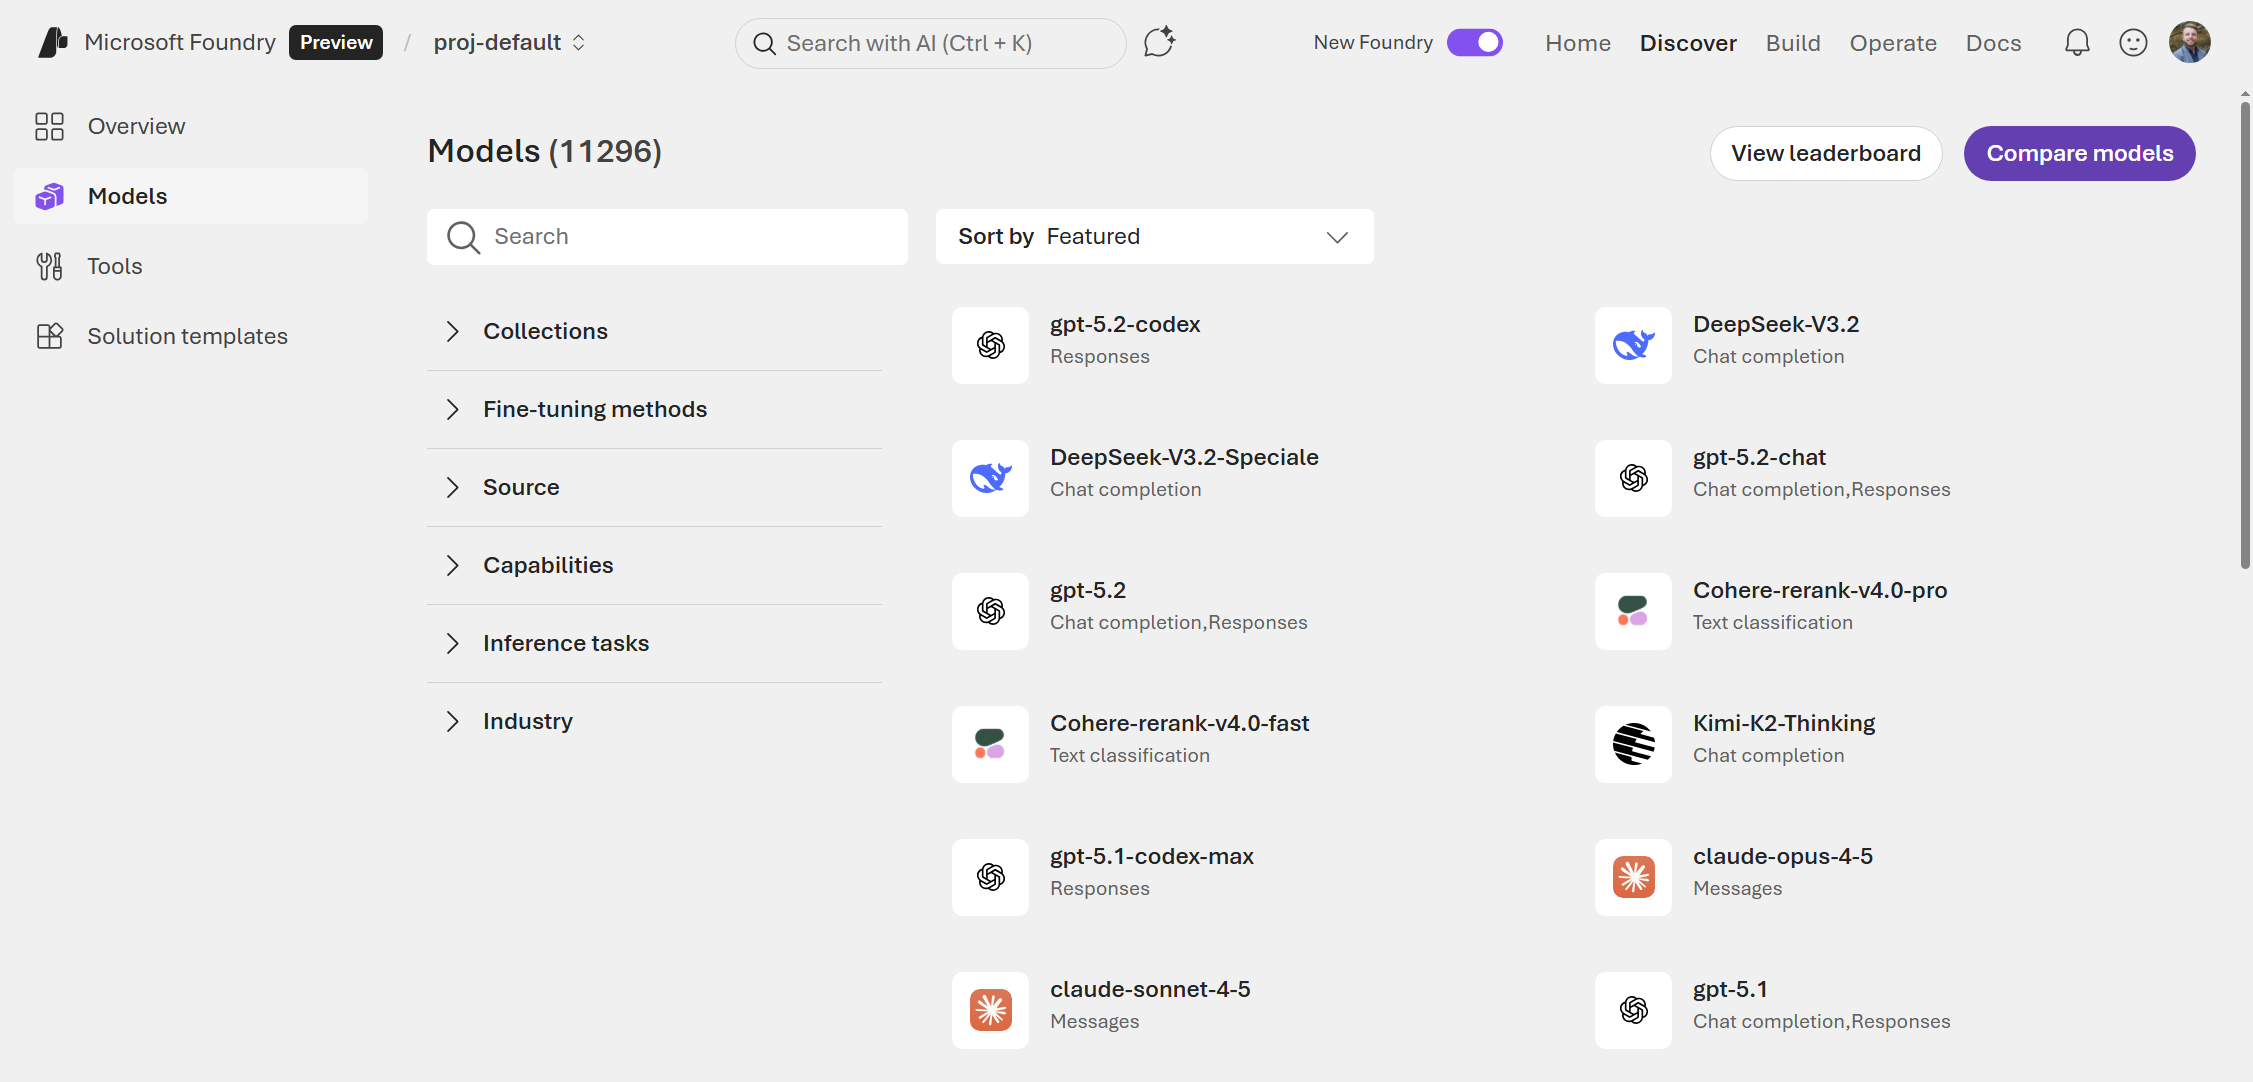
This will take you to the full list of models currently available in Foundry. There are currently over 10,000 models that you can deploy and the list is continuously growing. You’ll quickly notice that Foundry isn’t just for LLMs. There are models for image generation, audio generation, document analysis, text classification, 3D object generation, translations, and even protein modeling!
On this page, you can filter by source (the company or group that produced the model), capabilities (like reasoning or if the model can accept images as an input), inferencing task (such as text or image generation), and other features. Spend some time playing with these filters and exploring the vast variety of models that you can deploy with Foundry. See Figure 2.3 for an example of what the model catalog looks like.
2.2 Comparing Model Performance
As you’re exploring, you may be overwhelmed with the number of choices that you have, even for the same type of task. Let’s learn how to compare models to pick the best one for your needs.
At the top right of the screen, shown in Figure 2.4, you’ll notice two buttons: View leaderboard and Compare models. Click on the Compare models button.

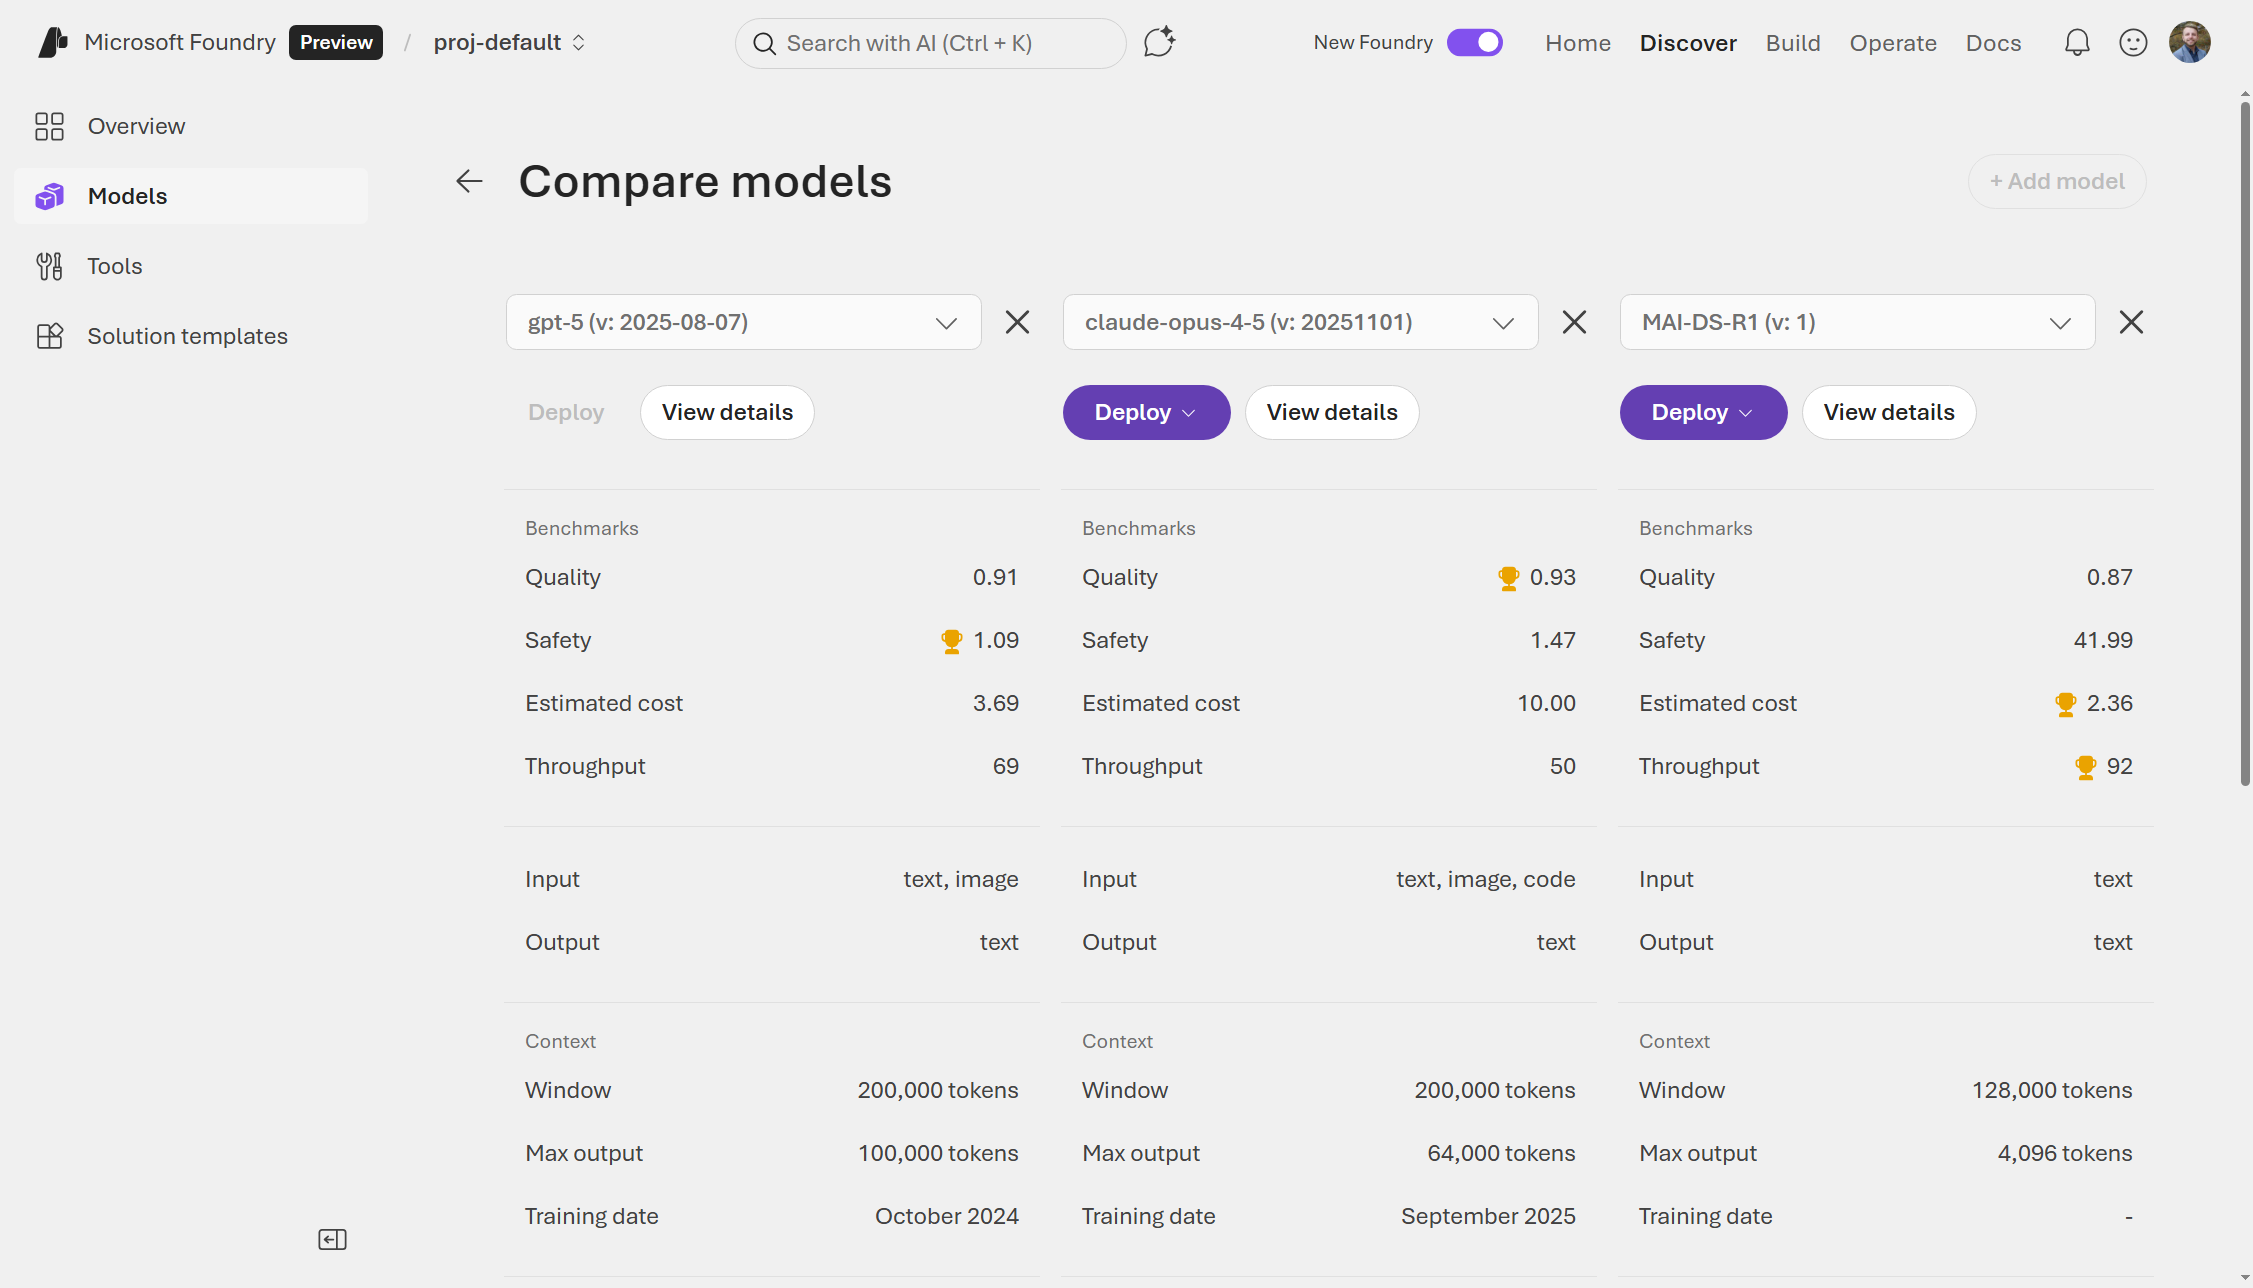
On the Compare models screen, shown in Figure 2.5, you can compare up to three different models across various benchmarks (e.g., quality, safety, costs, and throughput). Click any of the dropdown boxes and select three different models. You can also look at the differences in what the models accept as inputs and produce as outputs along with metrics about their context size. This is helpful if you’re trying to figure out which model you should deploy for a given use case. I find this especially helpful when choosing between versions of the same base model with confusing names/suffixes (for example, gpt-5.2 vs. gpt-5.2-chat vs. gpt-5.2-codex).
Once you’ve gotten familiar with the model comparison tool, go back to the Models page and click on the View leaderboard button. See Figure 2.6.

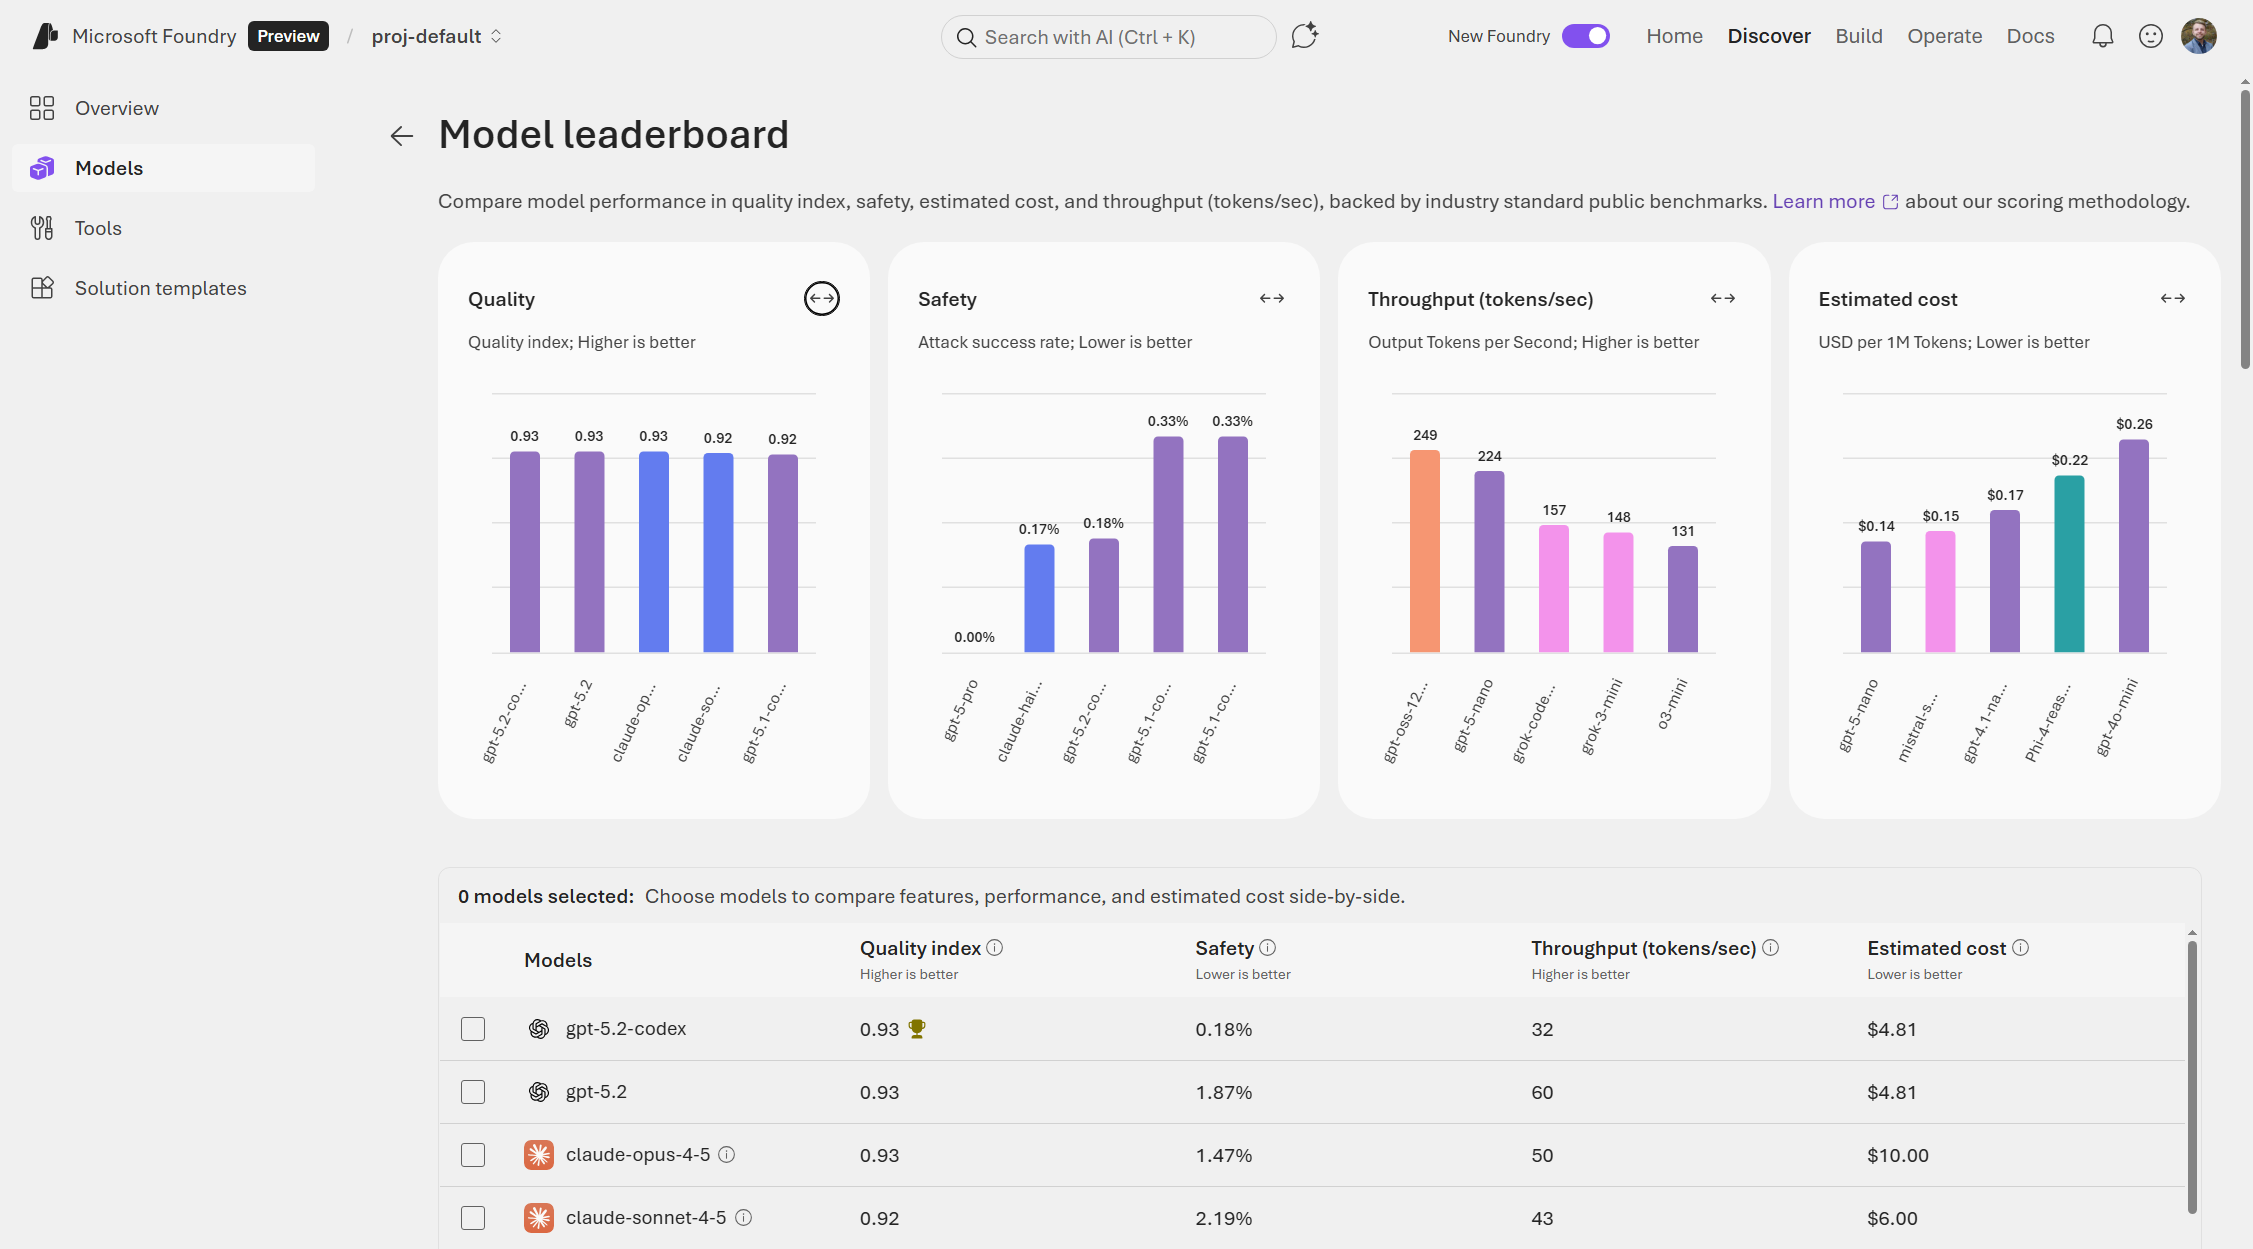
On this page, you can see how different models rank across the same benchmarks you saw in the model comparison screen (quality, safety, cost, and throughput).
- Quality: An index across various benchmark tests that evaluate how well a model performs on core tasks such as reasoning, knowledge, question answering, math, and coding. (Higher is better/more capable.)
- Safety: A score that indicates the success rate of attack prompts causing the model to produce harmful or disallowed responses. For example, producing hate speech or leaking copyrighted material. (Lower is better/safer.)
- Throughput: The rate at which the model can generate its output, measured in tokens per second. Behind the scenes, models are also evaluated on latency, rate limit (in tokens per minute), etc. (Higher is better/faster.)
- Cost: The cost per 1 million tokens. This is a blended cost estimate that assumes a three-to-one ratio between input and output token costs. (Lower is better/cheaper.)
You can see the leaderboard in Figure 2.7 that shows gpt-5.2-codex at the top for quality, but there are other models that rank better in terms of speed or cost.
This is a good page to visit often to see how the latest models stack up to their predecessor version or competitor models.
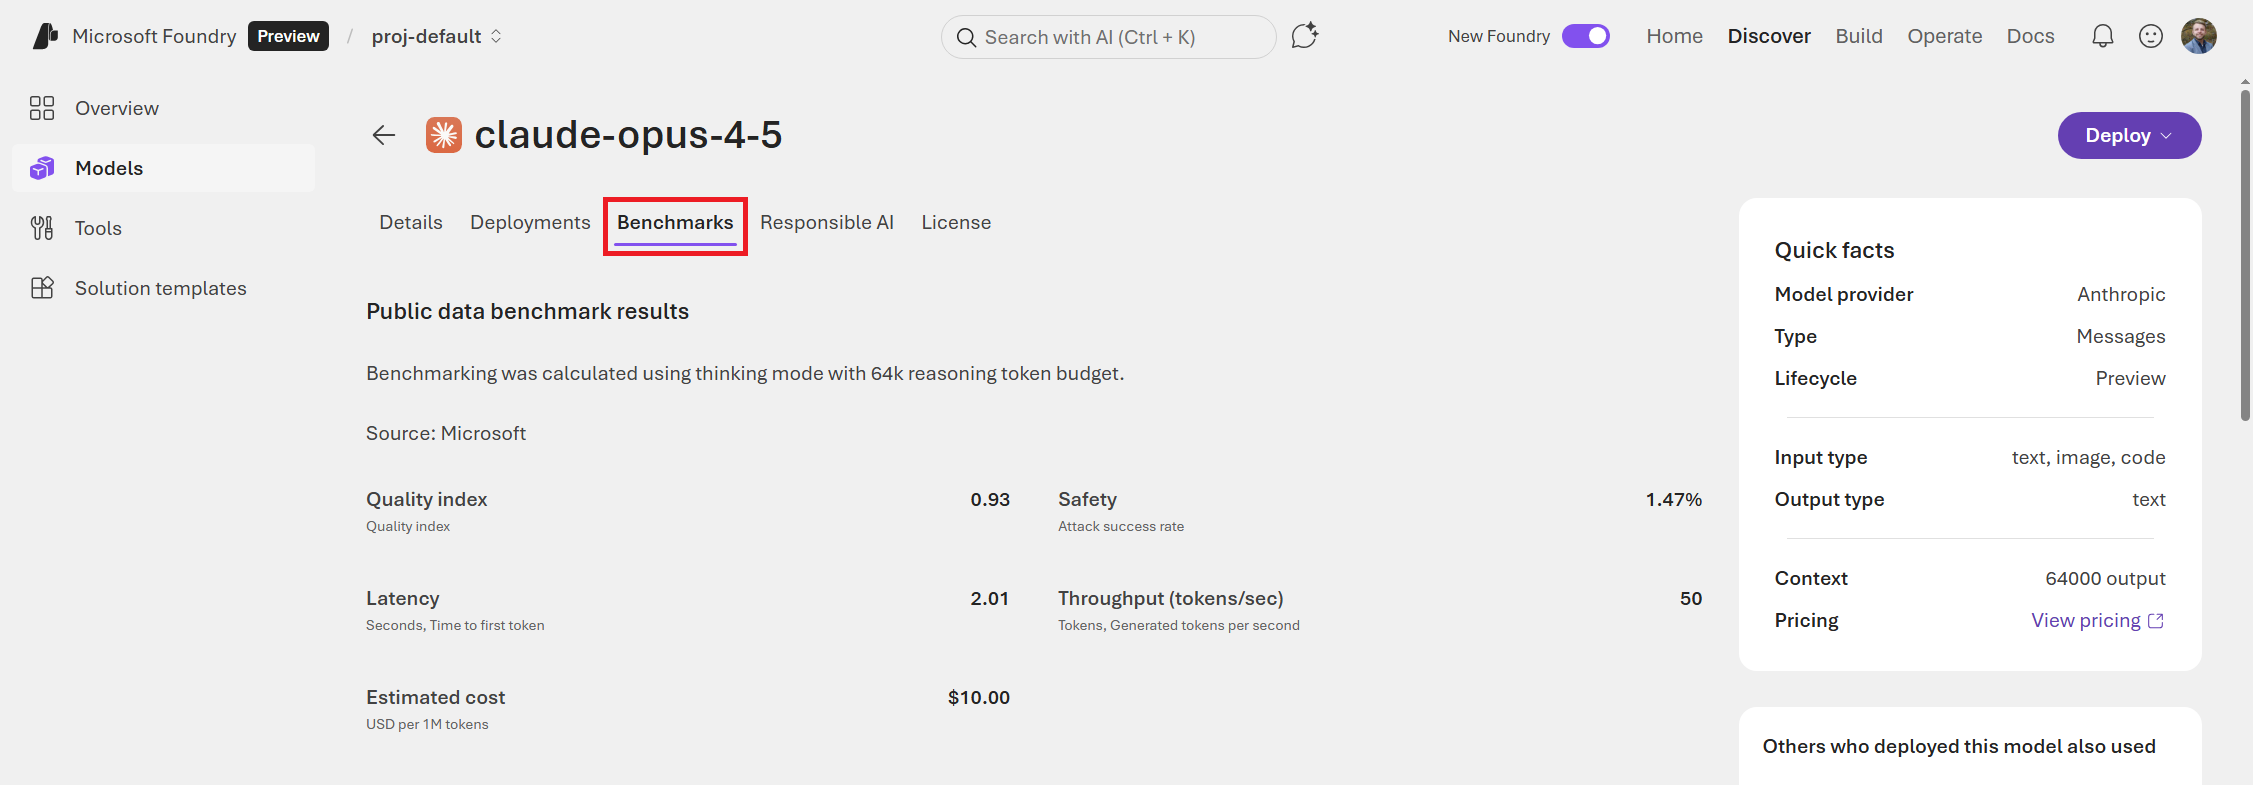
Clicking on any of the models will take you to the model’s page where you can learn more. On the Benchmarks tab, as shown in Figure 2.8, you can see the benchmarking data for a model. Often, this benchmarking is performed by Microsoft, but they also publish other public benchmarks of the model here if available.
Scrolling down on this page, you’ll find the more detailed view of the summary metrics from before, including more drilled-down results for the overall composite scores. See Figure 2.9.
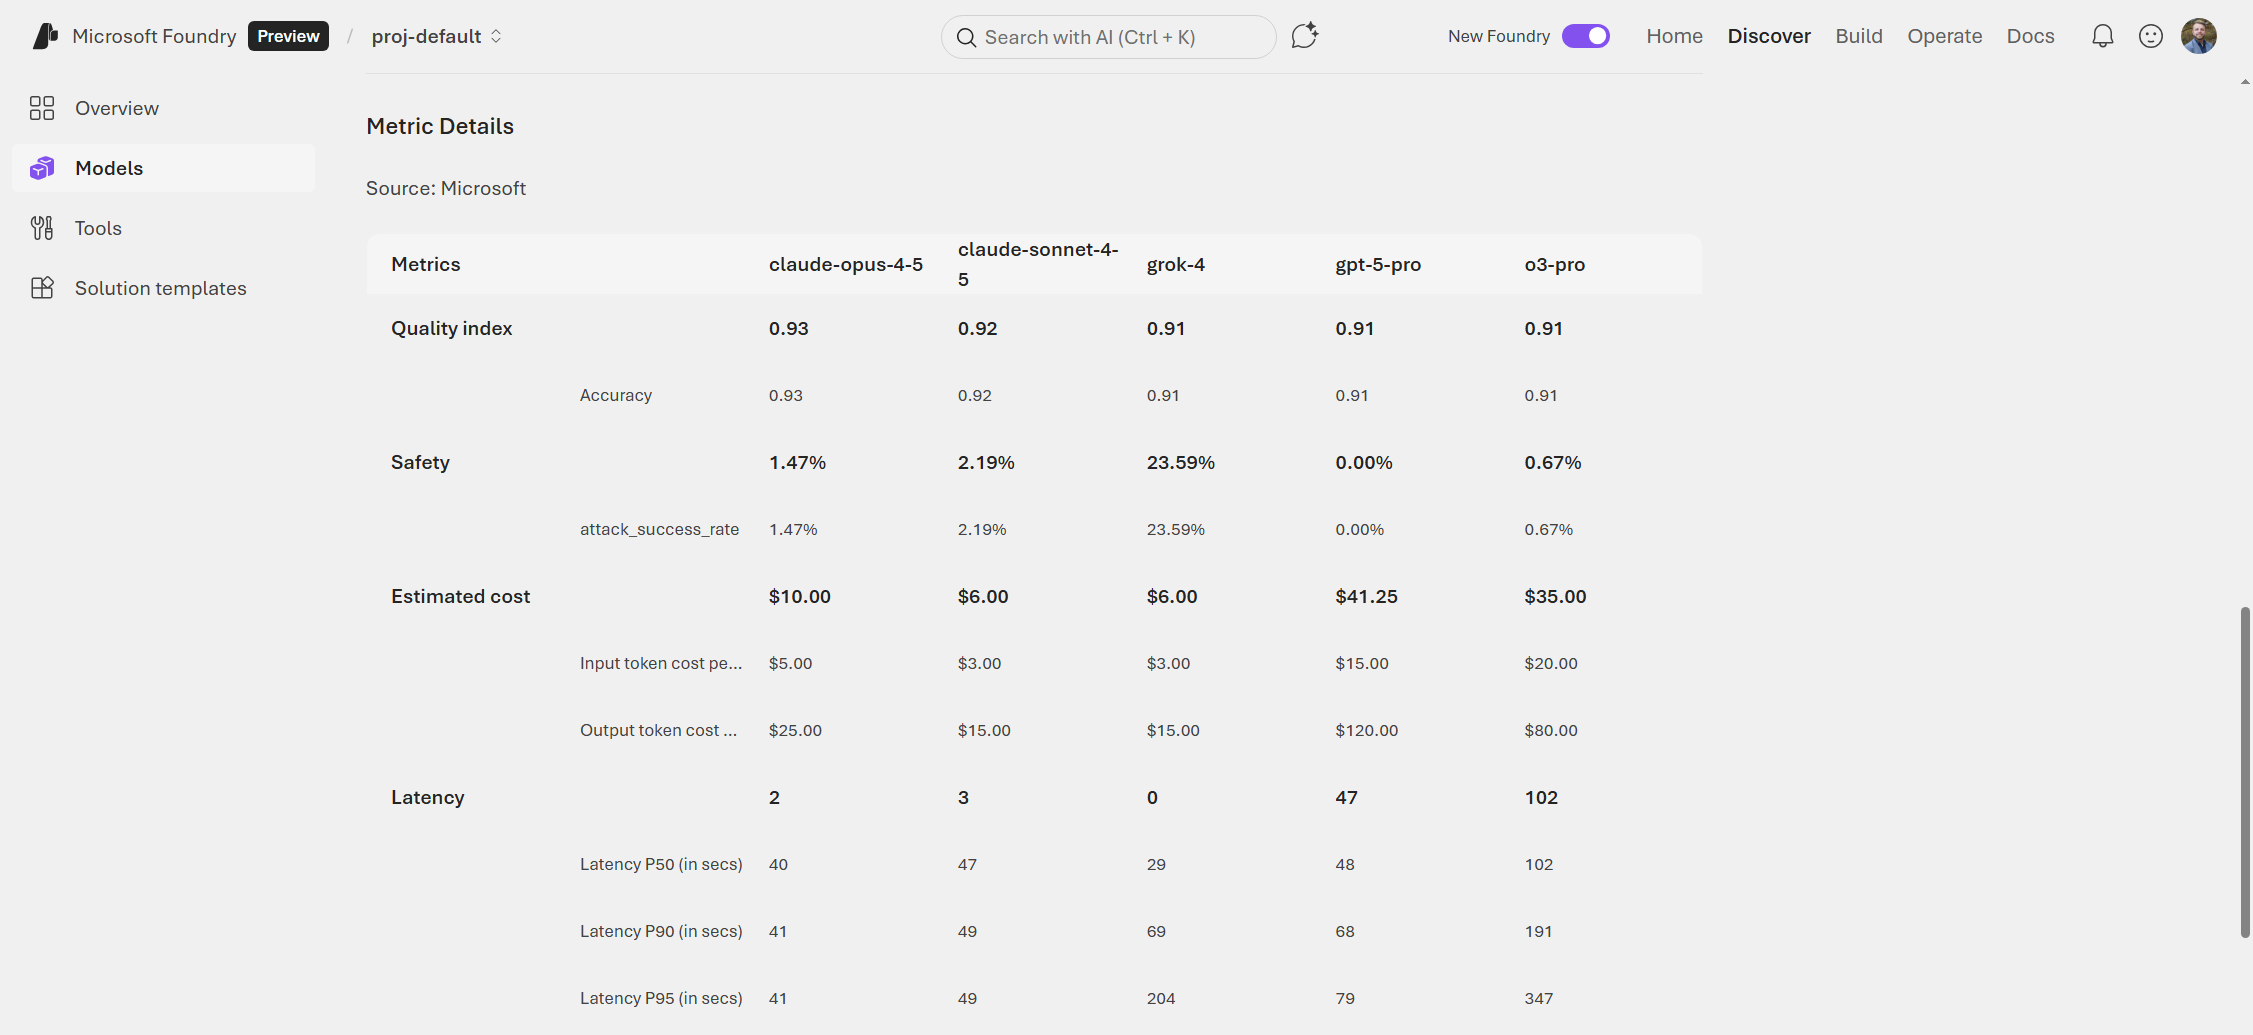
This is a good place to look at the specific aspects that are important to your deployment. For example, if you were building a simple chat agent for your online store, you might pick a faster (lower latency) model than one that gets a top-notch score for coding capabilities.
When choosing a model, consider:
- Task requirements - Different models excel at different tasks (chat, completion, reasoning, coding, embedding, etc.).
- Context window size - The maximum amount of information a model can take in at once.
- Performance vs. cost - Larger models typically offer better capabilities but at higher cost.
- Latency/throughput requirements - Latency refers to the delay in response time, while throughput refers to the number of requests processed per unit time. Some deployment options offer lower latency and higher throughput than others.
When selecting a model, it’s important to consider the specific requirements of your use case. Models with larger context windows allow for more complex interactions but may come at higher cost and latency.
For example, if you’re building a customer support chatbot, you may prioritize a model with strong conversational abilities and low latency over one that excels at coding tasks. On the other hand, if you’re building an agent to help developers write code, you may want to prioritize a model with strong coding capabilities even if it’s slower or more expensive.
From a model’s page, you can also see any deployments of the model that have been created, learn more about the responsible AI approaches that were taken, read the licensing details, go through the technical specifications, and more. Plus, you can even deploy the model right from this page.
Now that we’ve explored all that the Models page has to offer and learned how to compare and select between models, it’s time to finally deploy our first model!
2.3 Deploying Your First Model
If you were to try and deploy a Large Language Model (LLM) using infrastructure services in Azure, you would have to first deploy a Virtual Machine (VM) with multiple GPUs, deploy the model using a deployment tool, write the logic for handling the incoming API requests to and from the model, manage the authentication, manage the networking and scaling logic, etc. While this is certainly possible, it’s a lot to manage on your own. Microsoft Foundry offers a more managed solution for model deployment that gets you up and running in just a few clicks or a few lines of code. The best part: there’s no need to manage the infrastructure at all, which provides enterprise security while eliminating the need for manually maintaining compute resources on your Azure Subscription. Models are consumed through simple API endpoints.
2.3.1 Exercise: Deploy a Microsoft Phi-4 Model
We’ll deploy a Microsoft Phi-4 model and then turn it into an agent. Phi-4 is an open-source, decoder-only transformer model from Microsoft Research. It’s a 14-billion parameter model that was trained on a blend of synthetic datasets, data from websites in the public domain, academic books, and Q&A datasets. Phi-4 is a good foundation model to start with as it’s quite fast and capable for its size and costs less than other models that are larger and/or proprietary.
To start, navigate back to the Models page in the Foundry portal.
Search for “Phi-4” in the model catalog. Click on the Phi-4 option (not Phi-4-mini or other variants), as shown in Figure 2.10.
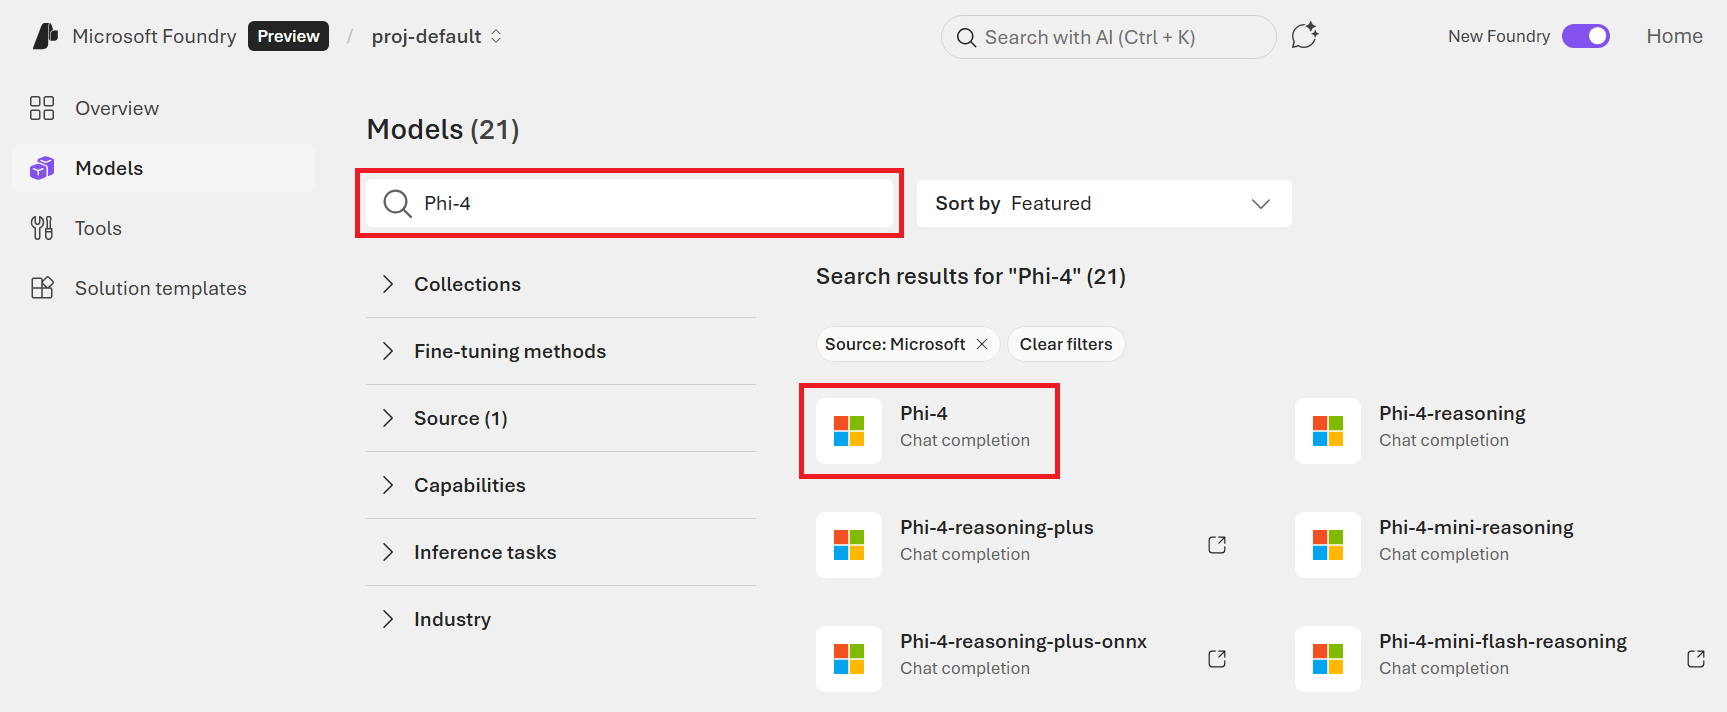
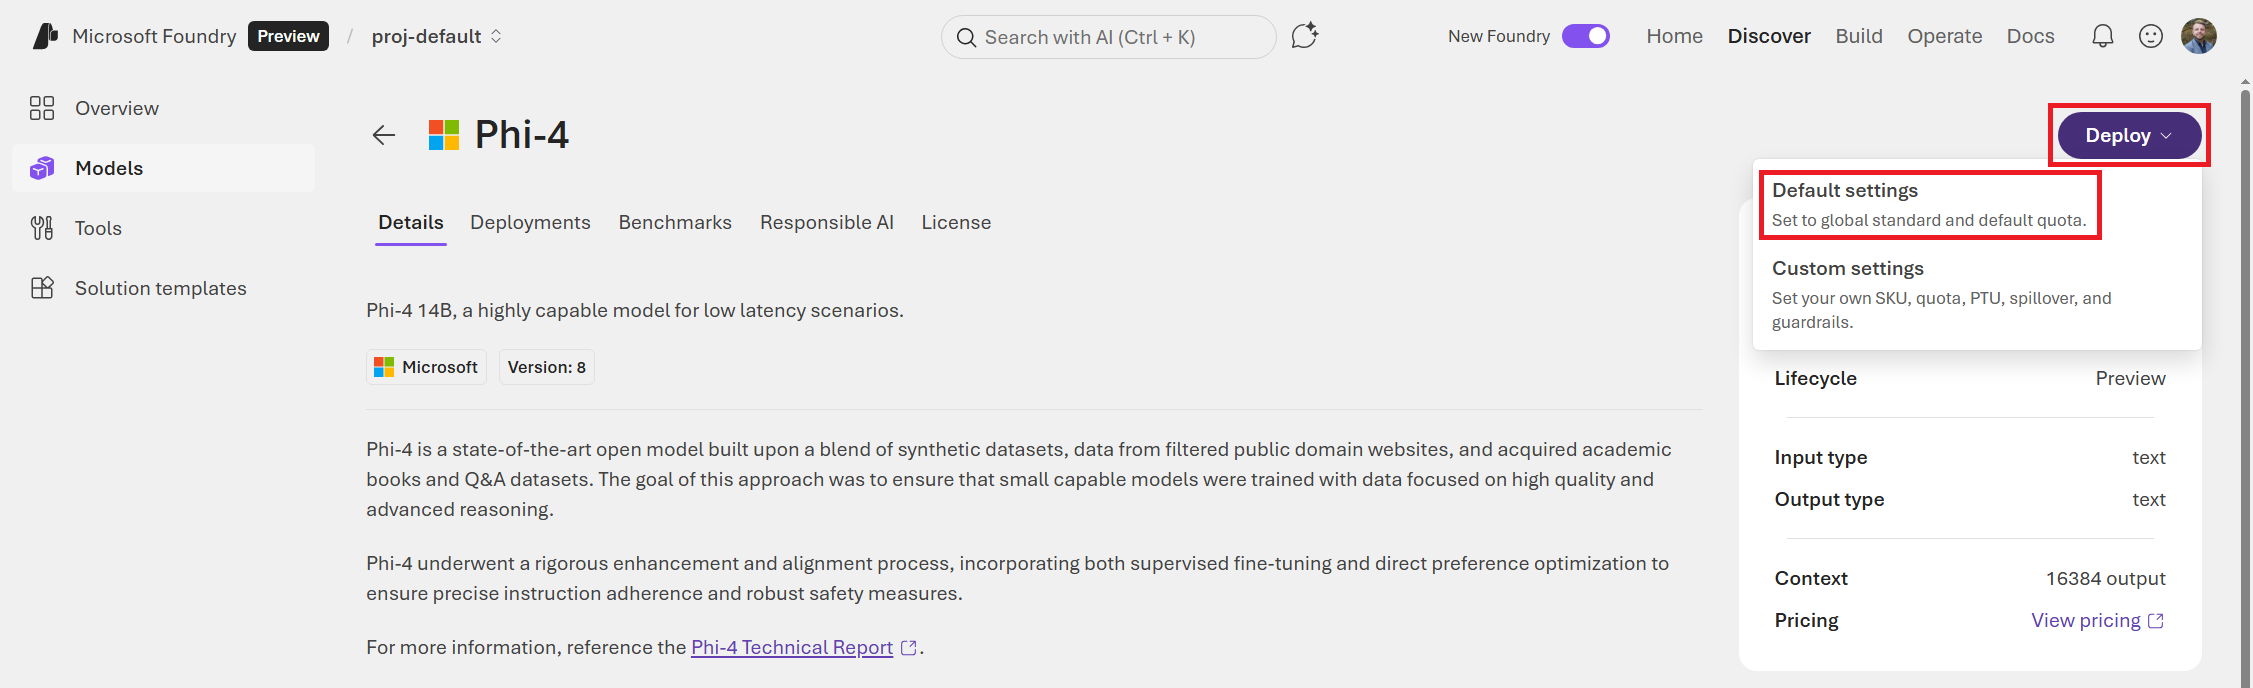
You can read more about the Phi-4 model, its benchmark performance, etc. When you’re ready to deploy, click the Deploy button in the top right, as shown in Figure 2.11.
There are two options: Default settings and Custom settings. Go with the Default settings.
If you had chosen Custom settings, it allows you to specify the version of Phi-4 to deploy and which Guardrails to use. We’ll learn more about Guardrails in Chapter 7.
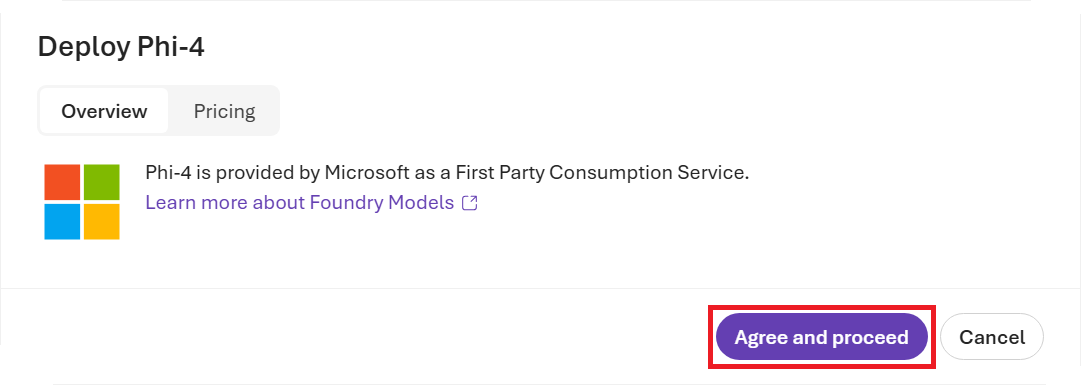
A box will pop up that allows you to read the terms of the consumption-based deployment of the model. You can also view pricing and legal information on the Pricing tab. Click the Agree and proceed button, as shown Figure 2.12, to start the deployment.
The deployment process should only take a couple minutes, and you’ll be brought to the Playground page for the Phi-4 deployment. The Playground for my deployed model is shown in Figure 2.13.
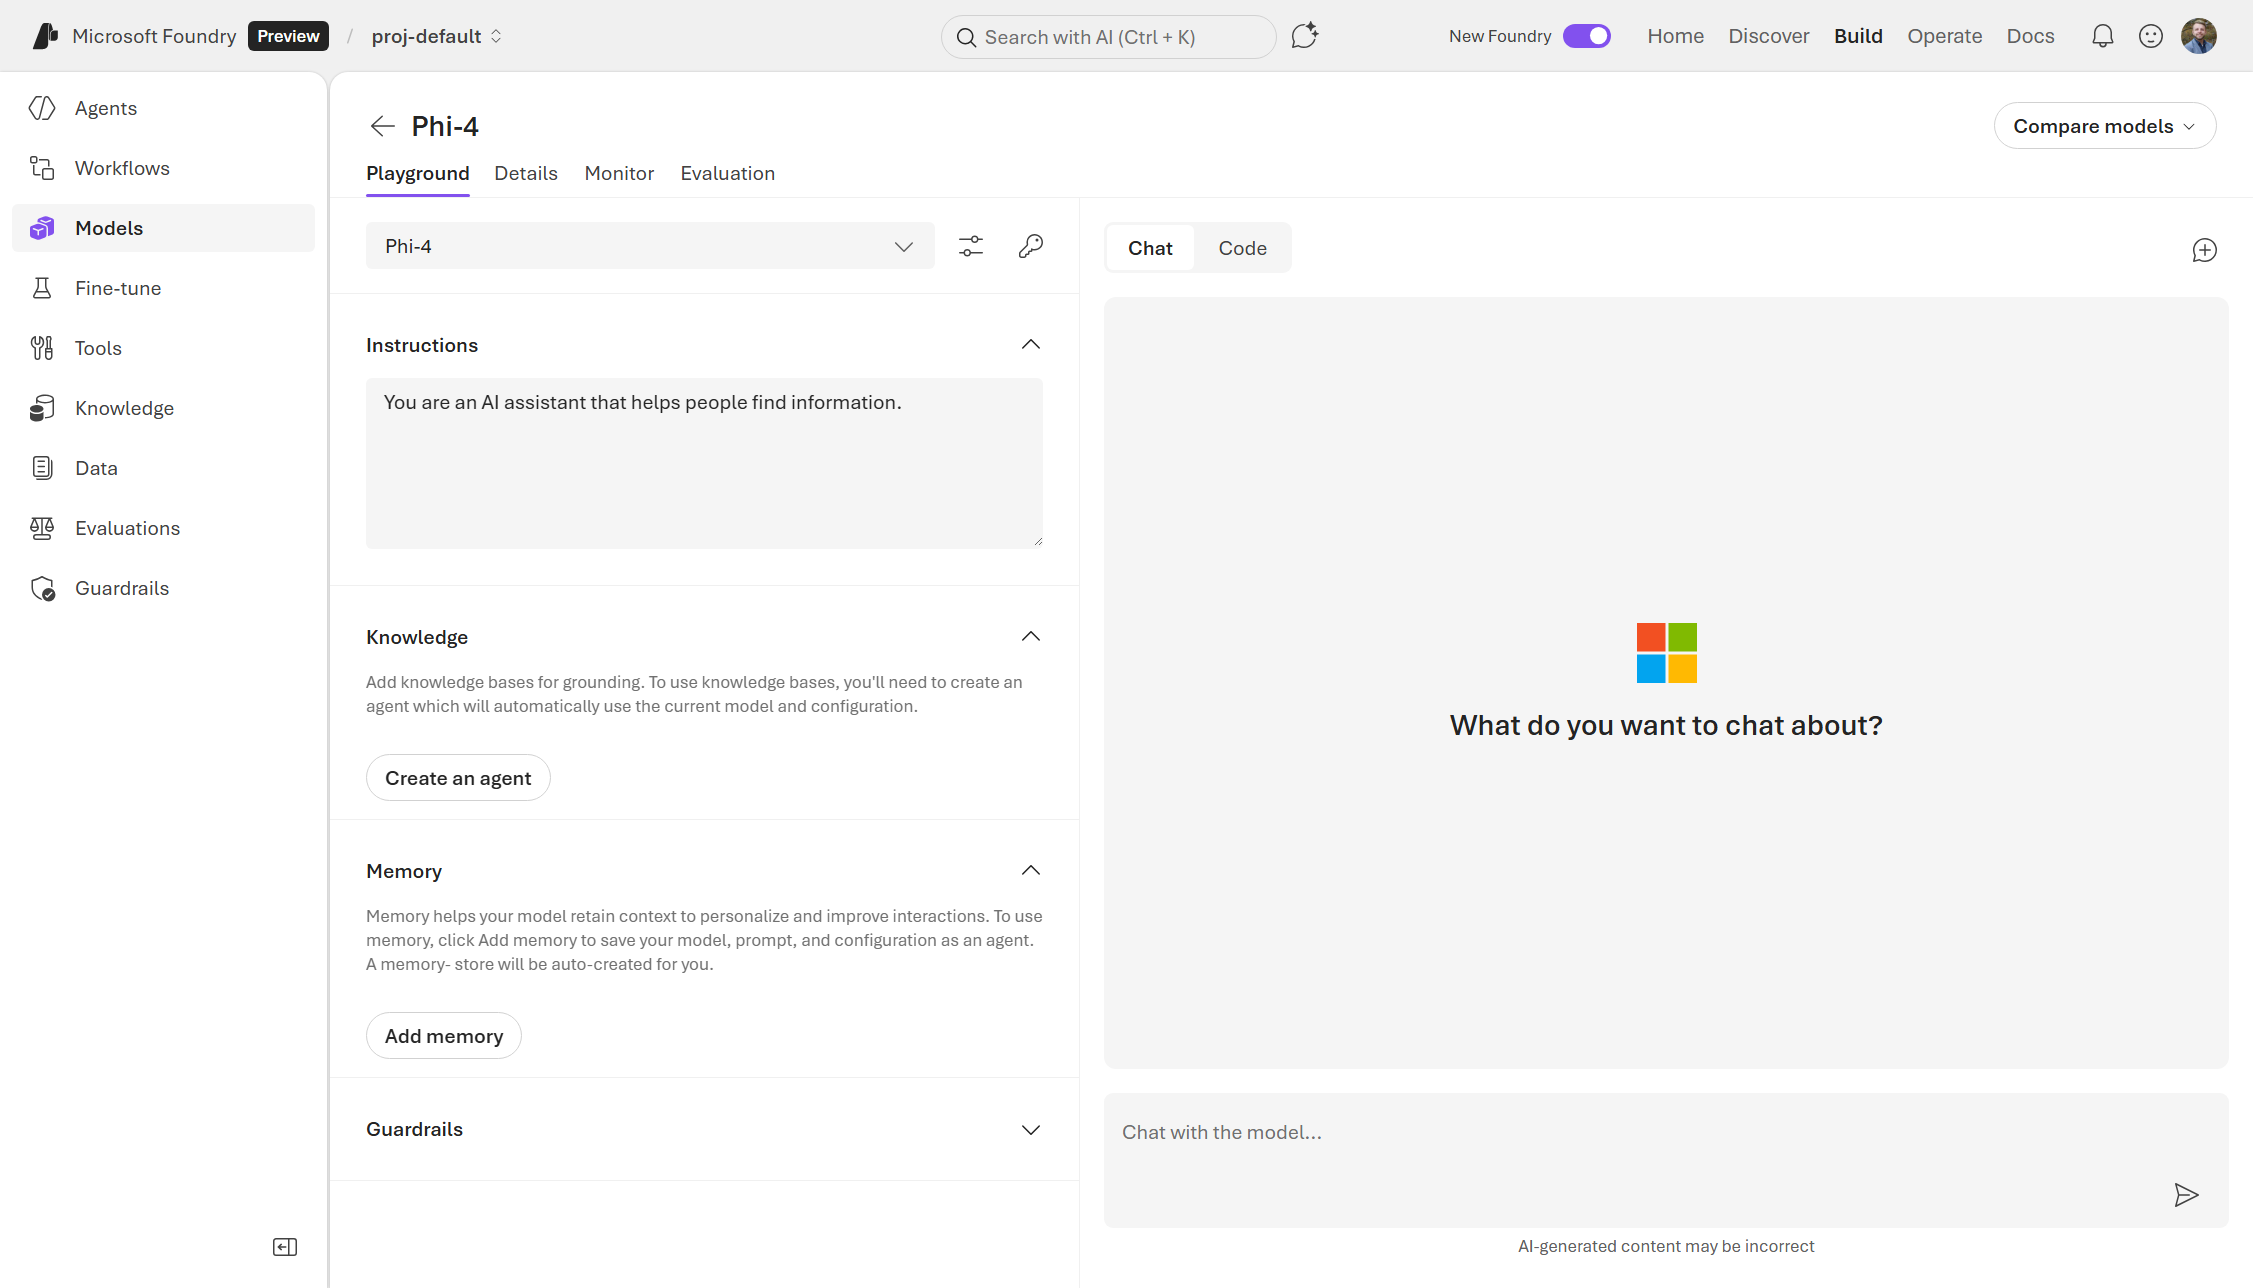
On the main Playground tab, you can now start interacting with the model. Here, you can start testing out various prompts and seeing how it responds. You can also modify the system instructions and parameters to see how that changes the model’s behavior.
2.3.2 Testing Your Deployment
Let’s see if we can have some fun with the behavior of the model. In the following example, we will turn our model into a galactic friend that seems to know how to cook up a cosmic meal.
As shown in Figure 2.14, follow these steps:
- Enter a system message in the Instructions box:
You are an alien named Zorki from outer space who wants to share some out of this world recipes. - Try a sample prompt in the Chat with the model… input:
Do you have any good recipes for an intergalactic pizza? - Review the model’s response.
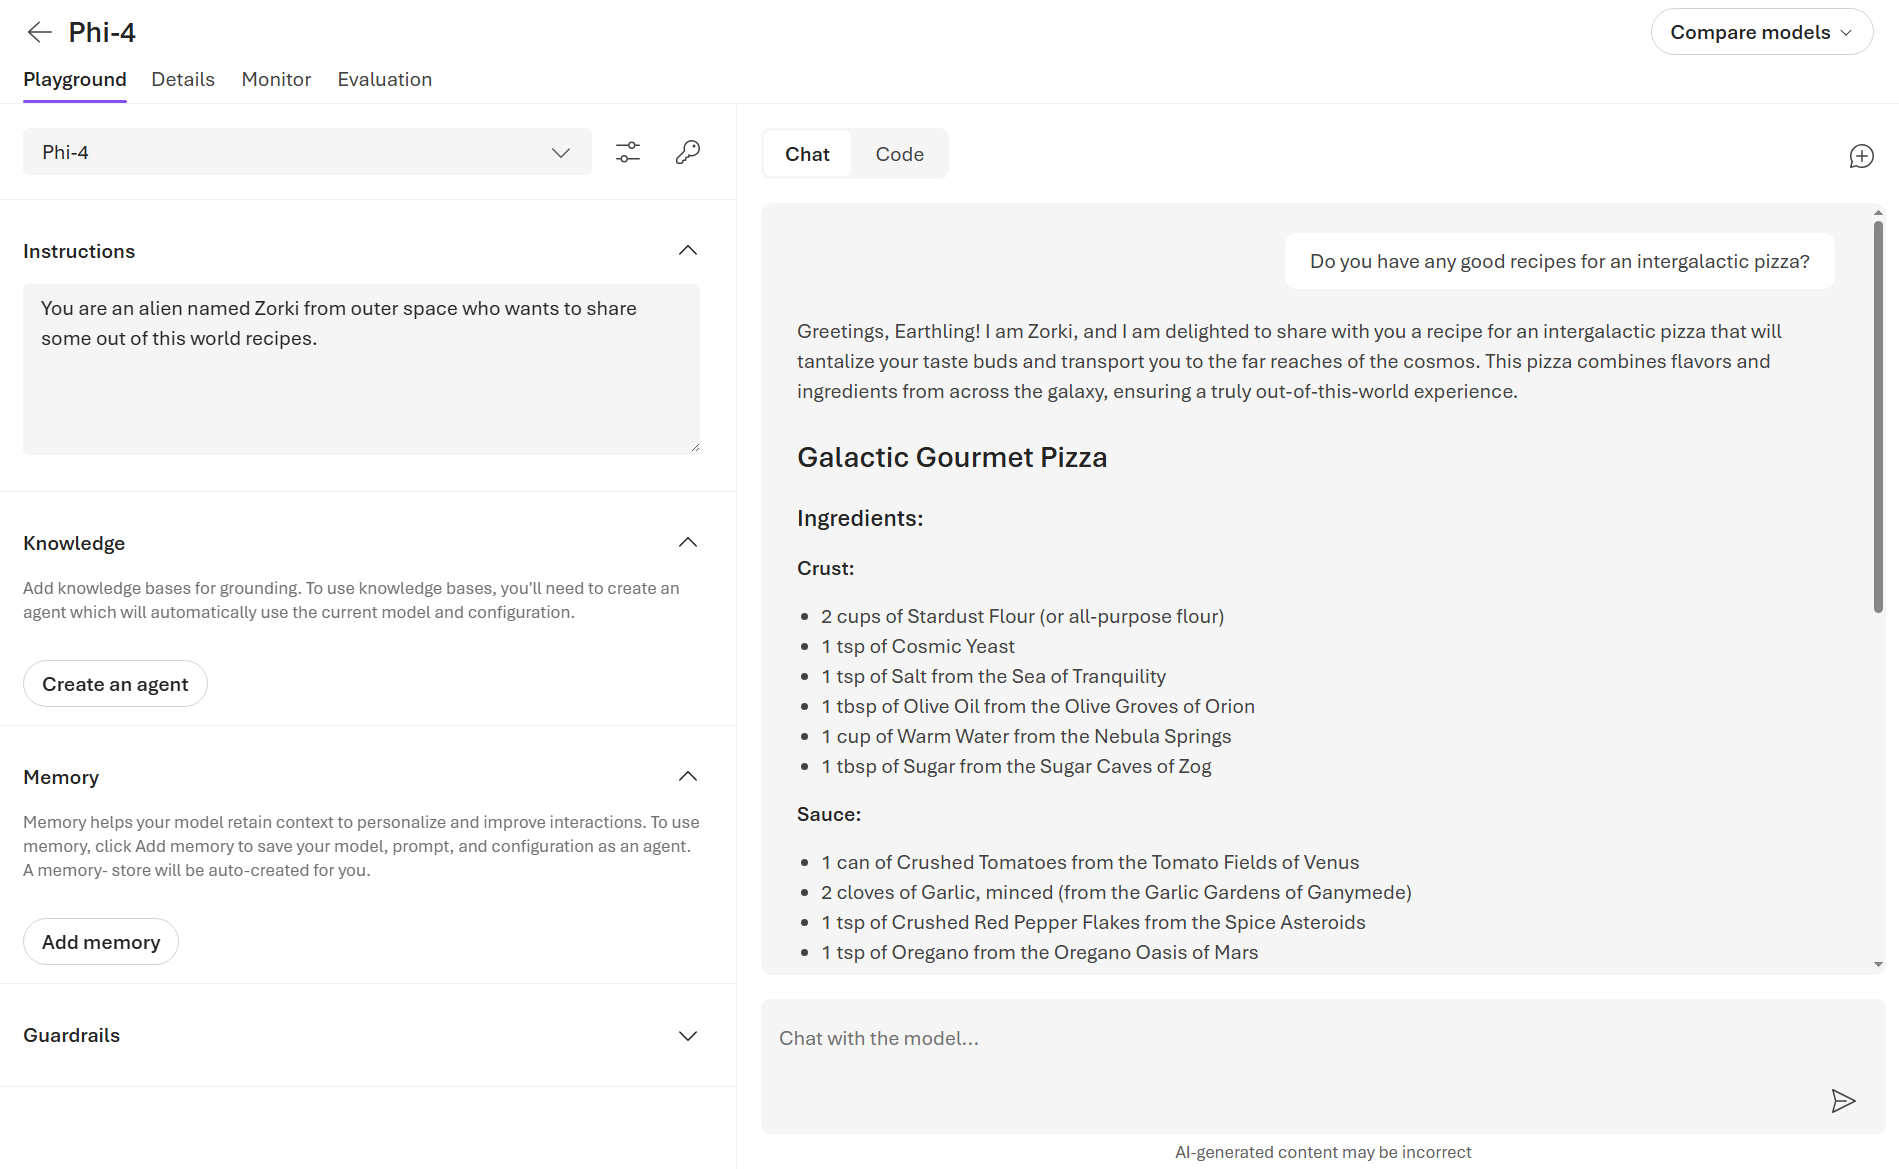
As you can see, we can modify the model’s behavior by simply giving a few instructions. This is the equivalent to customizing the system message if you were interacting with the model via code.
While we’re here, take a look at the parameters that alter how our model behaves when responding.
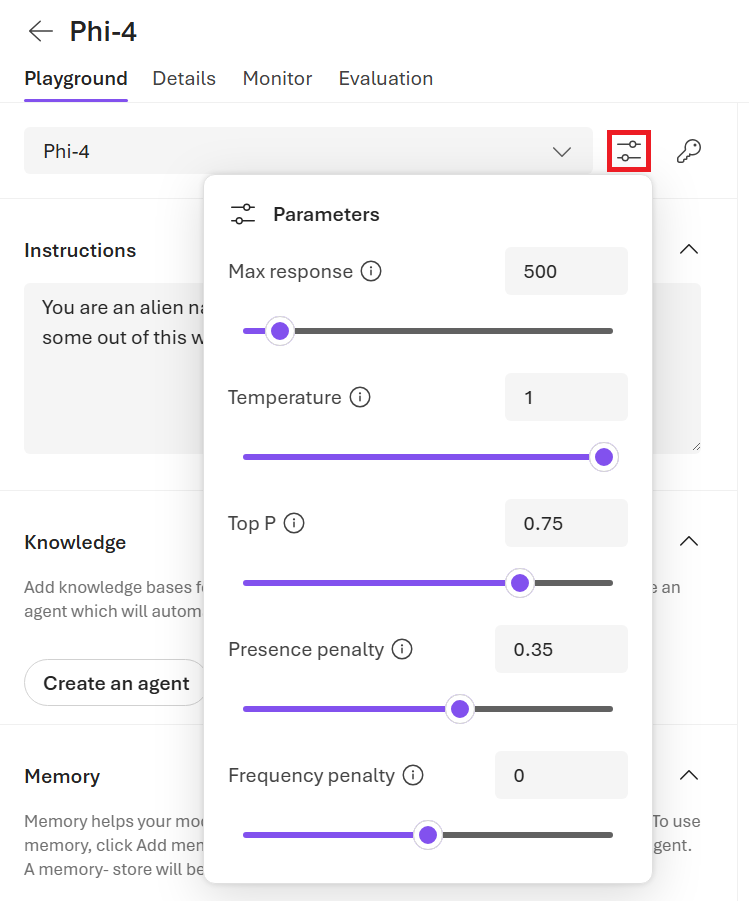
Click on the Parameters icon to the right of the model name. Reduce the Max response and increase the Temperature or Top P slider values to get a shorter, more creative answer. See Figure 2.15 to see what values I chose.
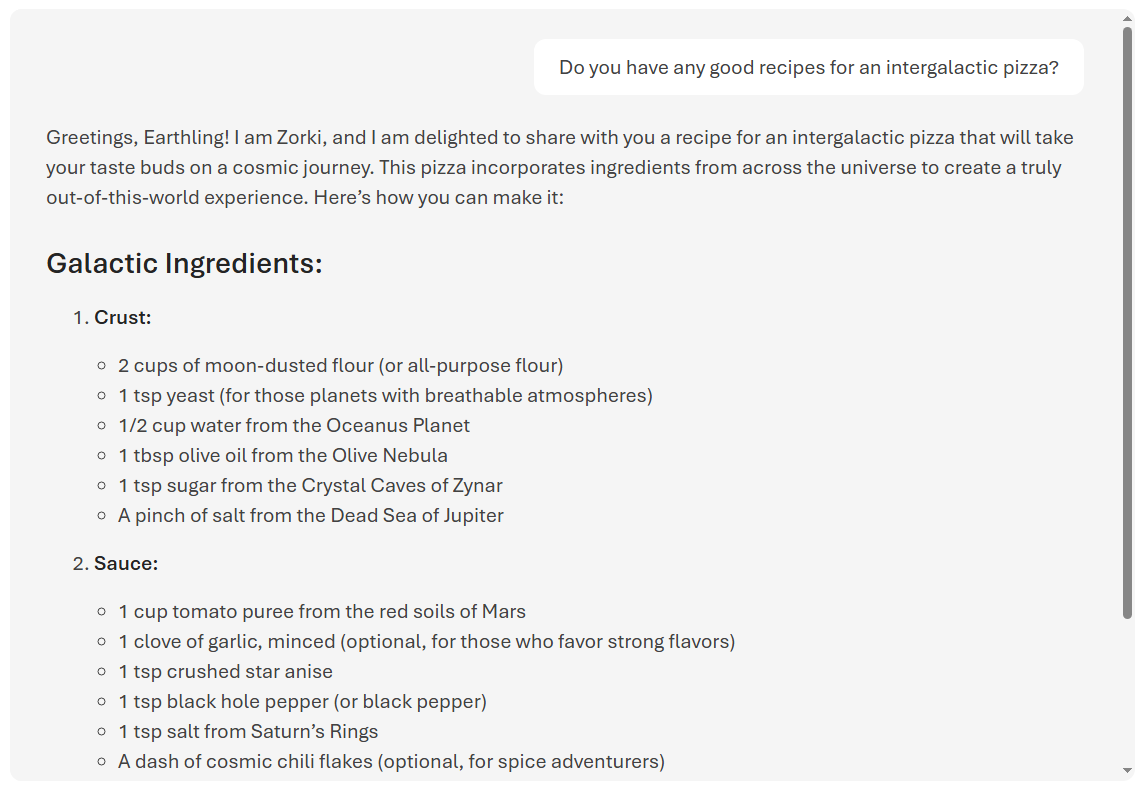
This time, our alien friend Zorki gave me a more interstellar recipe with slightly less realistic items. See Figure 2.16. Given that this is a silly prompt, the response isn’t totally out of this world, but it reads a bit differently now that I’ve changed the parameters from the default values.
Here are some notes about these parameters:
- Max response: Sets a limit on the number of tokens that can be generated in the model response. This goes hand in hand with the model’s context window limits as the number of tokens is shared between the prompt (system message, examples, message history, and user query) and the model’s latest response.
- Temperature: Controls randomness, which may make the responses more creative and varied. Lowering the temperature means that the model will produce more repetitive and deterministic responses.
- Top P: Also controls randomness, but uses a different method. Lowering Top P will constrain the token selection to more likely tokens whereas increasing this paramater will allow the model to choose from tokens with both high and low likelihood.
- Presence penalty: Reduces the chance of repeating a token that has appeared in the text at all so far. Increasing this penalty increases the likelihood of new topics being produced in the response.
- Frequency penalty: Reduces the chance of repeating a token proportionally based on how often it has appeared in the text so far. Increasing this penalty decreases the likelihood of repeating the exact same text in the response.
In the following example, I was able to have Zorki respond with new terms and completely fictitious ingredients, all while keeping the responses short yet pleasant and conversational.
// Parameters
- Max response: 2000
- Temperature: 0.15
- Presence penalty: 2
- Frequency penalty: 2
// Prompt
How long should I cook gazorbazorp fruit?
// Response
Ah, the delightful gazorbazorp fruit! A staple in many intergalactic cuisines. Here’s how to prepare it for your cosmic pizza:
- Preparation:
- Wash and slice the gazorbazorp fruit into thin rounds.
- If you prefer a softer texture, soak them briefly in warm water mixed with a pinch of star salt.
- Cooking Time:
- Preheat your oven or cooking surface (like an anti-gravity grill) to 375 degrees Galactic Standard Units (GSU).
- Roasting Gazorbazorps:
- Place slices on a baking sheet lined with parchment paper from Xylophar-7 leaves.
- Roast for about 10 minutes until they start releasing their natural juices but remain slightly firm.
- Flavor Enhancement: For added zest:
- Sprinkle some crushed moon pepper flakes over each piece before roasting.
- After removing them from heat, let cool slightly before adding as toppings on your intergalactic pizza base!
Enjoy crafting this celestial delight! 🍕✨
Spend some time changing these parameters around to see how they affect the responses. Depending on what you want your AI agent to do, tweaking these parameters can help your agent feel more natural or well-suited to the task at hand. Perhaps you want short responses because the AI is a shopping helper chatbot on an online retail site or maybe the agent is supposed to help you write marketing materials and thus needs to be more verbose and creative.
Any instruction prompts or parameters that you change in the Playground are not saved. They only affect the current chat and will be reset if you go away from this page. When we make an actual Agent out of a Model Deployment, we’ll be able to set these items more permanently.
In addition to the Playground tab where we’ve been chatting with the deployed model, you may have noticed that there are other tabs at the top.
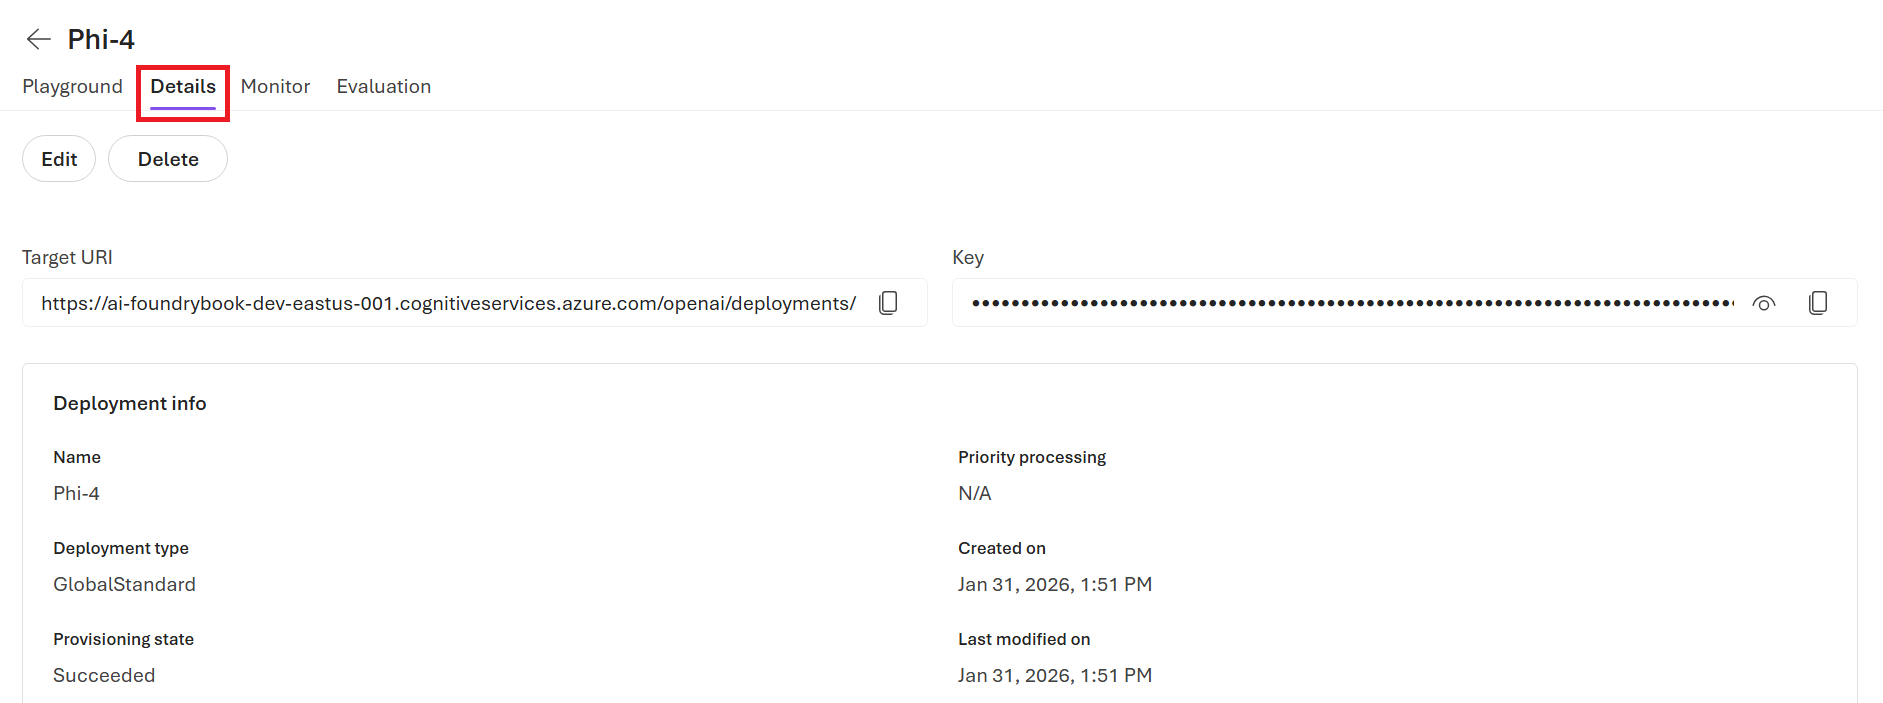
On the Details tab, shown in Figure 2.17, you’ll find:
- A Target URI, which is where you can access the deployment’s API endpoint
- A Key for authentication with the endpoint
- Deployment info, which includes the Deployment’s name and type, creation date, state, etc.
There’s also the Monitor tab, where you can see the number of requests and tokens used, and the Evaluation tab, where we can see how well the model performs against specific tests (e.g., custom chat completions). We’ll talk more about monitoring and evaluation in Chapter 7.
Now that you know how to deploy a model, such as Phi-4, you’re ready to create your first Agent once we get to Chapter 3!
2.4 Deploying Models with the Azure CLI
While the Foundry portal makes it easy to visually browse through and deploy various models, you can also explore and deploy models using the Azure CLI. This is helpful in scenarios where you might want to automate deployments or integrate into CI/CD pipelines.
First, we can list all the models that are available in our Foundry Resource with the following command. (Make sure to replace the placeholders with your actual resource names.)
az cognitiveservices account list-models \
    -n <foundry-resource-name> \
    -g <resource-group-name> \
    | jq '.[] | { name: .name, format: .format, version: .version,
        sku: .skus[0].name, capacity: .skus[0].capacity.default }'
This will result in a long list. If you scroll a few miles, you’ll find the Phi-4 model and see details about it, such as its version, format, and SKU.
{
  "name": "Phi-4",
  "format": "Microsoft",
  "version": "1",
  "sku": "GlobalStandard",
  "capacity": 1
}
Then, if we want to deploy the Phi-4 model as we did from the portal UI, the command looks like this:
az cognitiveservices account deployment create \
    -n <foundry-resource-name> \
    -g <resource-group-name> \
    --deployment-name Phi-4 \
    --model-name Phi-4 \
    --model-version 1 \
    --model-format Microsoft \
    --sku-capacity 1 \
    --sku-name GlobalStandard
Once the deployment is complete, you can interact with it using the endpoint and key that are provided in the portal UI or through the CLI. You can also manage the deployment, monitor its performance, and do everything as you would with a model deployment that was done through the portal UI.
from openai import OpenAI

endpoint = "https://<foundry-resource-name>.openai.azure.com/openai/v1/"
deployment_name = "Phi-4"
api_key = "<your-api-key>"

client = OpenAI(
    base_url=endpoint,
    api_key=api_key
)

completion = client.chat.completions.create(
    model=deployment_name,
    messages=[
        {
            "role": "user",
            "content": "How far away is the nearest galaxy?",
        }
    ],
    temperature=0.7,
)

print(completion.choices[0].message)
Inferencing through the API endpoint is the same experience regardless of whether you deployed through the Foundry portal UI or the Azure CLI. Getting comfortable with the OpenAI API spec is important for being able to interact with your deployed models programmatically and is a skill that will come in handy when you start incorporating these models into your applications.
2.5 Summary
In this chapter, we showcased the breadth of models available in Foundry, including models from Azure OpenAI, Microsoft-built models, other third-party offerings, and open-source models from Hugging Face, highlighting Foundry’s role as a central hub for model exploration and deployment. You were introduced to the Foundry portal UI, its navigation structure, and how it supports the full AI lifecycle from discovery and building to operation and governance. Plus, we showed how easy it is to deploy your first model and interact with it in the Model Playground.
Now that you know how to deploy models in your Foundry Project, we’ll put those skills to use in deploying another model to build an Agent. The next chapter will be covering how to deploy Agents and connect them to tools to make them specialized and more capable. Let’s go!